This series of articles focuses on creating a scalable object oriented modular software architecture based on services you can reuse in all your robots, without needing to start from scratch every time you create a new robot.
Maybe the most cost effective approach to start in robotics is with the Smart Robot Car you can buy on any e-commerce (aliexpress, banggood, etc). But of course buying it is the easiest part... You don't need to buy specifically that, and even with the description Smart Robot Car You'll find many different variants. I'll be creating "services" for all the most common modules you get with this kit, so you can choose which service you need, and use them together to create your own Smart robot, without the need to start from scratch on every robot you make.
IndexThis is the index of the series or articles Taibot Robot Services that I will be creating .
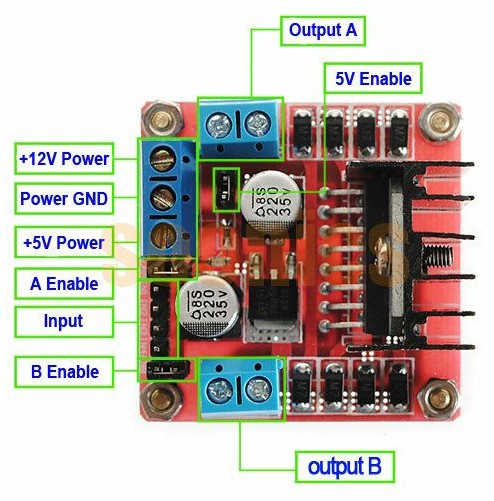
About the L298N Motor driverThis dual bidirectional motor driver will allow you to easily and independently control two motors of up to 2A each in both directions.
It´s ideal for robotic applications and well suited for connection to any Arduino requiring just a couple of control lines per motor.
An on-board user-accessible 5V regulator is also incorporated which can be used to supply any additional circuits requiring a regulated 5V DC supply of up to about 1A.
Features:- Motor supply: 6 to 35 VDC
- Control Logic: Standard TTL Logic Level
- Output Power: Up to 2 A each
- Enable and Direction Control Pins
- Heatsink for IC
- Power-On LED indicator
- 4 Direction LED indicators
We will be using the base Service class created in the previous article. If you didn't read it, please do so, so you can understand what we will be creating here.
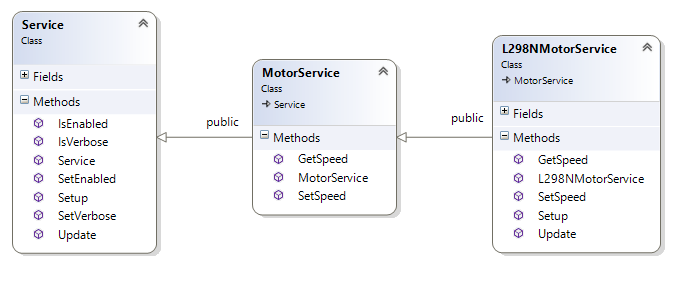
The MotorService base classWe are going to create another layer of abstraction, that will define the behavior that any Motor Service should have. Doing this, allows us to create different motor services for any hardware we buy, and use any motor service we have, in the same way (so with really few changes in the code).
The MotorService class should allow us to:
- Set the speed of the motor
- Get the speed of the motor
- And of course, the functionalities inherited from the base Service class
The MotorService class header file (MotorService.h) looks like this:
#pragma once
#include "Arduino.h"
#include "Service.h"
namespace Taibot
{
	class MotorService : public Service
	{
	public:
		MotorService(bool isEnabled, bool isVerbose);
		// Sets the speed of the motor
		// speed = 0 then  motor stops
		// speed between -255 and -1 then motor runs backwards
		// speed between 1 and 255 then motor runs forward
		// Method that must be implemented in every MotorService specific implementation inheriting from the MotorService class
		virtual void SetSpeed(int speed) = 0;
		// Returns the current speed of the motor
		// Method that must be implemented in every MotorService specific implementation inheriting from the MotorService class
		virtual int GetSpeed() const = 0;
	};
};
And its implementation (MotorService.h) :
#include "MotorService.h"
using namespace Taibot;
MotorService::MotorService(bool isEnabled, bool isVerbose) : Service(isEnabled, isVerbose)
{
}
As you can see, MotorService class doesn't do anything other that defining the contract for the MotorServices implementations (Now we will work on its implementation for the L298N Motor Driver module).
The L298NMotorService class
Finally we got to the code that really does something!
This class is the implementation of a MotorService, that controls a L298N Motor Driver Module. It follows the layout we specified in the previous two base classes.
As usual, first the header file (L298NMotorService.h):
#pragma once
#include "MotorService.h"
namespace Taibot
{
	class L298NMotorService : public MotorService
	{
	public:
		L298NMotorService(bool isEnabled, bool isVerbose, unsigned int pinEnable, unsigned int pinIn1, unsigned int pinIn2);
		// Implements the method inherited from the base MotorService class
		void SetSpeed(int speed);
		// Implements the method inherited from the base MotorService class
		int GetSpeed() const;
		void Setup();
		void Update();
	private:
		unsigned int _pinEnable;
		unsigned int _pinIn1;
		unsigned int _pinIn2;
		// Keeps track of the current speed of the Motor driver
		unsigned int _currentSpeed = 0;
	};
};
And its implementation (L298NMotorService.cpp):
#include "L298NMotorService.h"
using namespace Taibot;
L298NMotorService::L298NMotorService(bool isEnabled, bool isVerbose, unsigned int pinEnable, unsigned int pinIn1, unsigned int pinIn2)
	: MotorService(isEnabled, isVerbose)
{
	_pinEnable = pinEnable;
	_pinIn1 = pinIn1;
	_pinIn2 = pinIn2;
	_currentSpeed = 0;
}
void L298NMotorService::SetSpeed(int speed)
{
	// Save the current speed...
	_currentSpeed = speed;
	if (IsVerbose())
	{
		//If we are logging, print the speed we are giving to the motor
		Serial.print("L298NMotor: speed=");
		Serial.println(speed);
	}
	// Only activate the motors if the driver is enabled
	if (IsEnabled())
	{
		if (speed >= 0)
		{
			// if the speed is positive or 0 then move forward
			analogWrite(_pinEnable, speed);
			digitalWrite(_pinIn1, HIGH);
			digitalWrite(_pinIn2, LOW);
		}
		else
		{
			// if the speed is negative then move backwards
			analogWrite(_pinEnable, -speed);
			digitalWrite(_pinIn1, LOW);
			digitalWrite(_pinIn2, HIGH);
		}
	}
}
int L298NMotorService::GetSpeed() const
{
	return _currentSpeed;
}
void L298NMotorService::Setup()
{
	// We have nothing to set up
}
void L298NMotorService::Update()
{
	// This service doesn't do anythin in background so this method is empty
}
The real magic happens within the method SetSpeed. As you can see, before moving the motor, we are checking that the service is enabled. Also, we are checking if it is Verbose, before printing the debug information.
This method receives an int value within the range -255 to 255.
- When the values are negative (-255 to -1) the motor moves backwards.
- When the values are positive (1 to 255) the motor moves forward.
- And of course, when the speed is 0, the motor stops
Because of the way the L298N module works, we should send a PWM pulse to the _pinEnable, to set the rotation speed. This pulse can be between 0 and 255. We are using an analogWrite call to set the PWM output of a DIGITAL pin on the Arduino. (more details on that here).
We are also setting _pinIn1 and _pinIn2 to HIGH or LOW, depending on the direction of rotation, as the documentation of the L298N module specifies.
Testing the ServiceWe now need to Add code to the sketch to test this Service. I think that here is were you might understand why we did all this code mess we've been working on.
This is how the Arduino Sketch should look:
/*
Name:		Taibot.ino
Created:	12/13/2016 10:27:53 AM
Author:	Nahuel Taibo  savagemakers.com
*/
#include "L298NMotorService.h"
using namespace Taibot;
// Pin definitions for the L298N Motor driver (Change this defines according to your hardware configuration)
#define PIN_L298N_ENA PIN2
#define PIN_L298N_IN1 PIN3
#define PIN_L298N_IN2 PIN4
#define PIN_L298N_IN3 PIN5
#define PIN_L298N_IN4 PIN6
#define PIN_L298N_ENB PIN7
L298NMotorService rightMotor(true, true, PIN_L298N_ENA, PIN_L298N_IN1, PIN_L298N_IN2);
L298NMotorService leftMotor(true, true, PIN_L298N_ENB, PIN_L298N_IN3, PIN_L298N_IN4);
//We will use this variables to change the robot speed on after some seconds (without using delays)
unsigned long previousTime = millis();
unsigned int updateFreq = 5000;
// the setup function runs once when you press reset or power the board
void setup()
{
	Serial.begin(115200);
	// Call the Setup method of all the services we are using
	rightMotor.Setup();
	leftMotor.Setup();
	Serial.println("Taibot Started.");
}
// the loop function runs over and over again until power down or reset
void loop()
{
	// Call the Update method of all the service we are using...
	rightMotor.Update();
	leftMotor.Update();
	// Do anything else we want to do...
	if ((previousTime + updateFreq) < millis())
	{
		previousTime = millis();
		if (rightMotor.GetSpeed() > 0)
		{
			rightMotor.SetSpeed(0);
			leftMotor.SetSpeed(0);
		}
		else
		{
			rightMotor.SetSpeed(150);
			leftMotor.SetSpeed(150);
		}
	}
}
If everything worked correctly, after building and uploading this code to your robot, you should see it go forward for 5 seconds, stop for 5 seconds, and repeat that behavior until you turn it off.
ConclusionYes, its a lot of code just for moving a robot forward, but as soon as we start adding more and more services, you'll notice that the code makes a lot more sense than having endless spaghetti code. I hope you follow this series as we will keep giving your robot more and more intelligence with every new article.
You'll find the code repository attached to this article. I created a branch that holds only this service implementation, so you can get only this if that is your intention.
If you don't understand any part of this article, were unable to make this code work, found a bug, or have any suggestion, please let me know, I'm willing to improve this and make it a clean code base for anyone that wants to reuse it.


_wzec989qrF.jpg?auto=compress%2Cformat&w=48&h=48&fit=fill&bg=ffffff)


_3u05Tpwasz.png?auto=compress%2Cformat&w=40&h=40&fit=fillmax&bg=fff&dpr=2)
Comments
Please log in or sign up to comment.