*Submitted to the Amazon Alexa - Arduino Smart Home Challenge under the category of "Best Use of Alexa Voice Service Integration". No external Alexa echo devices need, taking full advantages of Alexa Voice Service!
IntroductioneyeLock has multiple features that ultimately brings ease into our daily lives. One of its main features allows users to open their front doors (or any door in their home) using facial recognition, similar to the authentication system used by many smartphones today. Additionally, users are given the option to ask about the humidity, brightness, temperature, and moisture levels of the ground right outside their homes for an accurate broadcast of the local weather conditions. Users can also turn on any light in their home as long as it is connected to eyeLock.
The best part about this project is that unlike other projects which require an Alexa device/simulator to use, Alexa is fully integrated on to the raspberry pi locally, using Alexa Voice Services (AVS).
This guide will walk through all the necessary steps required to enable and use eyeLock. Buckle up -- we hope you enjoy the ride!
MotivationApple has shown the world that facial recognition has the potential to become a popular method of secure verification through the launch of FaceID. Looking at the current market for smart doors, common techniques include the use of mobile apps or fingerprints to unlock/open doors. Why not adapt facial recognition into our homes by building a smarter door than other smart doors? Imagine walking up to your house and have your door unlock and open for you, but for no one else. Hands-free, reliable, simple, and inexpensive (relatively). To make it a fully featured smart-home device, add AVS and additional sensors to the Arduino, and BAM that is an awesome project.
VideoThe following is a short video which demonstrates the use of eyeLock. The video features eyeLock being used in the Engineering Science Common Room at UofT -where real innovation happens :')
Note: we tested the set-up with both the custom skill using an echo device, and with AVS integration. Both are demoed in the video, though the AVS version is much more elegant!
The HardwareIn the proceeding sections, we will delve into the details of what each part is used for and how each sub-circuit works with eyeLock.
The Motors
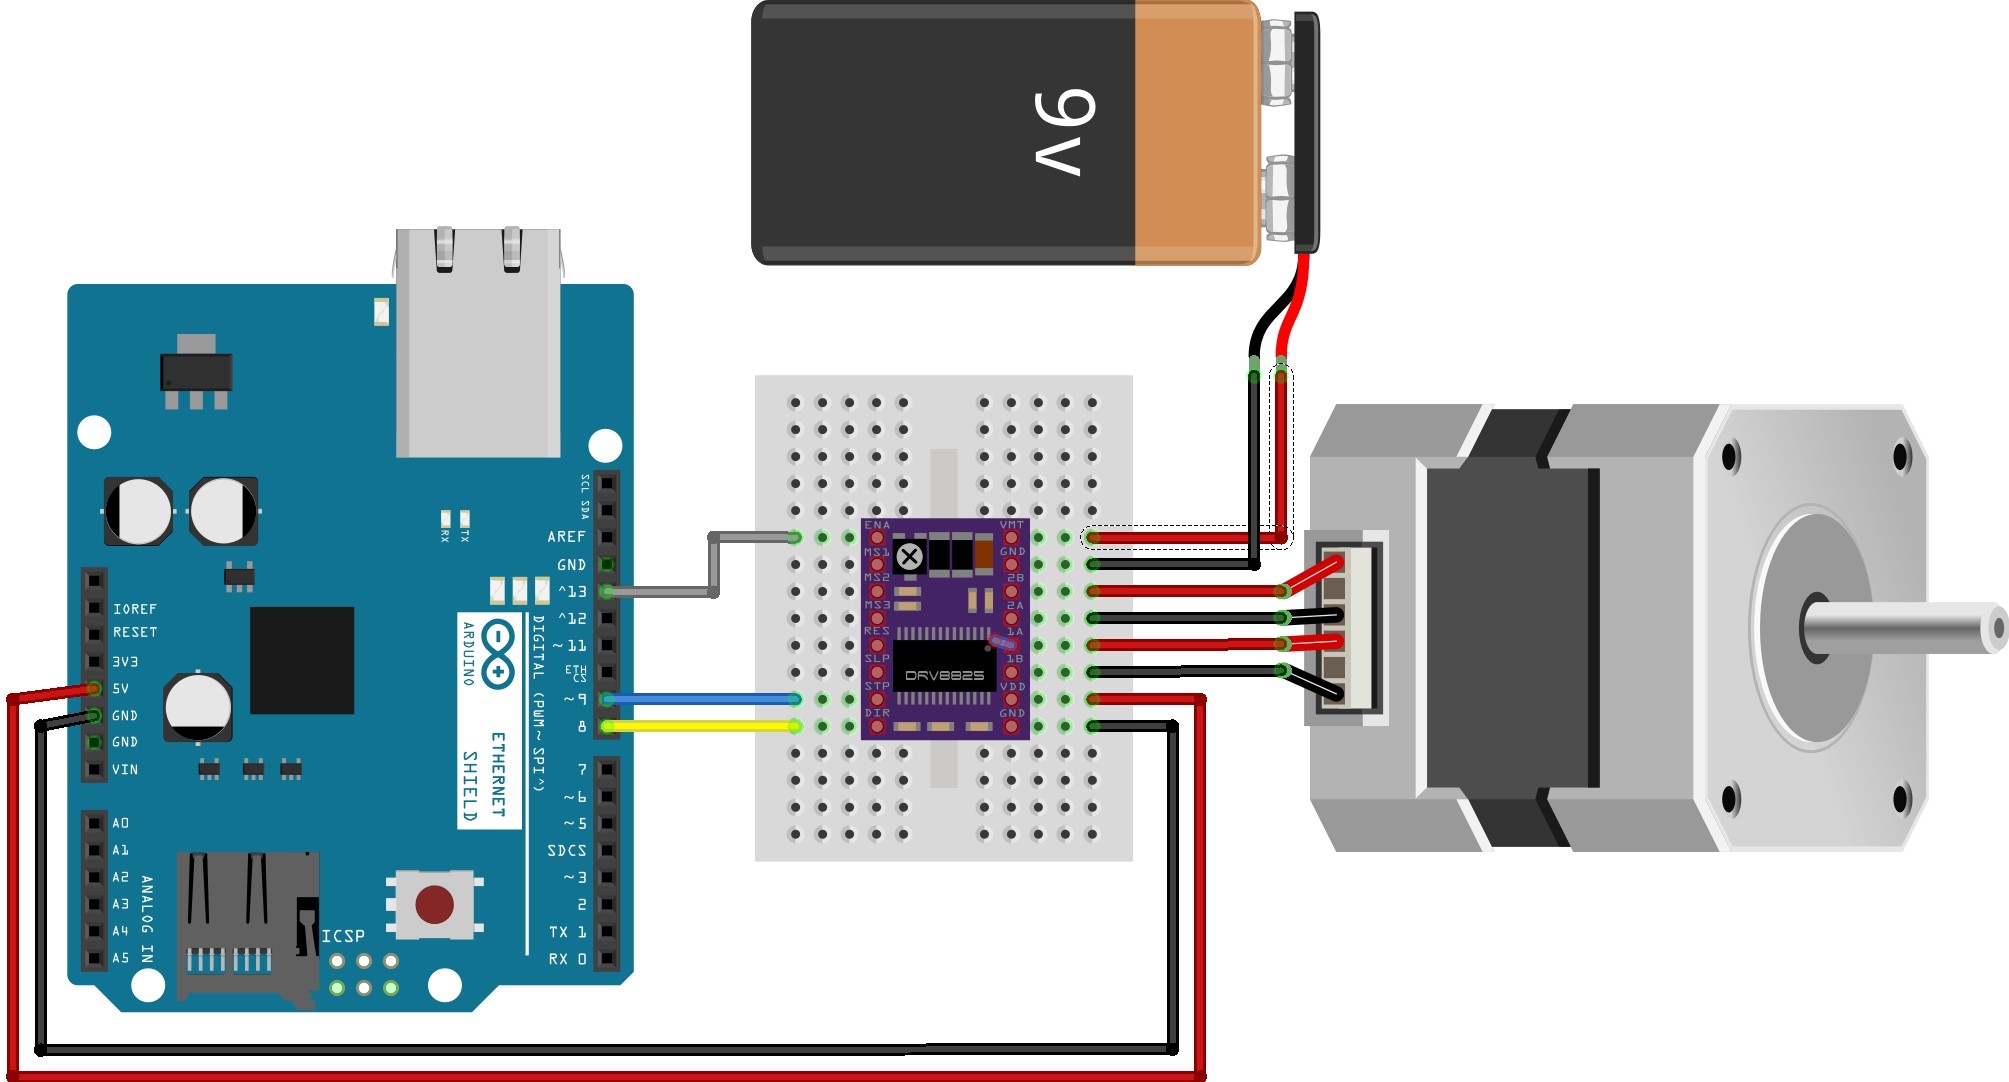
For this project, the specific mechanical setup will differ slightly from door to door. A simple sliding door in the common room was used to help illustrate the workings of eyeLock. In order to slide open and close the door, two motors were placed at each ends of the rail which spun the string attached to the door. This ultimately pulled the string way to slide the door open and then the other way to close the door by reversing the rotation of the motors. The motors used for the demonstration were Nema 17 Stepper Motors as they provided the torque required to move the sliding doors.
The following is the circuit schematic used to work the stepper motors in the demonstration:
The Sensors
Three sensors were used to depict the local temperature, humidity, brightness, and moisture levels of the ground outside your home.
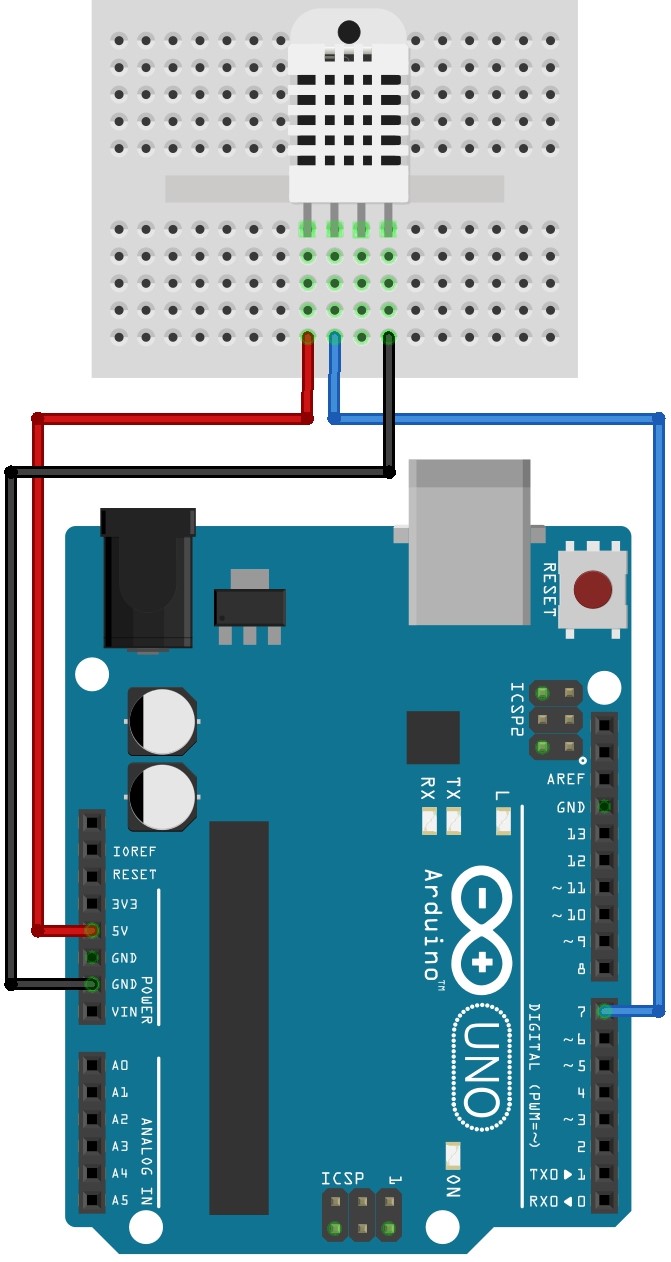
For the temperature and humidity, the DHT11 sensor was used. The following schematic was used to test and connect the sensors to the Arduino:
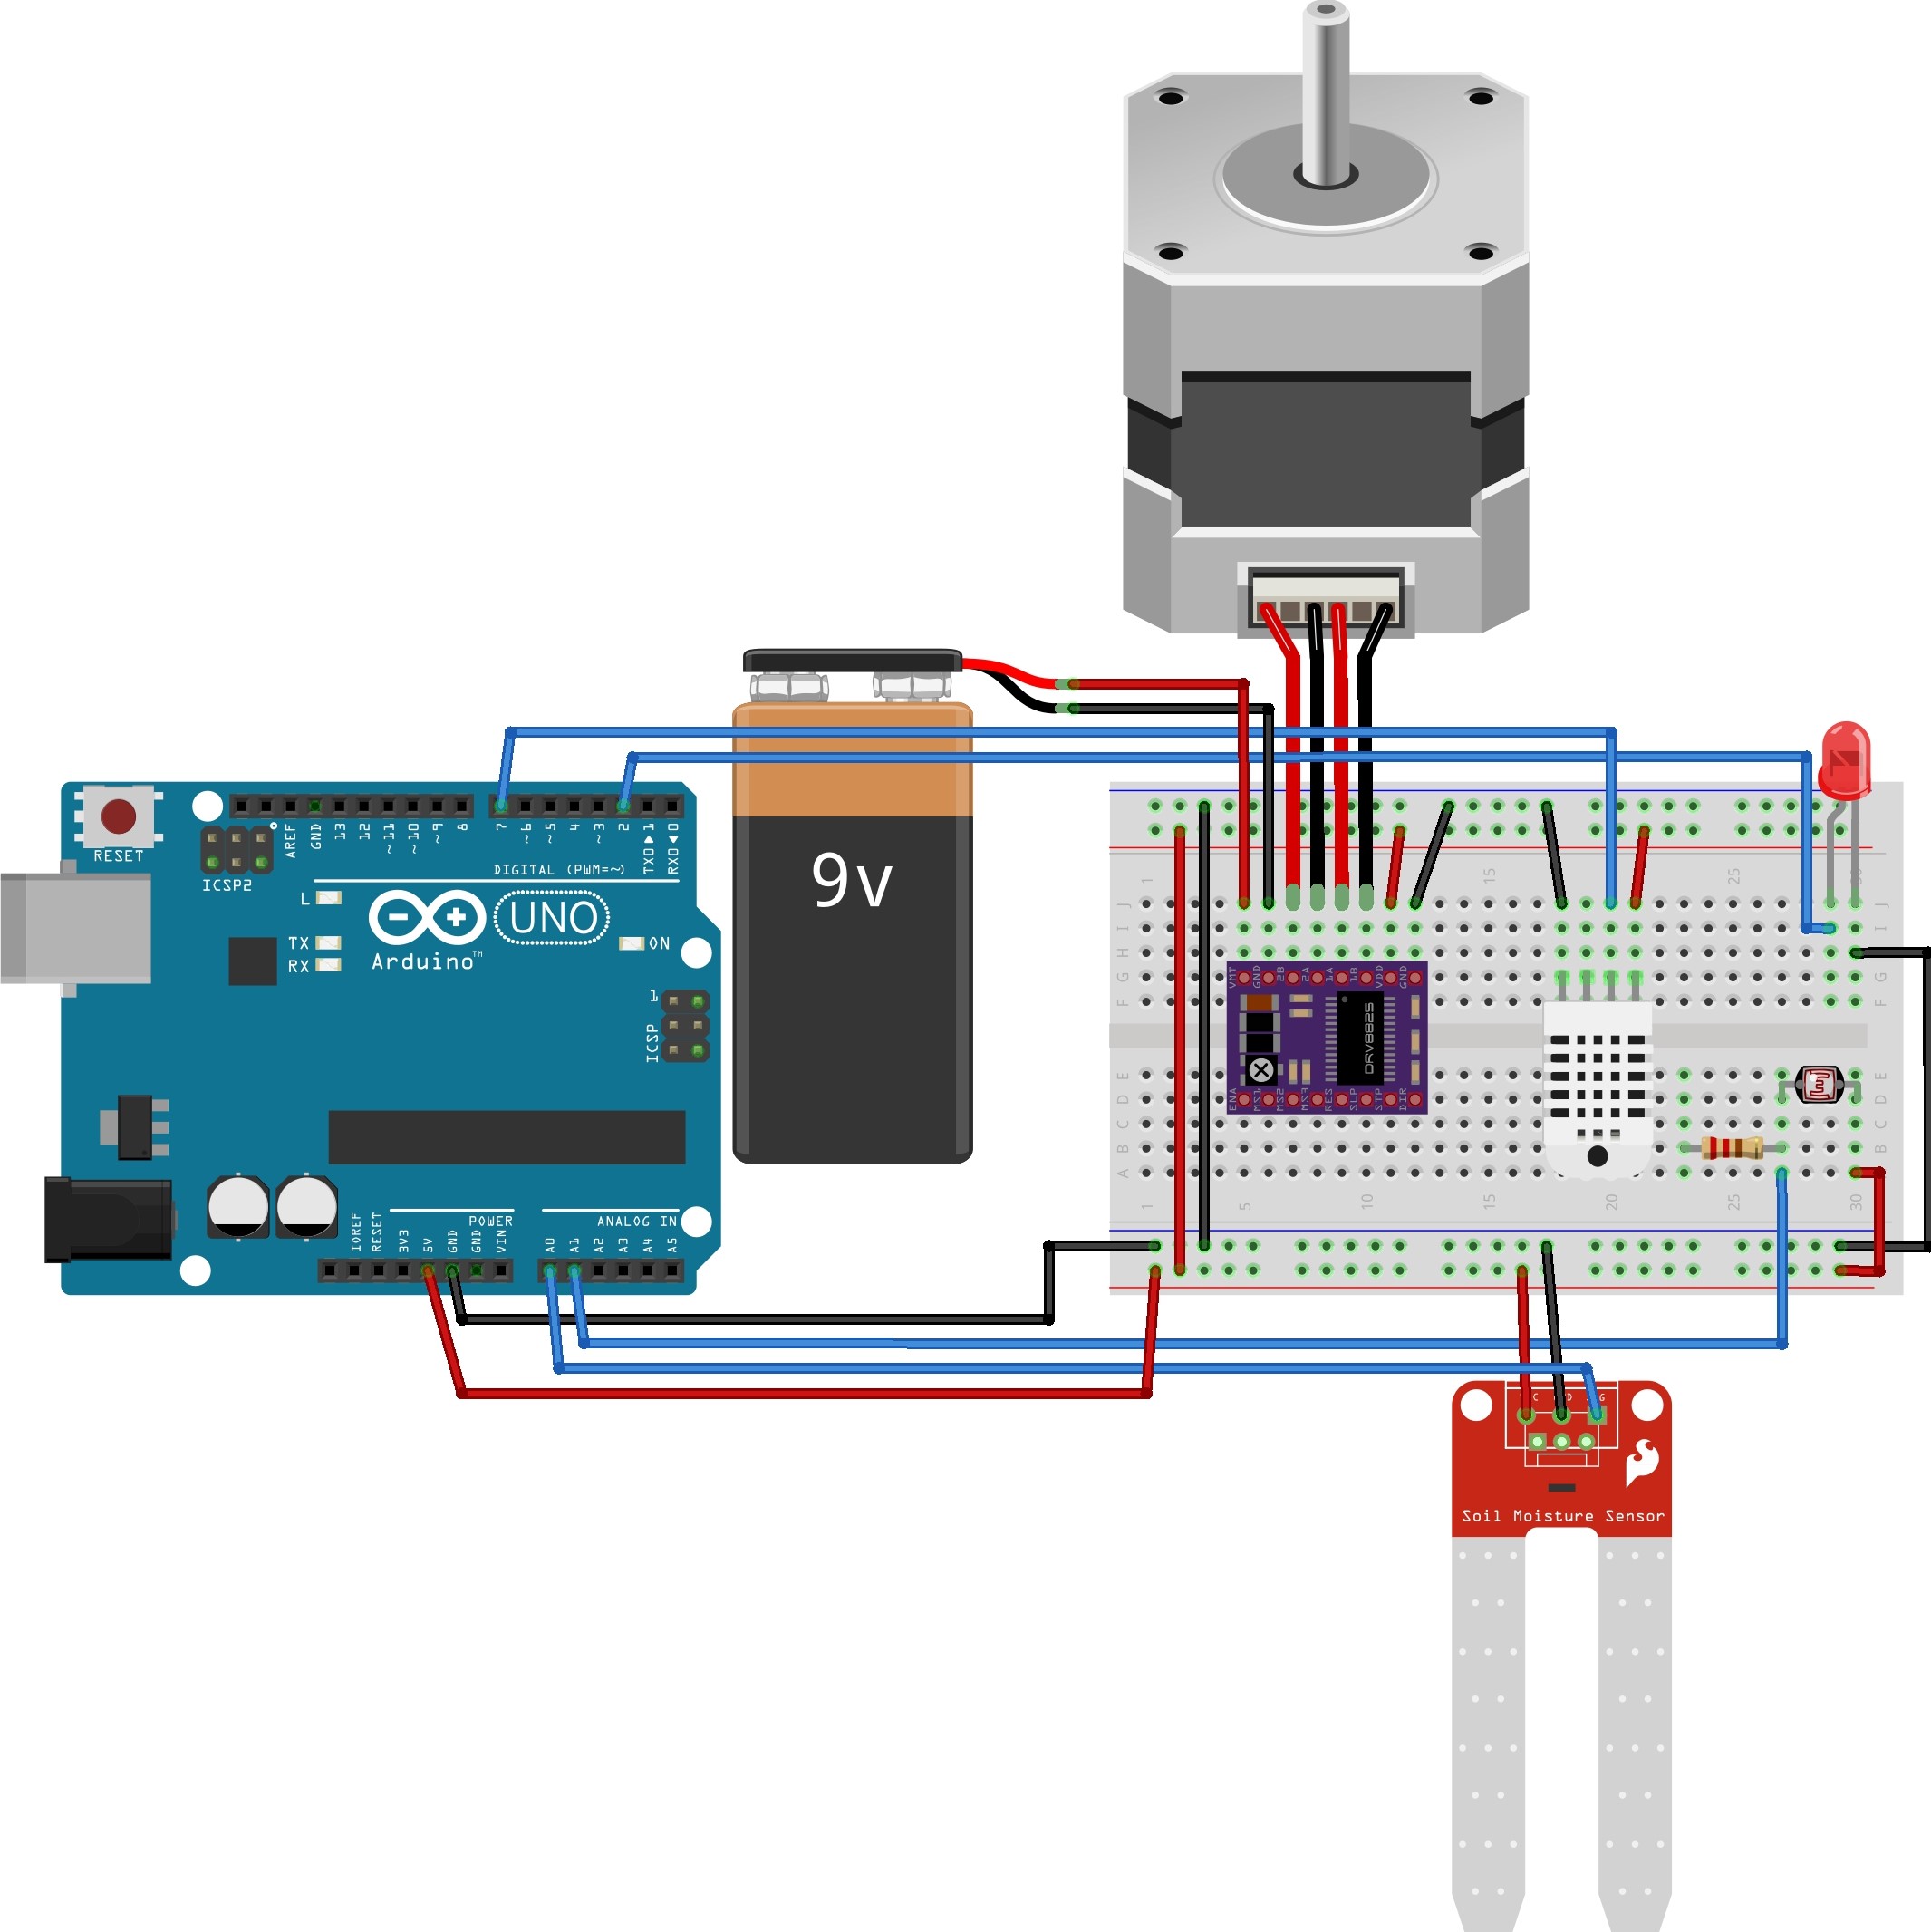
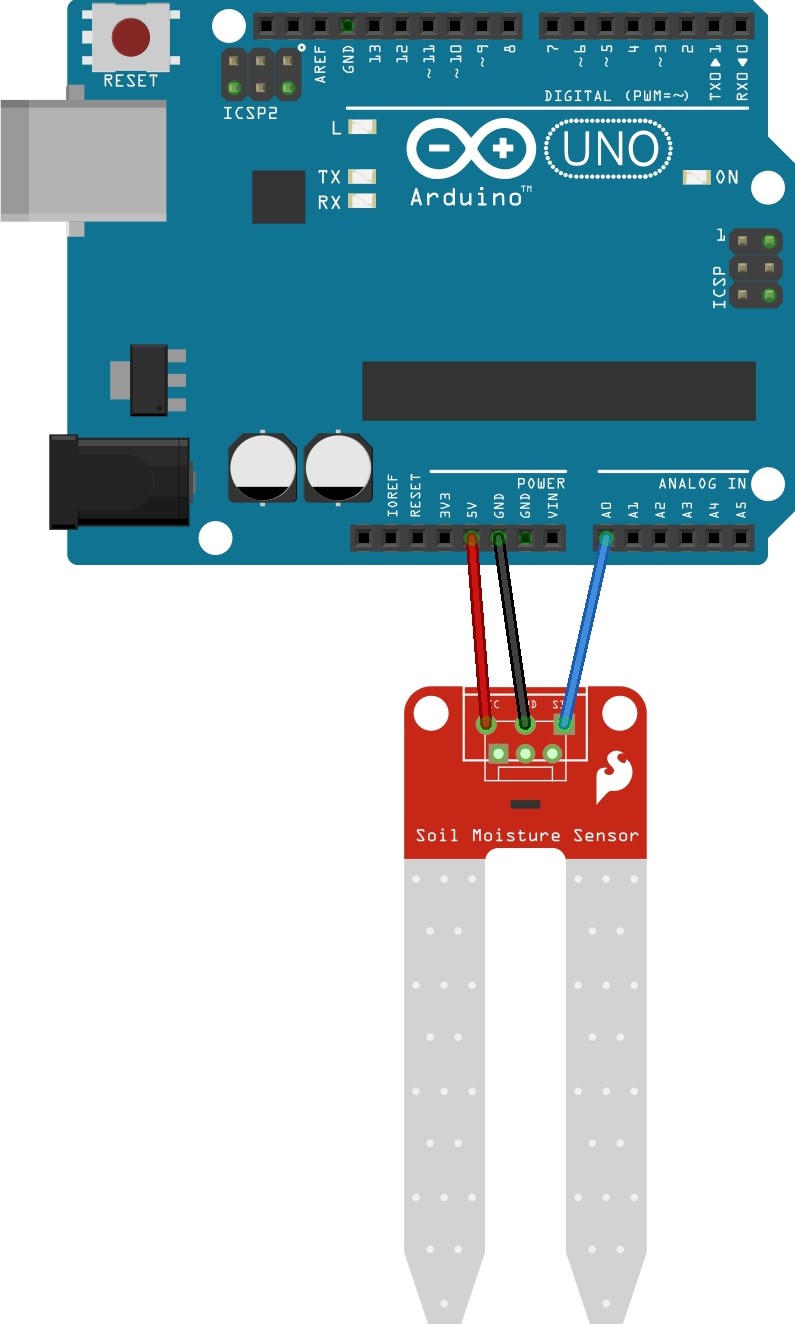
The Sparkfun Soil Moisture Sensor Circuit was used to sense the moisture in the ground (as the name suggests). The following circuit schematic was used:
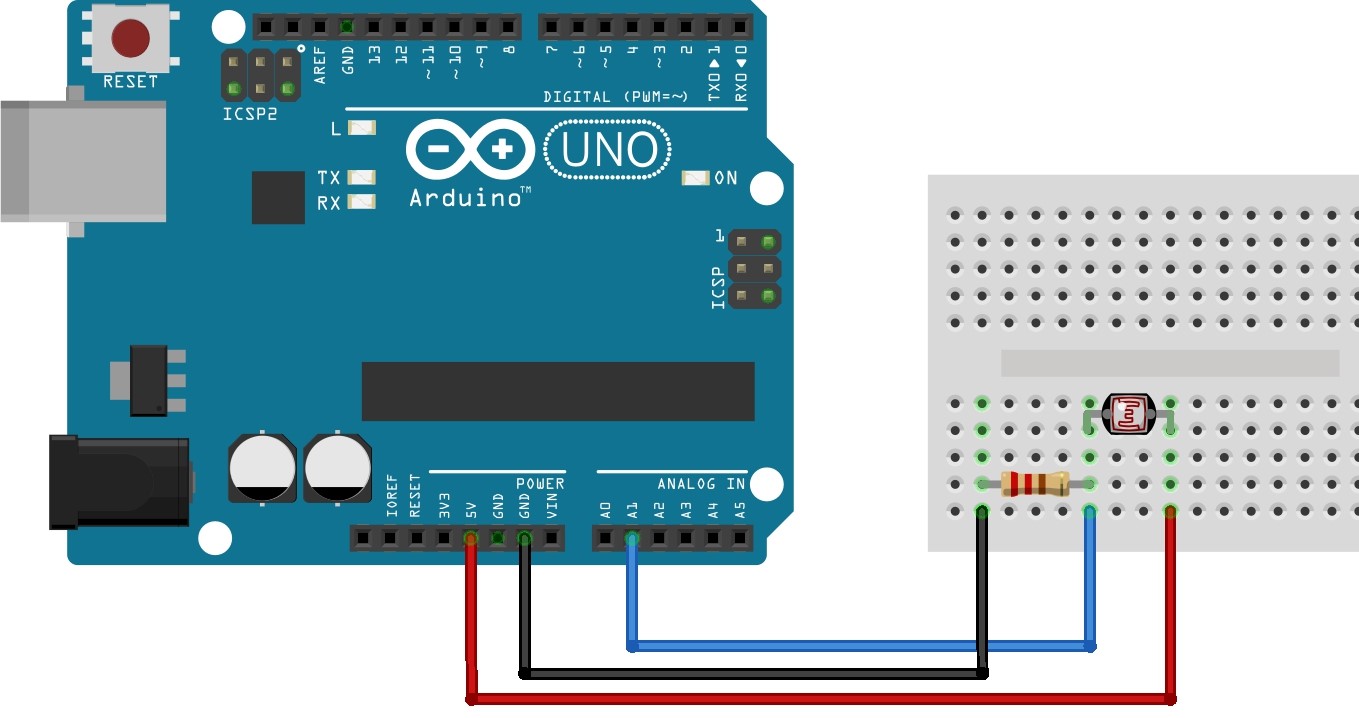
As for sensing the brightness, a simple photo-resistor was used. Again, the following schematic was used:
The LED
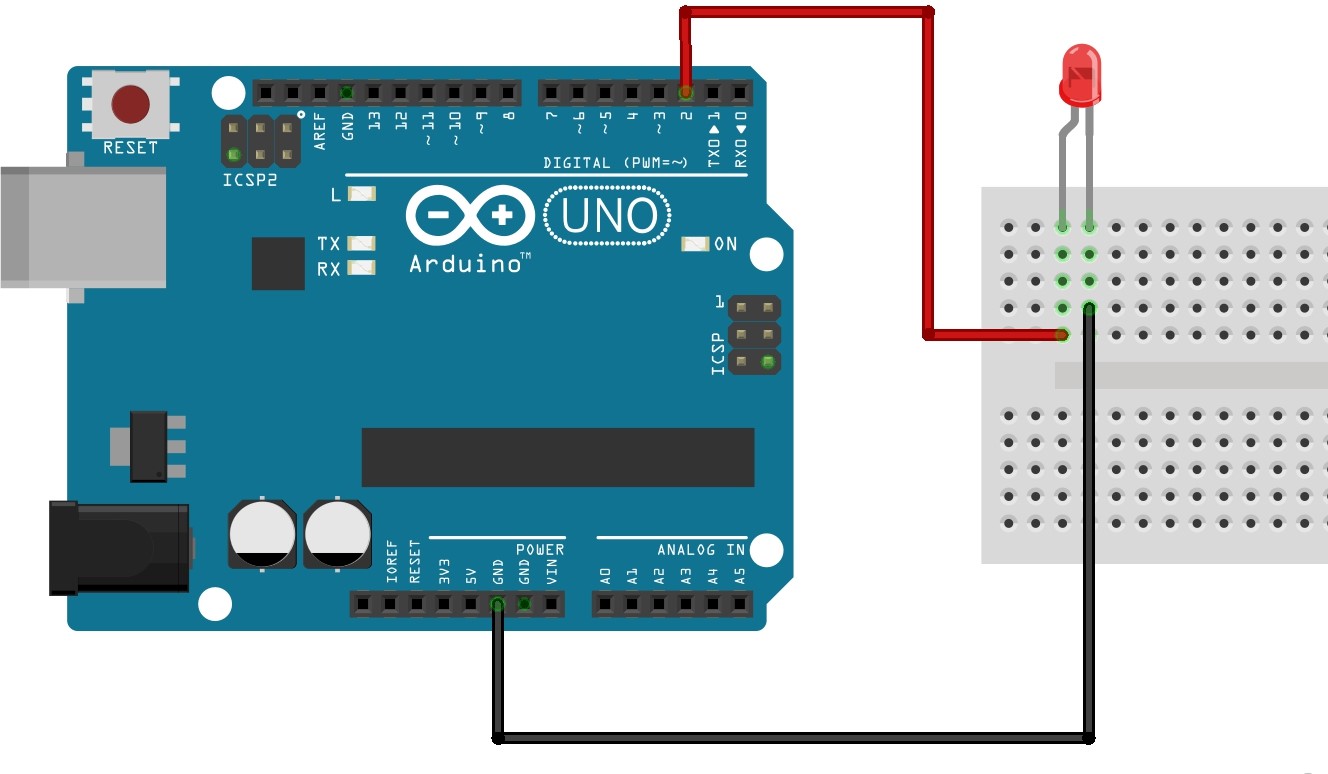
An LED was also connected to the Arduino. Here is the circuit schematic used:
The complete circuit used to connect all the sensors and motors is shown in the following figure:
(Make sure to pay attention to the pin numbers and connect the sensors to the correct pin numbers as shown in the diagram; the pin numbers are compatible with the Arduino Code discussed in the Software Section).
Speakers, Webcam, and the Raspberry Pi
Simply plug any speakers (ideally portable) into the 3.5mm jack on the Rpi, and plug a webcam into the USB port on the pi. It would make it a lot easier for there to be a built-in mic on the webcam, though this is not necessary and could work with an additional external mic.
More pictures:
The basic software setup involves 5 parts:
1. The Alexa Skills Kit (ASK) front-end interface for building the dialog model for voice integration.
2. The AVS Integration so that Alexa runs on your Rpi locally, and controls the Arduino without the need for a separate Alexa device.
3. The Python Flask server which runs on the python and acts as a back-end to the Alexa skill. Expose the server through the use of ngrok.
4. The facial recognition feature implementation through the use of OpenCV.
5. The Arduino code which takes in serial commands from the Rpi and controls the various motors/sensors needed for eyeLock.
Pre-requisites
This tutorial assumes you are using a Raspberry Pi 3 Model B running the standard installation of Raspbian. Configuring the Software to start automatically uses the LXDE configuration, however this can be substituted if a different distribution or desktop manager.
Locally, the Python Flask server acts as the back-end to the Alexa skill. The following dependencies at minimum should be installed as follows before continuing:
$ sudo apt-get install python, python-pip, python-opencv,
$ pip install flask, flask-ask, pyserial
Note: This is a very error-prone and often tedious part of the project, as there are simply too many dependencies to list them all. If initial startup of any components fail, watch out for any missing dependencies and install them as necessary, or employ the method of googling (and hence fixing, hopefully) errors that arise.
Once dependencies have been installed, clone the main eyeLock repository. In this example, a directory called "eyeLock" will be created on the desktop and the repository cloned into it. The local path can be modified as desired.
$ cd ~/Desktop
$ git clone https://github.com/grahamhoyes/eyeLock2.git eyeLock
Alexa Skills Kit
The ASK setup is the most straightforward part, and hence we will address this first. Create an amazon developers account if you do not have one already, and start a new skill. Fill out the fields of the skill as follows:
Note: replace the default endpoint address with the one provided by ngrok when it is run, unless you have premium subscription to ngrok in which case you can reserve a custom subdomain and never change the endpoint again. This was what we did, and allows autolaunching of the entire project when the Rpi is rebooted. There are also alternative services which may provide free reserved subdomains, but ngrok is by far the most popular way to achieve this. Additional notes on setting up the local web server on the Rpi will be discussed in later sections.
After the fields have been filled, click the "Interaction Model" tab followed by "Code Editor". Copy the interaction model from ASKModel.txt and click build model. Voila, one section down, 4 more to go!
Alexa Voice Service Integration
Alexa Voice Service (AVS) allows the Raspberry Pi to act as an Alexa smart device, eliminating the need for a separate Echo device. AVS consists of a local server, application, and wake word engine that detect your voice commands on the Raspberry Pi, and the cloud portion that processes the natural language commands.
Setting up the Amazon Developer Account
Log into (or create an account on) the Amazon Developer Account portal. Select the Alexa tab in the top bar, and click "Get Started" under Alexa Voice Service (recall that the Alexa Skills Kit was configured earlier). If this is your first AVS application, select "Get Started" again on the new page. Give the product a name (e.g. "Alex's eyeLock") and a Product ID. For product type, choose "Alexa-Enabled Device", and select "No" for Will your device use a companion app? Select "Smart Home" as the Product Category, provide a brief description, and select "Hands-free" for how users will interact with your product. Finally, select "No" for your intent to distribute commercially and if the product is intended for children under 13 years of age (Note that at no point are images transmitted off the Pi, only voice; this last point is at your discretion).
On the next page, create a new security profile. Give it a name and description. Now, under the "Web" tab, copy down your Client ID and Client Secret. These, along with your Product ID from earlier, will be later input into the Pi. Finally, for Allowed Origins, enter https://localhost:3000, and for Allowed return URLs enter https://localhost:3000/authresponse. These are the addresses of the local web server that will run on the Pi to communicate with the Alexa cloud.
Local AVS Server Configuration
First, clone the repository for the AVS sample app as follows. Note that this repository should be cloned inside of the folder made for eyeLock in the pre-requisites section.
$ cd ~/Desktop/eyeLock
$ git clone https://github.com/alexa/alexa-avs-sample-app.git
Next, you'll need to input your ProductID, ClientID, and ClientSecret generated earlier. This is done in the automated_install.sh script:
$ nano alexa-avs-sample-app/automated_install.sh
CTRL+x and y to save and exit. Finally, run the install script:
$ alexa-avs-sample-app/automated_install.sh
Type "y" at any prompts that result during installation. This step can take a while, so be patient.
Initial Configuration of AVS
The following steps only need to be run once during initial setup to register the Alexa client with your account. Afterwards, startup can be handled by a startup script which can be invoked manually or set to run on startup.
First, we need to launch the AVS companion service. This can be done in a one-liner from anywhere, but it gets messy. So, to appease, npm, first navigate to the directory the start:
$ cd ~/Desktop/eyeLock/alexa-avs-sample-app/samples/companionService
$ npm start
npm now opens a port to communicate with the Alexa servers. Leave this terminal window open, and open a new one. Then, run the sample app:
$ cd ~/Desktop/eyeLock/alexa-avs-sample-app/samples/javaclient
$ mvn exec:exec
You will then be prompted to authenticate your device. Click Yes, or copy the link into a browser window. Log into your Amazon account in the browser window. Allow authentication for your device, after which the browser displays "device tokens ready". Return to the sample app, and click OK on any remaining pop-ups.
Finally, start the Wake Word engine which listens for the "Alexa" trigger phrase. Once again, launch a new terminal window (leaving the previous two open and running) and run the following:
$ ~/alexa-avs-sample-app/samples/wakeWordAgent/src/wakeWordAgent -e sensory
Your Alexa device should now be up and running! Try saying "Alexa, What's the weather?" to make sure everything is working (make sure a microphone and speaker are connected to the Pi first!).
Now that the device is authenticated with Amazon and is working, we don't need to launch the companion service, app, and wake word agent every time if we use a startup script. Kill each of the three terminals currently running by clicking in each and typing CTRL+c, then "exit", to shut down the AVS service.
The startup script is located in the first git clone directory (~/Desktop/eyeLock in this tutorial) as eyeLockStart.sh. A few changes should be made depending on the situation, so open up the file to start:
$ nano ~/Desktop/eyeLock/eyeLockStart.sh
The following file should appear:
1  #!/bin/bash
2
3  BASEDIR=/home/pi/Desktop/eyeLock/
4  SUBDOMAIN=eyelock # For use with custom ngrok subdomains
5  echo "Starting"
6  echo "----------$(date)----------" >> ${BASEDIR}HacksterEyeLock2/pythonlogs.log
7  echo "----------$(date)----------" >> ${BASEDIR}HacksterEyeLock2/mavenlogs.log
8  npm start --prefix ${BASEDIR}alexa-avs-sample-app/samples/companionService --cwd ${BASEDIR}alexa-avs-sample-app/samples/companionService &
9  (sleep 10; sudo mvn -f ${BASEDIR}alexa-avs-sample-app/samples/javaclient exec:exec) &
10 (sleep 25; cd ${BASEDIR}alexa-avs-sample-app/samples/wakeWordAgent/src; ./wakeWordAgent -e sensory) &
11 (cd ${BASEDIR}HacksterEyeLock2; python eyeLock2.py) &
12 # Omit the -subdomain flag and "> /dev/null" to output ngrok url for Alexa endpoint if not using a custom subdomain
13 (${BASEDIR}ngrok http -subdomain=${SUBDOMAIN} 5000 > /dev/null)
14 echo "Up and running!"
First off, if the initial git repository was cloned into a different folder the BASEDIR variable in line 3 should be changed to reflect this.
Next, the file given assumes that the basic paid version of ngrok is used, where a custom subdomain can be specified, which is done in line 4. If the free version is being used, modify line 13 to be as follows:
(${BASEDIR}ngrok http 5000)
The subdomain flag is removed for obvious reasons, > /dev/null is removed to stop suppressing the output. When the script is run, the ngrok url for this instance will be printed, which should be configured as the endpoint for Alexa in the Developer control panel.
To manually run the AVS, the script can be invoked manually:
$ ~/Desktop/eyeLock2/eyeLockStart.sh
This will start all the necessary components for the AVS and eyeLock (including the Python Flask server discussed below), but it does take a quite while so be patient.
Automated Startup
The startup process is automated by telling the Raspberry Pi to run the eyeLockStart.sh script automatically on startup. First, we tell the Pi to run the script when the default pi user logs in, by adding to the .bashrc file:
$ cd ~
$ nano .bashrc
Use the arrow keys to navigate to the bottom of the file, and add the following line of code at the end:
bash /home/pi/Desktop/eyeLockStart.sh
Press CTRL+x then y to save and exit. Note to change the path if the initial repository was cloned to a different location.
Finally, the companion app like to be running in a visible terminal to actually work properly. So, we configure the Pi to automatically launch a terminal window when it first logs in (this will happen whether or not a monitor is plugged in, as long as the Pi is set to auto-login and automatically launch the desktop manager). This is accomplished by modifying the pi user's LXDE autostart file:
$ nano /home/pi/.config/lxsession/LXDE-pi/autostart
At the end of the file add:
@lxterminal
Then CTRL+x and y to save and exit.
Everything is now good-to-go, reboot the pi and the AVS and Python Flash server should start automatically! Once again, ask Alexa something simple like "Alexa, What's the weather?" to make sure everything is working.
Python Flask
Starting with the cloned repository, the only line that you may have to change in order to get your code to work is the serial address to the arduino micro controller in eyeLock2.py. You can check out the list of available serial addresses by:
$ ls /dev/tty*
Then, once the webcam and the Arduino are plugged into the Rpi, simply navigate to the cloned directory and run the python script:
$ python eyeLock2.py
Now, your flask web server should be functional. You can expose the web server by downloading a version of ngrok appropriate for ARM based linux systems (for the Rpi). It will make your life much easier to move this ngrok executable into the same directory as the python scripts. To use ngrok, simple run:
$ ./ngrok http 5000
Then, copy the https forwarding address into the endpoint on the ASK interface noted above, and voila you are done with this part!
Facial Recognition Through OpenCV
Use the included picture.py script to capture images of faces, both positives and negatives. Launch the script by simply navigating to the correct directory in terminal and type:
$ python picture.py
Now, simply hit the SPACE key to capture and image and have it save to the folder which contains picture.py. From here, copy the images of the authorized user(s) into the folder s1 under training data, and copy the images of the unauthorized user(s) into s2. DO NOT place images of the same person in both s1 and s2 as this will mess up the algorithm.
After the images have been captured, saved, and moved into the appropriate folders, simply ctrl-C to exit the script. Now, the preparation for the training data should be complete. Note that each time the Rpi turns on (and therefore relaunches all the scripts), it does take a few minutes for the data to train locally in real time. Please be patient!
The facial recognition algorithm used is called Eigenfaces. All the
Arduino Code
The Arduino code is probably the most straightforward part of this project. Simply copy from eyeLock.ino. To use the DHT11 sensors, the SimpleDHT.h library is needed. To include the library, under the Sketch drop-down in the Arduino interface, click Include Library and Manage Libraries. Here, search for the DHT library and include the downloaded library in eyeLock.ino (there should already be a line '#include <SimpleDHT.h>').
Final Note on Software: Scripts are attached, but we strongly recommend cloning the git repo unless you wish to set up your own directory!



_ztBMuBhMHo.jpg?auto=compress%2Cformat&w=48&h=48&fit=fill&bg=ffffff)




_3u05Tpwasz.png?auto=compress%2Cformat&w=40&h=40&fit=fillmax&bg=fff&dpr=2)


Comments
Please log in or sign up to comment.