Hardware components | ||||||
_ztBMuBhMHo.jpg?auto=compress%2Cformat&w=48&h=48&fit=fill&bg=ffffff) |
| × | 1 | |||
| × | 1 | ||||
 |
| × | 1 | |||
Software apps and online services | ||||||
 |
| |||||
We all know what IR signals are. And we can decode it. But I made this tutorial because in the IRremote.h(most popular IR library), the newest version the easiest mode to decode IR Signals is deprecated, and it took 3 days to find the another good one.
We use the same parts, but other code.
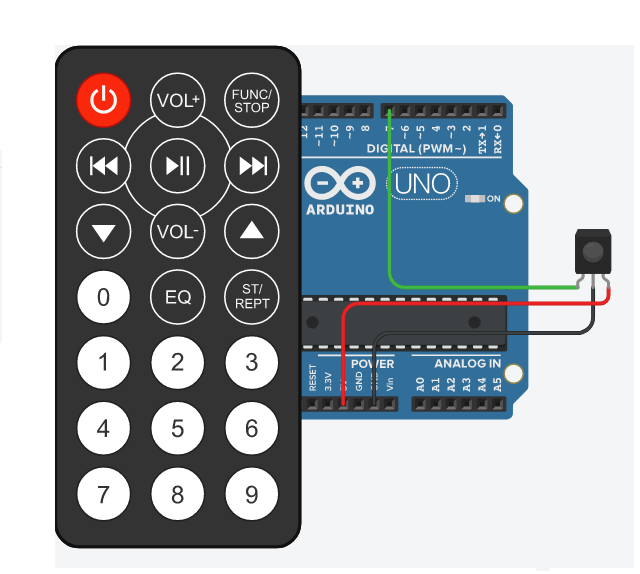
We need an IR Remote, IR receiver and... an Arduino
#include <IRremote.h>
#define MARK_EXCESS_MICROS    20 // recommended for the cheap VS1838 modules
//------------------------------------------------------------------------------
// Tell IRremote which Arduino pin is connected to the IR Receiver (TSOP4838)
//
int IR_RECEIVE_PIN = 11;
//+=============================================================================
// Configure the Arduino
//
void setup() {
  pinMode(LED_BUILTIN, OUTPUT);
  Serial.begin(115200);   // Status message will be sent to PC at 9600 baud
#if defined(__AVR_ATmega32U4__) || defined(SERIAL_USB) || defined(SERIAL_PORT_USBVIRTUAL)  || defined(ARDUINO_attiny3217)
  delay(2000); // To be able to connect Serial monitor after reset or power up and before first printout
#endif
  // Just to know which program is running on my Arduino
  Serial.println(F("Starting  " __FILE__ " from " __DATE__ "Using library version " VERSION_IRREMOTE));
  Serial.println("For Pronto details type 'pronto'");   // 2 blank lines between entries
  Serial.println("And for extra Pronto Details type 'prontodet'");
  IrReceiver.begin(IR_RECEIVE_PIN, ENABLE_LED_FEEDBACK); // Start the receiver, enable feedback LED, take LED feedback pin from the internal boards definition
  Serial.print(F("Ready to receive IR signals at pin "));
  Serial.println(IR_RECEIVE_PIN);
}
//+=============================================================================
// The repeating section of the code
//
void loop() {
  char ProntoHex = Serial.read();
  if (IrReceiver.decode()) {  // Grab an IR code
      // Check if the buffer overflowed
      if (IrReceiver.results.overflow) {
          Serial.println("IR code too long. Edit IRremote.h and increase RAW_BUFFER_LENGTH");
      } else {
          Serial.println();
          Serial.println();
          IrReceiver.printIRResultAsCVariables(&Serial);  // Output address and data as source code variables
            IrReceiver.compensateAndPrintIRResultAsPronto(&Serial);
      }
  /*
   * Example for using the compensateAndStorePronto() function.
   * Creating this String requires 2210 bytes program memory and 10 bytes RAM for the String class.
   * The String object itself requires additional 440 Bytes RAM from the heap.
   * This values are for an Arduino UNO.
   */
     }
      IrReceiver.resume();                            // Prepare for the next value
  }
/*
 * IRreceiveDump.cpp
 *
 * Dumps the received signal in different flavors.
 * Since the printing takes so much time, repeat signals may be skipped or interpreted as UNKNOWN.
 *
 *  Copyright (C) 2020-2021  Armin Joachimsmeyer
 *  armin.joachimsmeyer@gmail.com
 *
 *  This file is part of Arduino-IRremote https://github.com/z3t0/Arduino-IRremote.
 */

/*
 * You can change this value accordingly to the receiver module you use.
 * The required value can be derived from the timings printed here.
 * Keep in mind that the timings may change with the distance
 * between sender and receiver as well as with the ambient light intensity.
 */
#define MARK_EXCESS_MICROS    20 // recommended for the cheap VS1838 modules

#include <IRremote.h>

//------------------------------------------------------------------------------
// Tell IRremote which Arduino pin is connected to the IR Receiver (TSOP4838)
//
#if defined(ESP32)
int IR_RECEIVE_PIN = 15;
#else
int IR_RECEIVE_PIN = 11;
#endif

//+=============================================================================
// Configure the Arduino
//
void setup() {
    pinMode(LED_BUILTIN, OUTPUT);

    Serial.begin(9600);   // Status message will be sent to PC at 9600 baud
#if defined(__AVR_ATmega32U4__) || defined(SERIAL_USB) || defined(SERIAL_PORT_USBVIRTUAL)  || defined(ARDUINO_attiny3217)
    delay(2000); // To be able to connect Serial monitor after reset or power up and before first printout
#endif
    // Just to know which program is running on my Arduino
    Serial.println(F("START " __FILE__ " from " __DATE__ "\r\nUsing library version " VERSION_IRREMOTE));

    IrReceiver.begin(IR_RECEIVE_PIN, ENABLE_LED_FEEDBACK); // Start the receiver, enable feedback LED, take LED feedback pin from the internal boards definition

    Serial.print(F("Ready to receive IR signals at pin "));
    Serial.println(IR_RECEIVE_PIN);
}

//+=============================================================================
// The repeating section of the code
//
void loop() {
    if (IrReceiver.decode()) {  // Grab an IR code
        // Check if the buffer overflowed
        if (IrReceiver.results.overflow) {
            Serial.println("IR code too long. Edit IRremoteInt.h and increase RAW_BUFFER_LENGTH");
        }
            Serial.println(IrReceiver.decodedIRData.decodedRawData);
        IrReceiver.resume();                            // Prepare for the next value
    }
}


Comments
Please log in or sign up to comment.