


Hardware components | ||||||
 |
| × | 1 | |||
 |
| × | 1 | |||
 |
| × | 13 | |||
 |
| × | 1 | |||
| × | 1 | ||||
| × | 1 | ||||
| × | 1 | ||||
Software apps and online services | ||||||
 |
| |||||
Counting... such a seemingly simple concept. However, counting is the foundation for many systems (complex and basic) that we commonly take for granted, from a stadium's score display to devices that aid world-class research.
We here at Make It Count! started our journey by imagining how we represent and save the tactile world around us. With the aforementioned applications and the secondary systems we plan to build from our counter, Make It Count! is confident that this project will lay the foundation to advance projects big and small.
Project OverviewOur customer, a farming company, needed a simple way to track how many times a machine of theirs had been used since it was last serviced. Because the machine is fragile, it must be serviced after 9 uses. Moreover, since the machine is crucial to the farm's operation, the customer needs to keep it in constant working order. To solve this problem, we developed a device that would count by 1 at the push of a button, then reset to 0 after it reached 9. At the customer's request, we also incorporated a tilt switch that allows a user to reset the counter to 0 at any time.
Our device uses a 7 segment display to count how many times, up to 9, a button has been pushed. A tilt switch resets the display to 0 if the device is tilted to one side.
Here is a little more about how we got here...
Build Instructions:Hardware:Components: TI LaunchPad, 13 jumper wires, 7 segment display, breadboard, tilt switch, push button, TI Breadboard BoosterPack (optional)
Steps:
(1) We used a schematic from the Energia website to set up the 7 segment display:
(2) We connected the Launchpad to the Breadboard by using the Breadboard BoosterPack:
(3) We connected our display to the launchpad, supplying both power and a means to control the display:
After we had designed a system that would count up to 9 and reset, our client came to us with a concern: Waiting till the counter reached 9 before they could reset the display would severely constrain the device's usefulness. In response, our team adapted our design to include a tilt switch that would set the counter back to zero at any time.
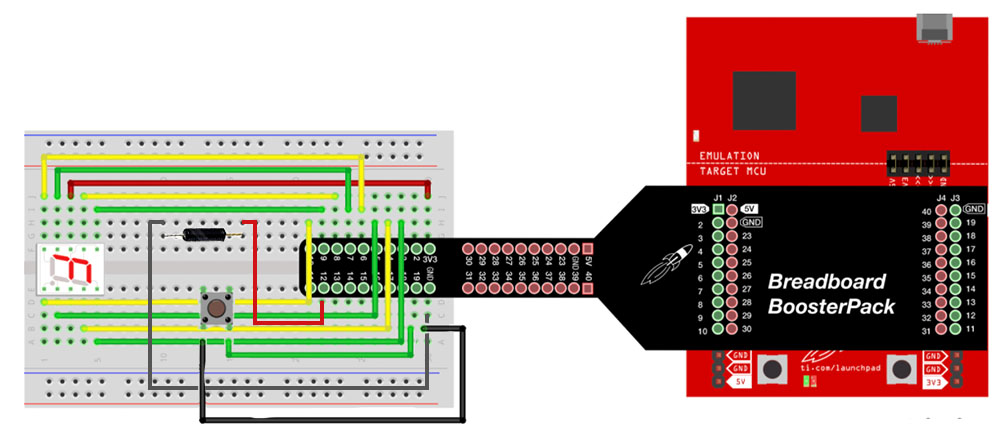
(4) We added the push button and tilt switch, shown in the full schematic below:
We used Energia to write and execute our code.
(1) We created this separate program which reads whether the button is pressed or not:
(2) We integrated the previous part with a modified version of the code for a 7 segment display, found on the Energia website. This code worked, but did not include instructions for a tilt switch:
(3) Finally, we added code to control the tilt switch, per the client's request. The result was our finished product, a fully operational counter.
The Finished ProductFollowing the steps outlined above, we created a product that displays the number of times the button is pushed, but resets to zero any time the user simply tilts the breadboard.
Here is a video of our product in action!


Comments
Please log in or sign up to comment.