AVLinux is a distro of Linux that runs on IBM PC computers with Intel and AMD processors. Music and MultiMedia apps come pre-configured and scripts automate setup for your peripherals.
Read up on AVLinux and download the 4GByte iso file. Well documented and regularly updated made from MX Linux. This project uses release 21.3. Ubuntu needs a real time kernel to work this way.
Make bootable AVLinuxA bootable USB key means portability and there are many install and persistence options. It can fit on a DVD. We want the simple live boot for our project. YUMI and Etcher can both make bootable media.
Close the Welcome panel.
Booting from live media can be complicated. Difficulties occur if your download iso file is not good, PCs have boot settings and another software might create a boot device that works.
If you have booted successfully then plug your headphones into the jack on the side of your computer.
Open a Terminal type guitarixType ctrl-alt-t on your keyboard or click the terminal icon. Enter guitarix and you will be prompted to Start Jack audio software. The terminal shows valuable info.
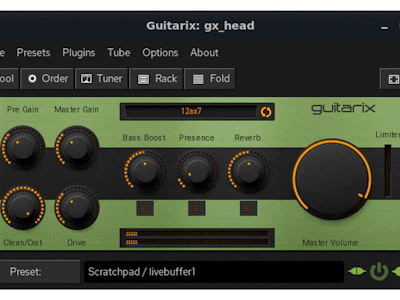
Look at the two panels on the screen JACK Audio Connect and Guitarix: gx_head. Your computer is now emulating an audio patching system called Jack and a guitar amplifier named gx_head.
Click Graph on the Jack Audio Connection Kit panel. The red stop button means the JACK server is running. A green play button means it is paused.
This mess pops up. It is a graphical representation of audio devices connected together or not. The guitar amp is virtually there but not connected. We only care about the green audio hookups not the Midi.
Re-arrange the boxes and move the Midi out off screen. AVLinux scanned a laptop and found one built-in microphone capture_1 and the computer has right and left stereo sound named playback_1 and playback_2.
The guitar amplifier gx_head has a disconnected port in_0 and two disconnected outputs out_0 and out_1. Left-click on capture_1 and hold while pulling the simulated cable over to In_0 on gx_head_amp.
A stereo sound source would have capture_1 and capture_2. We only connect one.
Left-click on capture_1 and hold while pulling the simulated cable over to In_0 on gx_head_amp. Do the same for out_0 to playback_1 and out_1 to playback_2.
If we are lucky as soon as the connection was made between capture_1 and in_0 sound from the microphone started going into the simulated guitar rig. We should see movement on the VU meter. Tap the microphone, clap, make sound.
There was an instruction to plug in your headphones. Put them on and listen. Do you hear what the microphone is picking up? Left-click directly on the Master Volume knob and pull up and down.
All of the gain knobs affect volume. Unplug the headphone jack. Is there a loud screeching noise as the sound from the speakers is caught by the microphone and amplified? It's called feedback.
CheatingA lot of the time mixing audio systems together can be disasterous. Pulse and ALSA software are used by Linux to manage sound. They can work poorly together but AVLinux lets us go to the bottom of the screen and click on the speaker icon.
Source is a microphone or USB sound card device. Software can create virtual sound interfaces like the rack of guitar equipment. USB PnP Sound Device is our GuitarLink device.
Sink is where the sound is going to: speakers, headphones, etc. Microphones can be single channel mono sound or stereo. Our USB PnP guitar adaptor is mono input but gives stereo sound out.
Connect the GuitarLink USB Dongle to the computer. It is basically a microphone for your guitar. Inside are the same circuits used by lots of PCs. Quarter inch jacks that work with adaptors for 3.5mm plugs.
Plug your guitar cable into the port with the icon and insert headphones into that port. More information at USB Guitar Link software.
Dongle recognized in dmesg and lsusb as USB PnP Sound Device.
JACK Audio Connection KitClick Setup on the Jack Audio Connection Kit panel. The red stop button means the JACK server is running. A green play button means it is paused.
When we change circuits the server can shut down. The Jack server can fail to start if it cannot deal with the default audio interfaces.
While starting and restarting programs it is normal to see error messages as connections are lost. You need to recheck and possibly re-do connections.
SetupThe Parameters panel let's us select sound devices so see analog and digital circuits, built-in and USB plug-in devices. Select USB PnP Sound Device and check to see if our signal makes it through to the guitar amp.
When we click Apply or OK the Jack Server will restart and we will see an alert. This is normal and may take a moment. We may need to return to the Graph panel to fix connections.
Return to the graph panel and re-do the input and output connections. Check the Start and Stop buttons on the Jack control panel.
Advanced SetupClick Advanced. Output Device and Input Device are both (default) this explains why Guitarix connects automatically to the microphone and speakers.
Desktop PCs with microphone, speaker and headphones on the front and back with USB and BlueTooth devices mean a lot of connections to support. Click on the triangle for the Input Device drop-down menu.
For our dongle we need Input Device: select hw:Device USB PnP Sound Device.
Output Device: select hw:Device USB PnP Sound Device(hw.. You can return later and try the HDMI audio output channels. Perhaps you can get your guitar to play out through your TV.
Eventually we get to this and it should work for the guitar dongle to play your guitar through the PC into the headphones. Output Device is hw:Device, O and Input Device is hw:Device.
If all goes well you should hear guitar music playing out through the headphones connected to the GuitarLink dongle. You can add extra modules to your rack and turn them on to hear distortions.
Digital audio uses a buffer to collect digits and then processes the sound. The buffer takes time to fill and this introduces a delay of some milliseconds. A big delay will bother us, a short delay may not be a problem. Let's adjust the buffer and check the effects.
Go to the Jack Control Panel and click setup. Go to the parameters panel. We see the default parameters used to generate the buffer of audio samples. Nominally 1024 Frames/Period and 3 Periods/Buffer gives an estimated delay value of 70 milliseconds or a fourteenth of a second .
Change the initial buffer parameters to 256 Frames/Period and 2 Periods/Buffer. Latency is a calculate 11.6 milliseconds or 1/90th of a second in Imperial.
This will result in a much shorter time lag between strumming the guitar and hearing the note come from the headphones. Try increasing the latency by selecting 256 Frames/Period and 2 Periods/Buffer now it is 186ms almost 1/5th of a second.
Can you hear this delay?
Quit GuitarixWatch the Graph display when you turn off Guitarix. The screen refreshes to update the disconnected sound equipment.
If you are interested in Audio Video Linux you can Install AVLinux to USB or HDD. It creates a permanent installation of linux that you can apply updates and keep projects.


Comments