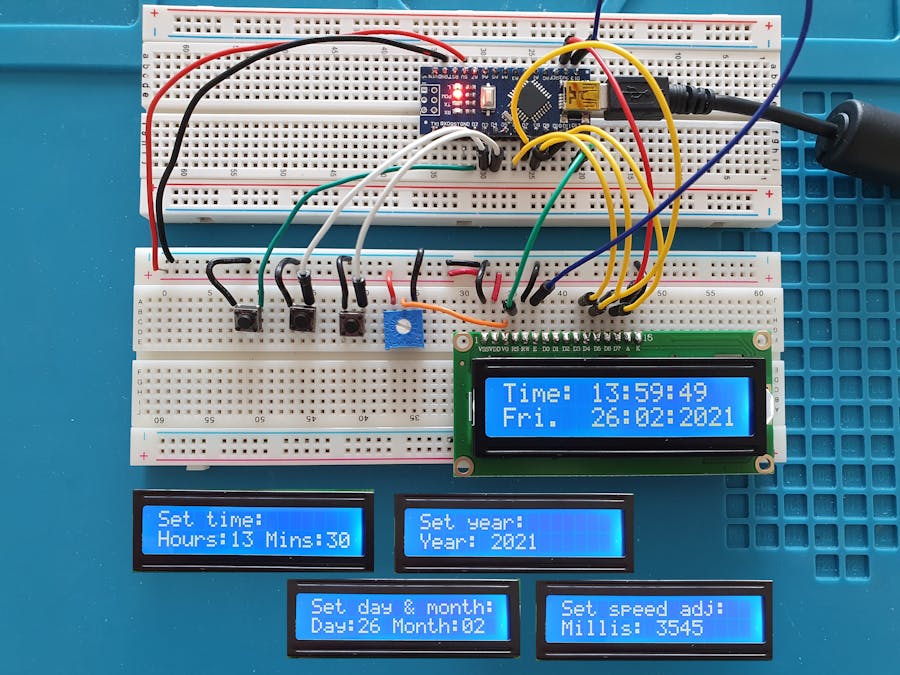
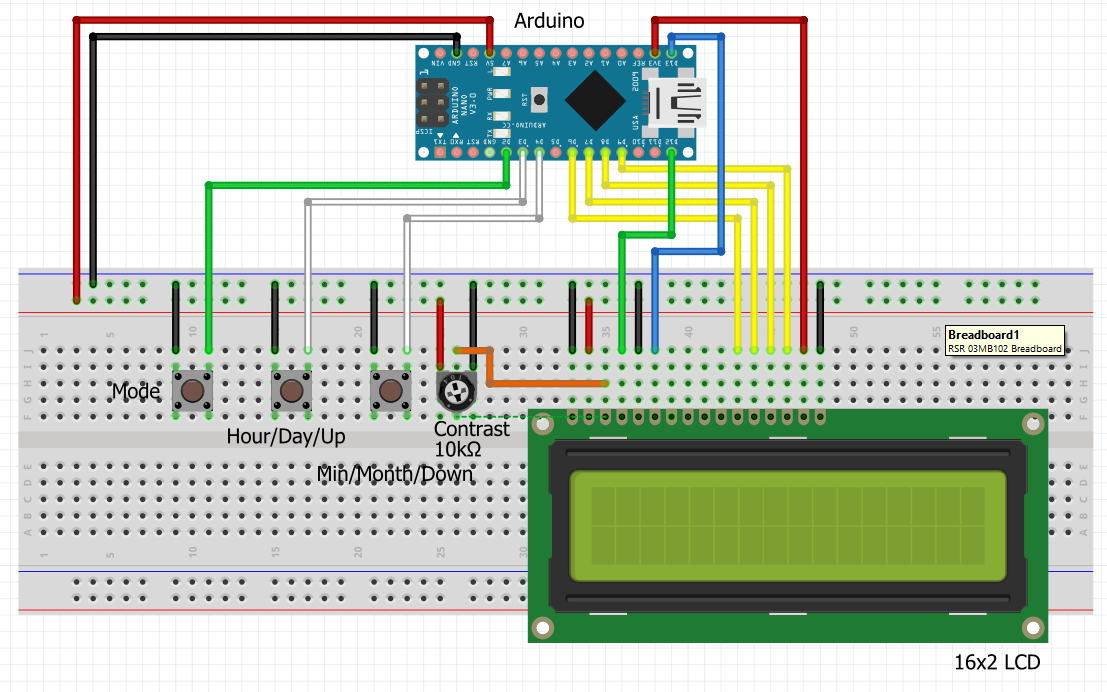
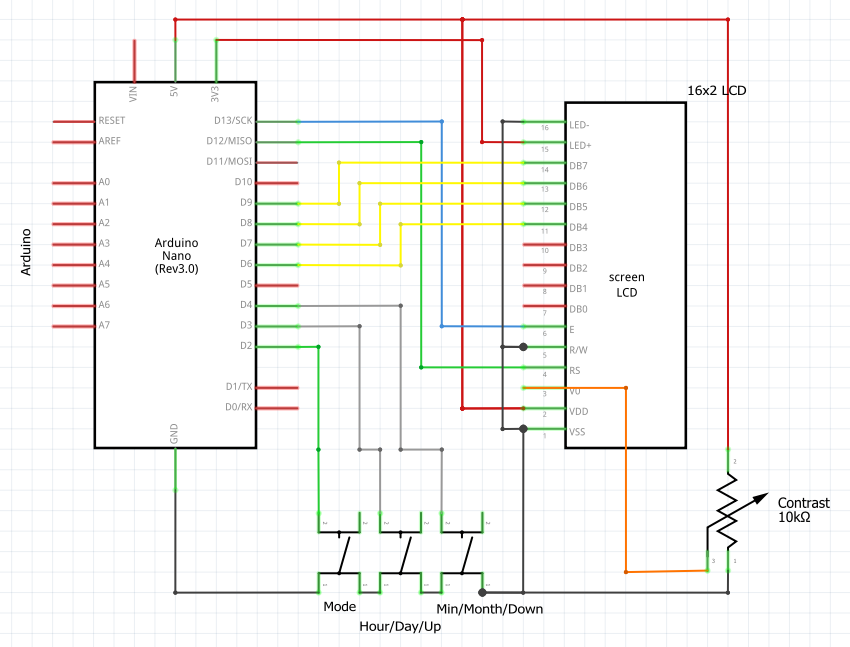
I started this as an academic exercise, but ended up with a very accurate clock. After running for 5 days, it had not lost or gained any time.
The main issue with using just an Arduino is that its internal clock speed is not 100% accurate. Hence if you just rely on this then the count of the milliseconds elapsed will be out by a small percentage and the clock you are creating will either loose or gain time. My approach was to test the accuracy of the Arduino I was using and determine how many milliseconds it lost or gained per hour. All that was then needed was to program a speed adjustment to add or deduct this difference from the internally tracked milliseconds each hour.
My other concern was whether the Arduino clock was consistently inaccurate, but as indicated, the clock I programmed has maintained very accurate time over 5 days so it appears that the inaccuracy is consistent.
The second issue is that the internal millis() function resets itself every 50 days or so and you cannot manipulate the millisecond count. Hence, the answer was to replace the millis() interrupt using a counter that I could manipulate and that would count the milliseconds from midnight, resetting each day removing any run time restrictions.
Assessing the inaccuracyTo assess the inaccuracy, I made the assumption that my computer clock, and hence the millis() in Processing was accurate. I therefore created a program for the Arduino to send the number of milliseconds elapsed since handshaking to Processing once every 2 seconds and a script for Processing to read this and compare it to its elapsed milliseconds displaying a real time result and the difference after an hour had elapsed. This gave the number of milliseconds that had been lost or gained in an hour and therefore the value to use for the speed adjustment in the clock program.
The code for the Arduino program and the Processing script are provided below.
If you do not have Processing installed, visit https://processing.org where you can download and learn about it.
The clock codeThe main areas of interest in the clock code are the setting of the interrupt, how this is used and the way the date is held and manipulated.
The interrupt
The following code will set an interrupt that will trigger every millisecond. This diverts the interrupt used to maintain millis() so millis() and delay() will no longer work.
 // Set up  time interrupt - millis() rolls over after 50 days so
 // we are using our own millisecond counter which we can reset at
 // the end of each day
 //Set the CTC mode Compare time and trigger interrupt
 TCCR0A = (1 << WGM01);
 //Set value for time to compare to ORC0A for 1ms = 249  (8 bits so max is 256)
 //[(Clock speed/Prescaler value)*Time in seconds] - 1
 //[(16,000,000/64) * .001] - 1 = 249 = 1 millisecond
 OCR0A = 0xF9;
 //set timer compare interrupt
 TIMSK0 |= (1 << OCIE0A);
 //Set the prescale 1/64 clock
 // ie 110 for last 3 bits
 TCCR0B |= (1 << CS01);
 TCCR0B |= (1 << CS00);
 //initialize counter value to 0
 TCNT0  = 0;
 //Enable interrupt
 sei();
This is the code that will be called every second:
// This is interrupt is called when the compare time has been reached
// hence will be called once a millisecond based on the
// OCR0A register setting.
ISR(TIMER0_COMPA_vect) {
 if (currentMode != SET_TIME)
   currentTime++;
 elapsed++;
}
currentTime and elapsed are unsigned long variables. Note that these are qualified as volatile when defined as we are also manipulating the variables in the main code. This forces the system to read the variable every time it is used and not use a cached value.
currentTime stores the number of milliseconds since midnight and there are routines to convert this to HH:MM:SS and reset it when you set the time.
When 24 hours have elapsed, the system deducts the number of milliseconds in a day from the time and increases the date by 1 day. The clock is not therefore impacted by the maximum value that the variable can store, unlike millis().
 // If at end of the day reset time and increase date
 if ((currentMode == SHOW_TIME) &&
     (currentTime > millisecondsInADay)) {
   //Next day
   // Stop interrupts while reset time
   noInterrupts();
   currentTime -= millisecondsInADay;
   interrupts();
   currentDate++;
 }
Note that we disable interrupts while manipulating the currentTime variable otherwise the interrupt call could be triggered in the middle of the calculation to deduct millisecondsInADay corrupting the calculation.
After each hour has passed, the system adjust the number of milliseconds elapsed by the speed adjustment we calculated earlier, adjusting the current time to compensate for the fast or slow internal clock.
 // At the end of each hour adjust the elapsed time for
 // the inacuracy in the Arduino clock
 if (elapsed >= millisecondsInHour) {
   noInterrupts();
   // Adjust time for slow/fast running Arduino clock
   currentTime += speedCorrection;
   // Reset to count the next hour
   elapsed = 0;
   interrupts();
 }
Date storage and calculation
The date is held as a Julian date, which is the number of days that have elapsed since Monday, January 1, 4713 BC. Routines are included to calculate the Julian date and convert it back to the Gregorian calendar.
float JulianDate(int iday, int imonth, int iyear) {
 // Calculate julian date (tested up to the year 20,000)
 unsigned long d = iday;
 unsigned long m = imonth;
 unsigned long y = iyear;
 if (m < 3) {
   m = m + 12;
   y = y - 1;
 }
 unsigned long t1 = (153 * m - 457) / 5;
 unsigned long t2 = 365 * y + (y / 4) - (y / 100) + (y / 400);
 return 1721118.5 + d + t1 + t2;
}
void GregorianDate(float jd, int &iday, int &imonth, int &iyear) {
 // Note 2100 is the next skipped leap year - compensates for skipped leap years
 unsigned long f = jd + 68569.5;
 unsigned long e = (4.0 * f) / 146097;
 unsigned long g = f - (146097 * e + 3) / 4;
 unsigned long h = 4000ul * (g + 1) / 1461001;
 unsigned long t = g - (1461 * h / 4) + 31;
 unsigned long u = (80ul * t) / 2447;
 unsigned long v = u / 11;
 iyear = 100 * (e - 49) + h + v;
 imonth = u + 2 - 12 * v;
 iday = t - 2447 * u / 80;
}
The adjusting buttons
The Mode button advances the current mode from Show Time, to Set Time, Set Year, Set Date, Set Speed Adjustment and back to Show Time. Each of these are self explanatory and use the other 2 buttons to adjust the current setting.
Once the clock is running, if it is gaining or loosing time, you can change the speed adjustment, by accessing the Set Speed Adjustment mode and using the up and down button to increase or reduce this by 5 seconds at a time.


Comments
Please log in or sign up to comment.