If you are a beginner, you can learn more about Arduino - Wifi.
When creating Arduino-powered devices, there are some parameters that can be changed by user during operation (such as UART baud rate, schedules...). It's inconvenient if we do the hard-coding these parameters. If you do so, each time users want to change a parameter, they have to make a change in code, and then re-upload Arduino code to the board again.
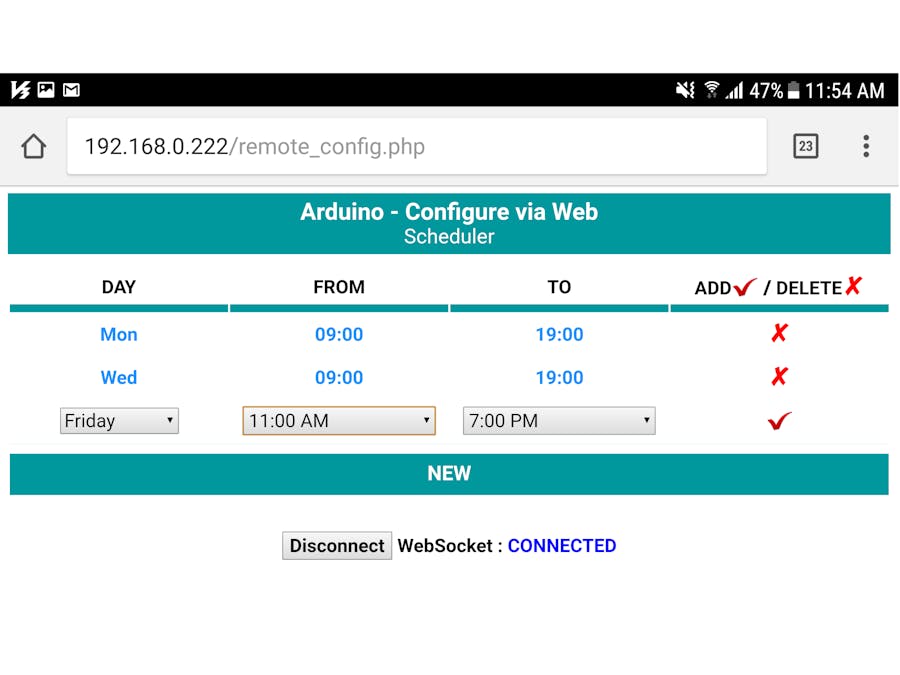
There is a solution for it. Let users set these parameters via Web any time they want. These parameters will be stored in EEPROM that information is not lost when the power is down.
This tutorial shows how to do it. I take the setting schedule via Web as an example. Let's start!
DemonstrationArduino blinks an LED if the current time is on a schedule. If not, Arduino turns off the LED.
Working Flow of ArduinoRight after booting up (see setup() function in Arduino code)
Arduino wil load the existing schedules from EEPROM.
Schedule is stored in EEPROM in CSV format. Each schedule is stored in a line. Each parameter in a schedule is separated by comma. For example, There are two schedules: Monday, from 8h:00 to 15:00h and Friday, from 9:30h to 17:00h. They will be stored in EEPROM as follows:
1,08:00,15:00\n
5,08:00,15:00\n
where "1" and "5" represent for Monday and Friday, respectively.
In infinite loop (see loop() function in Arduino code)
- Arduino check whether there is any the incoming setting from Web or not (see Setting Schedule via Web for detail).
- Arduino check whether current time is on schedule or not. It get the current time, compare the time with time in the loaded schedules one by one. If the current time is on a schedule, it will do the some works. In my code, to make it simple, if the current time is on a schedule, Arduino will blink a LED. If not, Arduino turn off LED.
bool isOnSchedule(void) {
	int day, hour, minute;
	day		= datetime.dayofWeek();
	hour	= datetime.hour();
	minute	= datetime.minute();
	for(int i = 0; i < numSchedule; i++) {
		if(day == scheduleArray[i][DAY]) {
			int curTime, startTime, endTime;
			curTime		= hour * 60 + minute;
			startTime	= scheduleArray[i][START_HOUR] * 60 + scheduleArray[i][START_MINUTE];
			endTime		= scheduleArray[i][END_HOUR] * 60 + scheduleArray[i][END_MINUTE];
			if(curTime >= startTime && curTime < endTime)
				return true;
		}
	}
	return false;
}see scheduleLoop(void) function
This function keeps the role in communicating with Web application. It communication with Web via set of commands:
Command from Web to Arduino
- CMD_ARDUINO_CLR : request Arduino to delete all existing schedules
- CMD_ARDUINO_GET : Request Arduino to send all the existing schedules to Web.
- CMD_ARDUINO_ADD + data : Request Arduino add a schedule.
Command from Arduinio to Web
- CMD_WEB_CLR: Request Web to clear all the schedule on User Interface.
- CMD_WEB_UPD + data : Send a schedule to Web.
Data Flow between Web and Arduino
WhenwebappconnectstoArduinoviawebsocket:
- Web sends CMD_ARDUINO_GET command to Arduino.
- Arduino reads all schedule from EEPROM
- Arduino send CMD_WEB_CLR command to Arduino
- Web clear all all schedule in UI
- Arduino send CMD_WEB_UPD command along with schedule to Arduino one by one
- Web adds the schedule in a schedule list and displays the receiving schedule in Web UI
Whenuseradds/deletesascheduleonWeb:
- Web adds/deletes the schedule from the schedule list and UI
- Web sends CMD_ARDUINO_CLR to Arduino
- Arduino deletes all existing schedules in EEPROM
- Web sends CMD_ARDUINO_ADD along with schedule (one by one) to Arduino
- Arduino write the schedule to EEPROM
- Set Wifi information for PHPoC shield or PHPoC WiFi Shield (SSID and password)
- Upload remote_config.php to PHPoC shield
- Write Arduino code
Setting Wifi Information for PHPoC Shield
Upload new Web UI to PHPoC Shield
- Download PHPoC source code remote_config.php (on code section).
- Upload it to PHPoC shield using PHPoC debugger according to this instruction (note that do NOT delete the existing file on PHPoC Shield)
Write Arduino Code
- Install PHPoC library for Arduino on Arduino IDE (see the instruction)
- See source code in code section.
- Compile and upload to Arduino via Arduino IDE
- Click serial button on Arduino IDE to see the IP address.
- Open web browser, type
http://replace_ip_address/remote_config.php - Click connect button and test it.


_ztBMuBhMHo.jpg?auto=compress%2Cformat&w=48&h=48&fit=fill&bg=ffffff)


Comments
Please log in or sign up to comment.