prem harshan
Published © MIT

Air Quality Monitor with LCD display

It is a compact and Real-time DIY air quality monitor operated with Arduino Uno.

IntermediateFull instructions provided3 hours324
Air Quality Monitor with LCD display

Things used in this project

Hardware components

MG 811
×1
MQ 131
×1
DHT 22
×1
Arduino UNO
Arduino UNO
×1
High Accuracy Pi RTC (DS3231)
Seeed Studio High Accuracy Pi RTC (DS3231)
×1
Jumper wires (generic)
×1
Toggle Switch, Toggle
×1
Nextion 2.8 inch Display
×1

Software apps and online services

Arduino IDE
Arduino IDE
nextioin simHub

Hand tools and fabrication machines
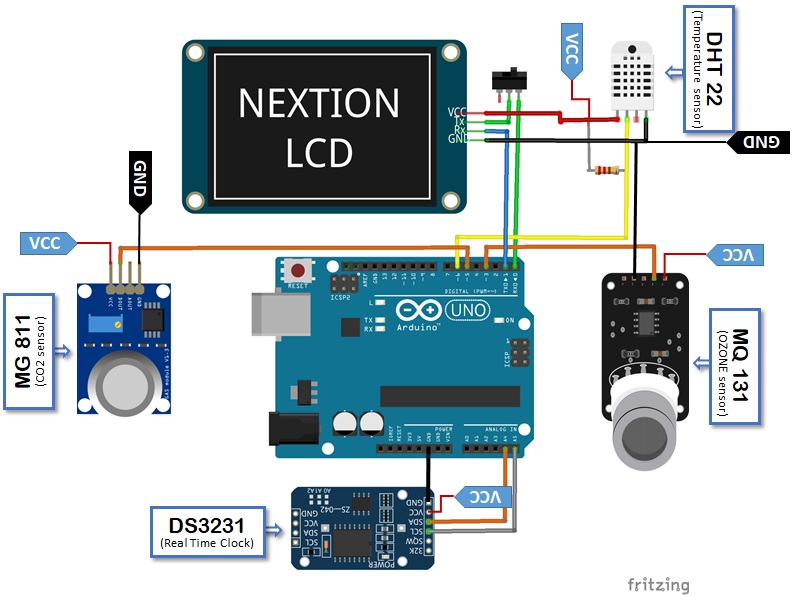
dot board

Story

Read more

Schematics

Connection diagram

Code

Code for Arduino uno

C/C++
Download all the mentioned library files form the Arduino IDE library.
/*
         DIY Air Quality Monitor
    this project is inspired by Dejan form HowToMechatronics youtube channel
*/
#include "CO2Sensor.h"     
#include "SoftwareSerial.h"
#include "MQ131.h"   // https://github.com/ostaquet/Arduino-MQ131-driver
#include "dht.h"     // https://github.com/RobTillaart/DHTlib
#include "DS3231.h"  // http://www.rinkydinkelectronics.com/library.php?id=73

/*
  For each sensor module I'm using libraries which can be found in the links above.
  For CO2 sensor the library has been attached with the git respositry ...
  For calibrating the sensors also use the libraries documentation
  For program of nextion display the source file is attached for further development 
  you have to download nextion editor software and program as per your requirements
  Also note that the code is not very well optimized.
*/

#define led 13
#define dht22 6  // DHT22 temperature and humidity sensor

dht DHT;             // Creats a DHT object
DS3231 rtc(A4, A5);  // Initiate the DS3231 Real Time Clock module using the I2C interface
Time t;              // Init a Time-data structure
CO2Sensor co2Sensor(3, 0.99, 100);
unsigned long dataTimer = 0;
unsigned long dataTimer3 = 0;
unsigned long dataTimer4 = 0;
int readDHT, temp, hum;
int o3;
int hours, minutes;
int previousMinutes = 1;
int CO2;
String timeString;
String receivedData = "Z";
// We store the last 24 hours sensor values  in arrays - store value each 15 minutes so for 24 hours we need 96 bytes.
// We must use bytes and can't increse the storing to let's say 5 mins because the Arduino uno has a limited dynamic memory
uint8_t tempData[96] = {};
uint8_t humData[96] = {};
uint8_t o3Data[96] = {};
uint8_t co2Data[96] = {};
int8_t last24Hours[12] = {};
int yAxisValues[4] = {};
int maxV = 0;
int8_t r = 99;

void setup() {
  Serial.begin(9600);
  // Device to serial monitor feedback
  pinMode(5, OUTPUT);
  pinMode(3, OUTPUT);

  // calibrate the sensor
  digitalWrite(5, HIGH);  
  delay(20 * 1000);       // delay 20 seconds
  digitalWrite(5, LOW);
  co2Sensor.calibrate();

  // Initialize all sensors
  rtc.begin();
  MQ131.begin(5, A0, LOW_CONCENTRATION, 1000000);  
  MQ131.setTimeToRead(20);                         // Set how many seconds we will read from the Ozone sensor. It blocks flow
  MQ131.setR0(41666668);                           // We get this value using the calirabrate() function from the Library calibration example
}

void loop() {
  // Read temperature and humidity from DHT22 sensor
  readDHT = DHT.read22(dht22);  // Reads the data from the sensor
  temp = DHT.temperature;       // Gets the values of the temperature
  hum = DHT.humidity;
  // Gets the values of the humidity
  //read the co2 sensor value
  checkForIncomingData();

  CO2 = co2Sensor.read();

  // Read MQ131 Ozone sensor
  checkForIncomingData();

  MQ131.sample();
  /* This is also a blocking function which is using delay.
     When callibrating the Ozone sensor you will notice that the reading time, in order to get stable readings is usually high, like more then a minute.
     But if we use it here just like that everyting will be freezed for that time. However, you can set the sampling time lower, but the output might not be accurate in such a case.
     Also,you set the ozone sensor heater to be active all the time in order to get more accurate results, but this may cause significant heat from the sensor so you would need a case fan in order to accurate values from the temp sensor.
     I suggest trying the library examples for calibrating and see what will get you test best results. I would also suggest not including this sensor in this project unless you really want it.
  */
  o3 = MQ131.getO3(PPB);

  checkForIncomingData();

  // Get the time from the DS3231 Real Time Clock module - For setting the time use the library example
  t = rtc.getTime();
  hours = t.hour;
  minutes = t.min;
  // Store current sensors data
  storeData();

  // Send the data to the Nextion display
  dataTimer4 = millis();
  while (millis() - dataTimer4 <= 200) {

    // each command ends with these three unique write commands in order the data to be send to the Nextion display
    Serial.print("o3V.val=");
    Serial.print(o3);
    Serial.write(0xff);
    Serial.write(0xff);
    Serial.write(0xff);

    Serial.print("tempV.val=");
    Serial.print(temp);
    Serial.write(0xff);
    Serial.write(0xff);
    Serial.write(0xff);

    Serial.print("humV.val=");
    Serial.print(hum);
    Serial.write(0xff);
    Serial.write(0xff);
    Serial.write(0xff);

    Serial.print("co2V.val=");
    Serial.print(CO2);
    Serial.write(0xff);
    Serial.write(0xff);
    Serial.write(0xff);
  }
}

void checkForIncomingData() {
  // Check if data is coming from the Nextion
  if (Serial.available() > 0) {
    receivedData = Serial.readString();
    delay(30);
    if (receivedData == "0") {
      r = 0;
    }
    if (receivedData == "1") {
      r = 1;
    }
    if (receivedData == "2") {
      r = 2;
    }
  }


  // if we have received any data, send data to the Nextion display to change to page 1, or the waveform
  if (r == 0 || r == 1 || r == 2) {
    delay(200);
    dataTimer3 = millis();
    while (millis() - dataTimer3 <= 200) {
      Serial.print("pageSwitch.val=");  // Activate page 1, or the waveform on the Nextion display
      Serial.print(1);
      Serial.write(0xff);
      Serial.write(0xff);
      Serial.write(0xff);
    }
    delay(100);
    getLast24Hours();      // get the last 24 hours and print them on as X-axis values on the waveform
    getYAxisValues();      // get the Y-axis values according to the sensor, it's range and it's max value. Print the Y-axis values as well as scale the Y-axis of the wavefrom accordingly
    sendDataToWaveform();  // send the stored data of the last 24 hours to the waveform
    r = 99;                // reset the "r" to 99(arbitrary number, different than the ones we assign when we receive data depending on which sensor we have pressed)
  }
}
void storeData() {
  // Storing current sensor values into arrays
  if ((minutes - previousMinutes) >= 15) {              // store the value each 15 minutes
    memmove(tempData, &tempData[1], sizeof(tempData));  // Slide data down one position
    tempData[sizeof(tempData) - 1] = temp;              // store newest value to last position
    memmove(humData, &humData[1], sizeof(humData));
    humData[sizeof(humData) - 1] = hum;
    memmove(co2Data, &co2Data[1], sizeof(co2Data));
    co2Data[sizeof(co2Data) - 1] = map(CO2, 0, 3000, 0, 255);
    memmove(o3Data, &o3Data[1], sizeof(o3Data));
    o3Data[sizeof(o3Data) - 1] = map(o3, 0, 1000, 0, 255);
    previousMinutes = minutes;

  }
  // So these if statemets check whether have passed 15 mins since the last time we stored a value - you can change this to any minutes you want, but you need to do that on both if statemets, for example "10" in the first if statement, and "-50" in the second if statement
  else if ((minutes - previousMinutes) == -45) {        // when minutes start from 0, next hour
    memmove(tempData, &tempData[1], sizeof(tempData));  // Slide data down one position
    tempData[sizeof(tempData) - 1] = temp;              // store newest value to last position
    memmove(humData, &humData[1], sizeof(humData));
    humData[sizeof(humData) - 1] = hum;
    memmove(co2Data, &co2Data[1], sizeof(co2Data));
    co2Data[sizeof(co2Data) - 1] = map(CO2, 0, 3000, 0, 255);
    memmove(o3Data, &o3Data[1], sizeof(o3Data));
    o3Data[sizeof(o3Data) - 1] = map(o3, 0, 1000, 0, 255);
    previousMinutes = minutes;
  }
}

void getLast24Hours() {
  for (int i = 11; i >= 0; i--) {
    last24Hours[11] = hours; 
       last24Hours[i - 1] = last24Hours[i] - 2;
    if (last24Hours[i - 1] < 0) {
      for (int k = -0; k > -11; k--) {
        if (last24Hours[i - 1] == k) {
          last24Hours[i - 1] = 24 + k;
        }
      }
    }
  }
  // send the hours values to the Nextion display
  for (int i = 0; i < 12; i++) {
    String last24 = ("n") + String(i) + String(".val=") + String(last24Hours[i]);  // e.g. for i=0 > "n0.val="
    Serial.print(last24);
    Serial.write(0xff);
    Serial.write(0xff);
    Serial.write(0xff);
    delay(10);
  }
  // Another write just to make sure it sends all data
  for (int i = 0; i < 12; i++) {
    String last24 = ("n") + String(i) + String(".val=") + String(last24Hours[i]);  // e.g. for i=0 > "n0.val="
    Serial.print(last24);
    Serial.write(0xff);
    Serial.write(0xff);
    Serial.write(0xff);
    delay(5);
  }
}
// With the following custom function we set the Y axis value for each sensor individually, as each sensor has different maximum value for the Y axis
void getYAxisValues() {
  maxV = 0;
  // CO2 Y-axis values are fixed from 0 to 3000 so we don't need to look for the max value in the array
  if (r == 0) {
    // Get the max sensor value from the last 24 hours
    for (int i = 0; i < sizeof(co2Data); i++) {
      if (maxV < map(co2Data[i], 0, 255, 0, 3000)) {
        maxV = map(co2Data[i], 0, 255, 0, 3000);
      }
    }
    if (maxV <= 2000) {
      // Setting the Y-axis values and scaling the waveform
      yAxisValues[0] = 500;
      yAxisValues[1] = 1000;
      yAxisValues[2] = 1500;
      yAxisValues[3] = 2000;
      Serial.print("s0.dis=");
      Serial.print(117);  // scale the waveform from 0 - 3000 to 0 - 2000 range
      Serial.write(0xff);
      Serial.write(0xff);
      Serial.write(0xff);
    }
    if (maxV > 2000) {
      // Setting the Y-axis values and scaling the waveform
      yAxisValues[0] = 750;
      yAxisValues[1] = 1500;
      yAxisValues[2] = 2250;
      yAxisValues[3] = 3000;
      Serial.print("s0.dis=");
      Serial.print(78);
      Serial.write(0xff);
      Serial.write(0xff);
      Serial.write(0xff);
    }
  }
  // Ozone Y-axis values
  if (r == 1) {
    // Get the max sensor value from the last 24 hours
    for (int i = 0; i < sizeof(o3Data); i++) {
      if (maxV < map(o3Data[i], 0, 255, 0, 1000)) {
        maxV = map(o3Data[i], 0, 255, 0, 1000);
      }
    }
    // Setting the Y-axis values and scaling the waveform
    if (maxV <= 100) {
      yAxisValues[0] = 25;
      yAxisValues[1] = 50;
      yAxisValues[2] = 75;
      yAxisValues[3] = 100;
      Serial.print("s0.dis=");
      Serial.print(78 * 10);
      Serial.write(0xff);
      Serial.write(0xff);
      Serial.write(0xff);
    } else if (maxV > 100) {
      int l = ((maxV / 100) + 1) * 100;  // get the hundreds value so we can properly scale the Y axis of the waveform
      yAxisValues[0] = l / 4;
      yAxisValues[1] = l / 2;
      yAxisValues[2] = l * 3 / 4;
      yAxisValues[3] = l;
      float ll = 78.0 / (l / 1000.0);  // scale value for the Y-axis in % - We multiply by 78 instead of 100 because our waveform is 200px in height, which is 78% of 255 (255 is max value the waveform can accept, 1 byte)
      Serial.print("s0.dis=");
      Serial.print(round(ll));
      Serial.write(0xff);
      Serial.write(0xff);
      Serial.write(0xff);
    }
  }

  // Temperature and Humidity Y-axis values - fixed from 0 to 100
  if (r == 2) {
    // Setting the Y-axis values and scaling the waveform
    yAxisValues[0] = 25;
    yAxisValues[1] = 50;
    yAxisValues[2] = 75;
    yAxisValues[3] = 100;
    Serial.print("s0.dis=");
    Serial.print(200);  // from 0 to 100 - 255/100 * 78 = ~200
    Serial.write(0xff);
    Serial.write(0xff);
    Serial.write(0xff);
  }
  delay(50);
  // Send the  Y-axis values to the Nextion display
  for (int i = 0; i < 4; i++) {
    String yValues = ("y") + String(i) + String(".val=") + String(yAxisValues[i]);  // e.g. for i=0 > "y0.val="
    Serial.print(yValues);
    Serial.write(0xff);
    Serial.write(0xff);
    Serial.write(0xff);
    delay(10);
  }
}

void sendDataToWaveform() {
  int k = 0;
  while (k != 2) {
    String str = String("addt 1,0,") + String(288);  // with this command we tell the nextion display that we will send an array of data to the waveform
    Serial.print(str);
    delay(100);
    Serial.write(0xFF);
    Serial.write(0xFF);
    Serial.write(0xFF);
    delay(100);
    // Now depending on the selected sensor we want the values stored in the arrays
    //co2value on channel 2
    if (r == 0) {
      for (int t = 0; t < sizeof(co2Data); t++) {
        int z = 0;
        while (z != 3) {
          Serial.write(co2Data[t]);
          z++;
        }
      }
    }
    // Ozone
    if (r == 1) {
      // ozone values on channel 1
      for (int t = 0; t < sizeof(o3Data); t++) {
        int z = 0;
        while (z != 3) {
          Serial.write(o3Data[t]);
          z++;
        }
      }
    }
    // Temp and hum
    if (r == 2) {
      for (int t = 0; t < sizeof(humData); t++) {
        int z = 0;
        while (z != 3) {
          Serial.write(humData[t]);
          z++;
        }
      }
      delay(100);
      Serial.write(0xFF);
      Serial.write(0xFF);
      Serial.write(0xFF);
      delay(100);
      // Humidity values on channel 1
      String str = String("addt 1,1,") + String(288);
      Serial.print(str);
      delay(100);
      Serial.write(0xFF);
      Serial.write(0xFF);
      Serial.write(0xFF);
      delay(100);
      for (int t = 0; t < sizeof(tempData); t++) {
        int z = 0;
        while (z != 3) {
          Serial.write(tempData[t]);
          z++;
        }
      }
      delay(100);
      Serial.write(0xFF);
      Serial.write(0xFF);
      Serial.write(0xFF);
    }

    k++;
  }
}

Code for Nextion display

C/C++
Download the simHUB tool form the provided link to view the source code.
No preview (download only).

Credits

prem harshan

prem harshan

1 project • 0 followers

Comments