In this project, we'll see how to hook up a 16x2 Character I2C LCD module with a ProtoStax Enclosure for Raspberry Pi to display interesting information like the Pi's IP Address, Date & Time, or any other information you would like to display!
The ProtoStax LCD Kit V2 is a new Extension Kit from ProtoStax. It can be used to add a 16x2 Character I2C LCD module to any ProtoStax Enclosure. You simply replace the top of your existing ProtoStax Enclosure with the one from the kit with the LCD module installed, and you'll have an enclosure with an LCD screen!
Firstly, mount the LCD screen from the kit to the Top Plate from the kit using the mounting hardware. Then, unscrew and remove the Top Plate from your ProtoStax Enclosure Raspberry Pi (A+/B+, 4B/Zero) and replace it with the LCD Kit Top Plate.
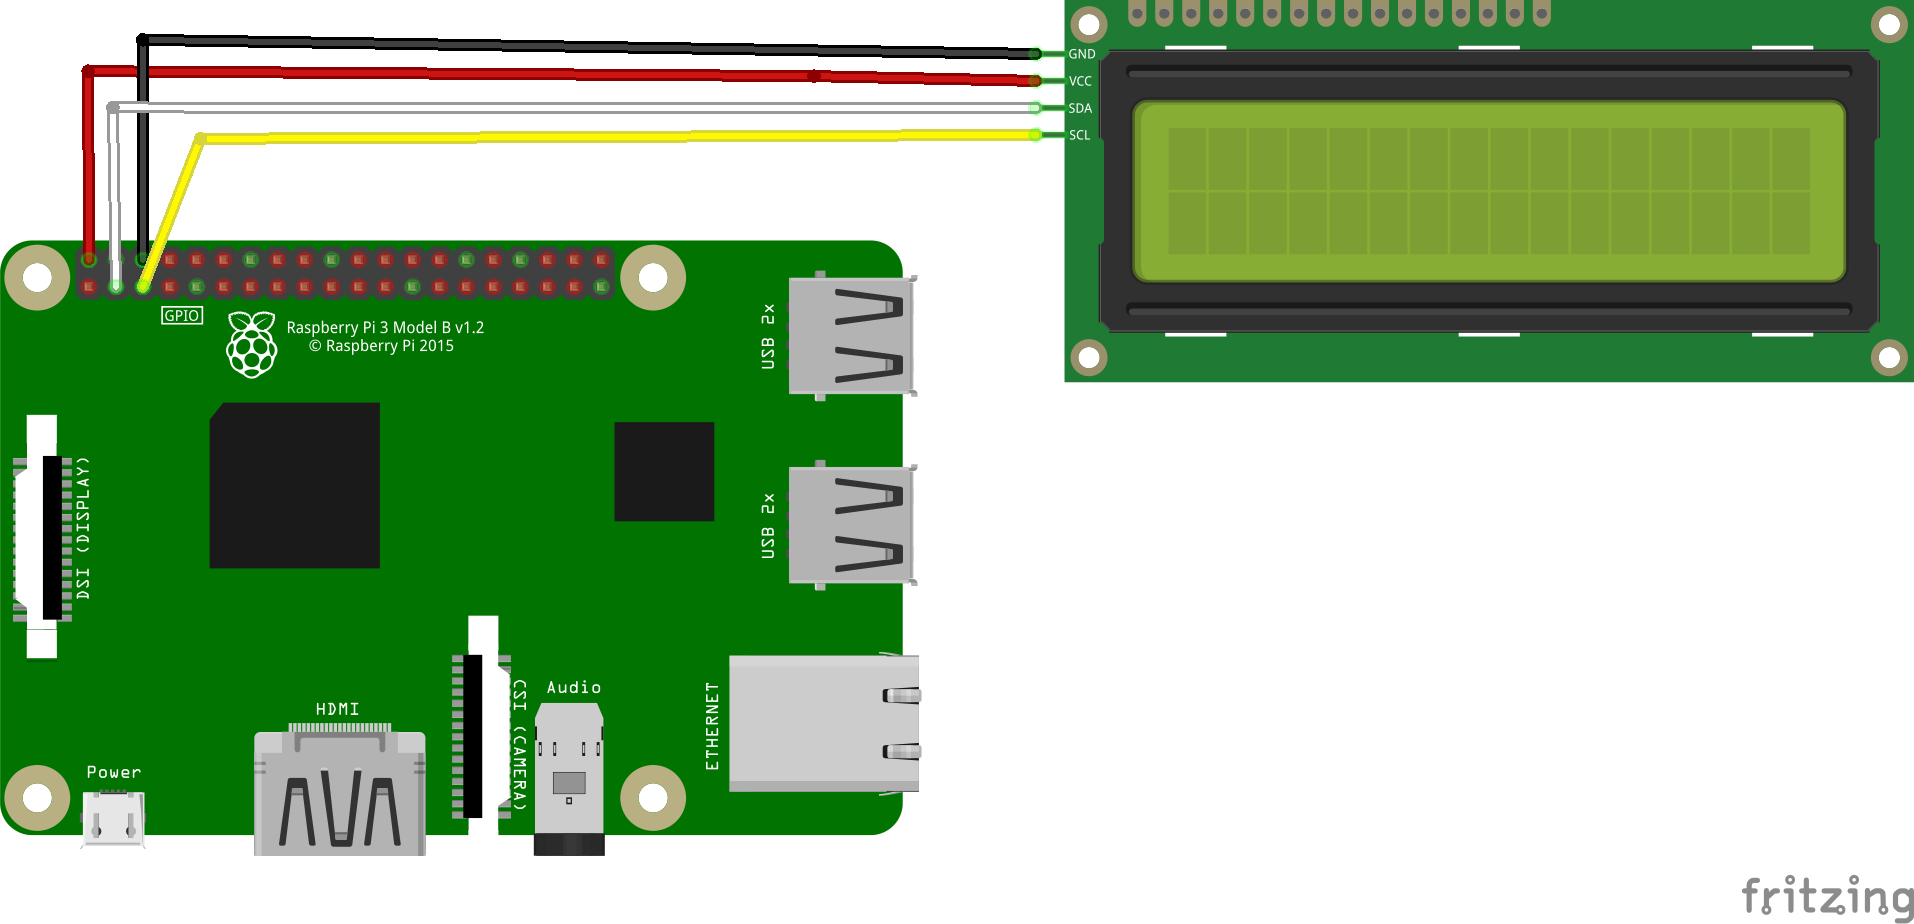
WiringUsing Female-Female jumper wires, make the connections from the LCD module to the Raspberry Pi.
Since the LCD module that is used has an I2C adapter, you only need 2 I2C pins to communicate with it. Wiring is super easy.
- RPi 5v pin (physical pin 2) - LCD VCC
- RPi GND pin (physical pin 6) - LCD GND
- RPi SDA (physical pin 3) - LCD SDA
- RPi SCL (physical pin 5) - LCD SCL
Next, we want to enable I2C on the Raspberry Pi (if it is not already enabled). You can do that using the raspi-config utility. Here are the steps to do so. You will first run
$ sudo raspi-configon your bash Terminal.
We are going to interact with the LCD using Python. To do that, we are going to use the install the necessary python packages - we use RPLCD and smbus (to use I2C to communicate with the LCD module).
$ sudo pip3 install RPLCD

$ sudo apt-get install python-smbus
We'll demonstrate printing the IP address and Date and Time on the LCD screen, using the Python program below. You can find the source code on the GitHub link below.
Assuming you've installed it in ProtoStax_RPi_LCD_Example/ under your home directory, launch the program thus:
$ python3 /home/pi/ProtoStax_RPi_LCD_Example/lcd_ip.pyThis displays the Date and Time on the first line, and the second line of the 16x2 display shows the IP address and hostname of the Raspberry Pi in a scrolling fashion (as the character count is longer than 16 characters, we have to resort to scrolling). The <hostname>.local can be used to address the Raspberry Pi (e.g raspberrypi.local for the default installation) without knowing its IP address, using mDNS (or multicast DNS). mDNS is supported out of the box on newer versions of Raspberry Pi OS by using the avahi service.
If the network is down on unreachable, then the IP address and hostname will be empty - therefore with a quick glance you can tell about the connection status of your Raspberry Pi as well as know how to connect to it, if it is headless. Just use the IP address or use <hostname>.local (on systems that support mDNS - earlier versions of Windows 10 may not support it).
Start on BootNow we want to make sure that this script gets run when we boot up the computer. We therefore create a service (which we call lcd.service) and make sure that the service is enabled (this assumes that the lcd_ip.py Python script is in the /home/pi/ProtoStax_RPi_LCD_Example directory - adjust the path accordingly in the WorkingDirectory below)
We write the following to /etc/systemd/system/lcd.service file:
[Unit]
Description=ProtoStax LCD IP Display
After=multi-user.target
[Service]
Type=simple
ExecStart=/usr/bin/python3 lcd_ip.py
WorkingDirectory=/home/pi/ProtoStax_RPi_LCD_Example
Restart=always
User=pi
[Install]
WantedBy=multi-user.target
to enable the service we do
$ sudo systemctl enable lcd.serviceAfter this when we reboot the Raspberry Pi, the lcd service will get started at boot up.
When shutting down the computer, the service gets stopped, and the python script as part of cleanup will clear the LCD screen and turn off the backlight.
Going FurtherOf course, you can also use the LCD display to display other information. For example, you can
- create a stock ticker that shows a scrolling ticker of stock prices you are interested in
- Display temperature and humidity of your local area weather
- Show the number of likes on your social media profile
- and more! 😊
As a little headless display you can place anywhere, the sky is the limit to what creative information you can display on your Pi's LCD screen!
Let us know in the comments below if you found this useful and also what data display ideas you have or have implemented!
Happy Making!
The ProtoStax Team 😊


Comments
Please log in or sign up to comment.