


Hardware components | ||||||
 |
| × | 1 | |||
 |
| × | 1 | |||
 |
| × | 1 | |||
Software apps and online services | ||||||
 |
| |||||
Hand tools and fabrication machines | ||||||
 |
| |||||
This is an on-going project but I attached what I've got so far. The software part is done, all is left to do is the hardware, mounting the case, the pump, and the power supply.
The system is designed to control the beer temperature while fermentation. It's very important to have a stable low temperature, or else the beer while spoil.
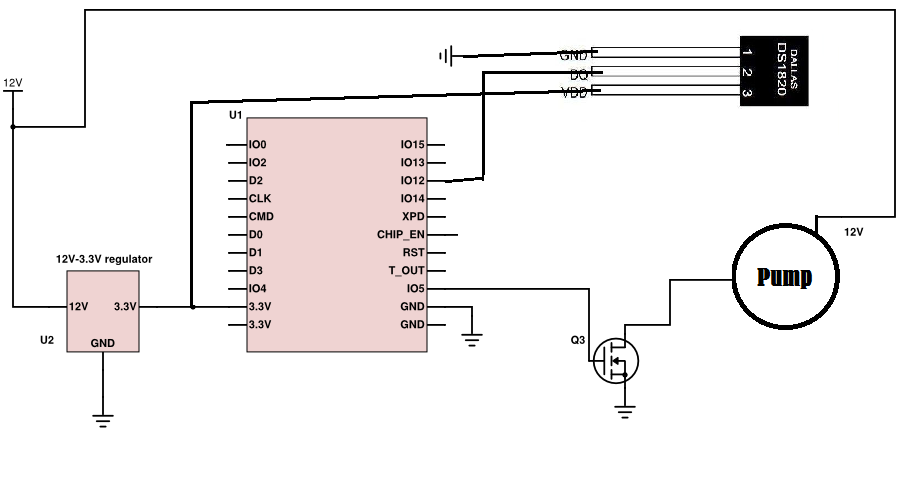
The main controller is the Sparkfun Blynk, based on ESP8266 microchip, the code is written in Arduino C, the temperature is read from a waterproof DS18B20 and the cold water pump is controlled with N Channel Transistor. (I used QP30N06L)
Below it's the small interface I designed in Blynk app, Having 2 Labeled value charts, a Graph, the button and the second Temp Labeled Value are not used currently. Take not of your projects Auth Token.
First step was to add the board in the Arduino IDE.
Open the IDE, go to File/Preference and paste the above link into Arduino Boards Manager URLS, and click Ok:
https://raw.githubusercontent.com/sparkfun/Arduino_Boards/master/IDE_Board_Manager/package_sparkfun_index.json
Then we need to add the libraries. Go to Sketch/Include library/Manage libraries. Search and add the latest versions of OneWire and DallasTemperature
libraries. Also add the libraries added in the Resource by Add from ZIP option.
Then get the Auth Token from Blynk app project, and along with the Wifi's SSID and the password, paste it in the attached code.
Connect the board and upload the code.
Currently I'm designing the pump to pull the cold water into the cooler, a 12v water pump. Therefore a 12v led array is perfect for testing. The logic is as follows:
- The board is making readings every 1s and compare the value with the one in the if loop.
- If the temperature is more or equal with 30 Degrees Celsius, then the motor starts running. If not the motor is stopped. Of course, 30 Degrees is a big temperature for fermentation (I'll go for 20-22 C)


_3u05Tpwasz.png?auto=compress%2Cformat&w=40&h=40&fit=fillmax&bg=fff&dpr=2)
Comments
Please log in or sign up to comment.