/*
written by raef atef
raef.madim@gmail.com
this code for Dance pad with 1sheeld
*/
#define CUSTOM_SETTINGS
#define INCLUDE_GLCD_SHIELD
#define INCLUDE_MUSIC_PLAYER_SHIELD
/* Include 1Sheeld library. */
#include <OneSheeld.h>
int c = 0; // counter of score
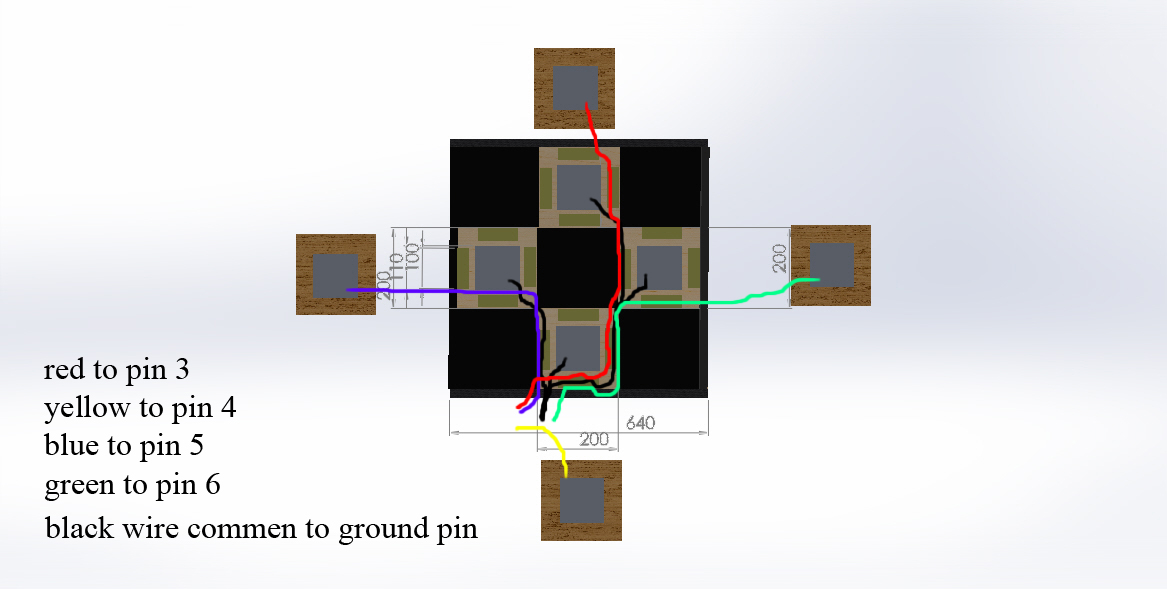
int up = 3;
int down = 4;
int left = 5;
int right = 6;
int x = 0;
int y = 0;
GLCDTextBox score(1, 1, "score:");
GLCDTextBox number(40, 1, "0");
char charArray[5];
void setup()
{
/*pinmode */
pinMode(up, INPUT);
digitalWrite(up, HIGH); // turn on pullup resistors
pinMode(down, INPUT);
digitalWrite(down, HIGH); // turn on pullup resistors
pinMode(left, INPUT);
digitalWrite(left, HIGH); // turn on pullup resistors
pinMode(right, INPUT);
digitalWrite(right, HIGH); // turn on pullup resistors
/* Start communication. */
OneSheeld.begin();
/* Clear the GLCD. */
GLCD.clear();
}
void loop() {
MusicPlayer.play();
x = selectrandom(); //draw dance instruction random
delay(700);
y = button(); //return the value of button fun
if (x == y)
{
MusicPlayer.play();
c++; //count score
}
else
{
MusicPlayer.pause();
}
GLCD.clear();
String(c).toCharArray(charArray, 5);
number.setText(charArray);
GLCD.draw(score);
GLCD.draw(number);
}
int selectrandom()
{
int x = 0;
x = random(1, 5);
if (x == 1) arrow(110, 70, 40, 40, "up");
if (x == 2) arrow(110, 60, 40, 40, "down");
if (x == 3) arrow(60, 43, 40, 40, "left");
if (x == 4) arrow(200, 43, 40, 40, "right");
return x;
}
int button()
{
int y = 0;
if (digitalRead(up) == LOW) return y = 1;
if (digitalRead(down) == LOW) return y = 2;
if (digitalRead(left) == LOW) return y = 3;
if (digitalRead(right) == LOW) return y = 4;
else return y = 0;
}
//don't edit any thing in arrow function
void arrow(int x, int y, int width, int lenght, char *t)
{
if (t == "right")
{
GLCDLine line(x, y, (x + lenght) - (0.4 * lenght), y);
GLCDLine line1(x, y + width, (x + lenght) - (0.4 * lenght), y + width);
GLCDLine line2(x, y, x, y + width);
GLCDLine line3((x + lenght) - (0.4 * lenght), y + width , (x + lenght) - (0.4 * lenght), y + 1.3 * width);
GLCDLine line4((x + lenght) - (0.4 * lenght), abs( y - .3 * width), (x + lenght) - (0.4 * lenght), y);
GLCDLine line5((x + lenght) - (0.4 * lenght), y + 1.3 * width, x + lenght , y + .5 * width);
GLCDLine line6((x + lenght) - (0.4 * lenght), abs( y - .3 * width), x + lenght, y + .5 * width);
GLCD.draw(line);
GLCD.draw(line1);
GLCD.draw(line2);
GLCD.draw(line3);
GLCD.draw(line4);
GLCD.draw(line5);
GLCD.draw(line6);
}
if (t == "left")
{
GLCDLine line(x, y, abs( (x - lenght) + (0.4 * lenght)), y);
GLCDLine line1(x, y + width, abs( (x - lenght) + (0.4 * lenght)), y + width);
GLCDLine line2(x, y, x, y + width);
GLCDLine line3(abs( (x - lenght) + (0.4 * lenght)), y + width , abs( (x - lenght) + (0.4 * lenght)), y + 1.3 * width);
GLCDLine line4(abs( (x - lenght) + (0.4 * lenght)), abs( y - .3 * width), abs( (x - lenght) + (0.4 * lenght)), y);
GLCDLine line5(abs( (x - lenght) + (0.4 * lenght)), y + 1.3 * width, abs( x - lenght) , y + .5 * width);
GLCDLine line6(abs( (x - lenght) + (0.4 * lenght)), abs( y - .3 * width), abs( x - lenght), y + .5 * width);
GLCD.draw(line);
GLCD.draw(line1);
GLCD.draw(line2);
GLCD.draw(line3);
GLCD.draw(line4);
GLCD.draw(line5);
GLCD.draw(line6);
}
if (t == "down")
{
GLCDLine line(x, y, x, (y + lenght) - (0.4 * lenght));
GLCDLine line1(x + width, y, x + width, (y + lenght) - (0.4 * lenght));
GLCDLine line2(x, y, x + width, y);
GLCDLine line3(x + width, (y + lenght) - (0.4 * lenght), x + 1.3 * width, (y + lenght) - (0.4 * lenght));
GLCDLine line4(abs( x - .3 * width), (y + lenght) - (0.4 * lenght), x, (y + lenght) - (0.4 * lenght) );
GLCDLine line5(x + 1.3 * width, (y + lenght) - (0.4 * lenght), x + .5 * width, y + lenght);
GLCDLine line6(abs( x - .3 * width), (y + lenght) - (0.4 * lenght), x + .5 * width, y + lenght);
GLCD.draw(line);
GLCD.draw(line1);
GLCD.draw(line2);
GLCD.draw(line3);
GLCD.draw(line4);
GLCD.draw(line5);
GLCD.draw(line6);
}
if (t == "up")
{
GLCDLine line(x, y, x, abs((y - lenght) + (0.4 * lenght)));
GLCDLine line1( x + width, y, x + width, abs((y - lenght) + (0.4 * lenght)));
GLCDLine line2(x, y, x + width, y);
GLCDLine line3(x + width , abs( (y - lenght) + (0.4 * lenght)), x + 1.3 * width, abs((y - lenght) + (0.4 * lenght)) );
GLCDLine line4(abs( x - .3 * width), abs( (y - lenght) + (0.4 * lenght)), x, abs((y - lenght) + (0.4 * lenght)));
GLCDLine line5(x + 1.3 * width, abs( (y - lenght) + (0.4 * lenght)), x + .5 * width, abs( y - lenght));
GLCDLine line6(abs( x - .3 * width), abs( (y - lenght) + (0.4 * lenght)), x + .5 * width, abs( y - lenght));
GLCD.draw(line);
GLCD.draw(line1);
GLCD.draw(line2);
GLCD.draw(line3);
GLCD.draw(line4);
GLCD.draw(line5);
GLCD.draw(line6);
}
}


_ztBMuBhMHo.jpg?auto=compress%2Cformat&w=48&h=48&fit=fill&bg=ffffff)


Comments