The Infineon "Connect things with code!" contest allows us to use Bundle B
- PSoC™ 62S2 Wi-Fi BT Pioneer Kit. This kit enables the design and debugging of the PSoC™ 62 MCU and the Murata 1LV Module Wi-Fi + Bluetooth Combo Chip.
We will be using the PSoC 62S2 Wi-Fi/Bluetooth Pioneer Kit and IoT Sense Expansion Kit.
PSoC 62S2 Wi-Fi/Bluetooth Pioneer Kit
The PSoC 62S2 Wi-Fi BT Pioneer Board has the PSoC 6 MCU (CY8C624ABZI-S2D44) & Murata 1LV ultra-small 2.4/5.0-GHz WLAN and Bluetooth functionality module, a 512-Mbit external Quad SPI NOR Flash, 4-Mbit Quad SPI F-RAM. It also has KitProg3 onboard SWD programmer/debugger, CapSense touch-sensing slider, onboard user LEDs, and buttons.
IoT sense expansion kit (CY8CKIT-028-SENSE)
The IoT sense expansion kit is a low-cost Arduino™ UNO compatible shield board that can be used to easily interface a variety of sensors with the PSoC™ 6 MCU platform, specifically targeted for audio and machine learning applications.
- Digital XENSIV™ MEMS Microphone(s)
- Digital XENSIV Barometric Air Pressure Sensor
- Bosch 9-axis Absolute Orientation Sensor
- Piezo MEMS Analog Microphone
- Audio Codec and headset jack
- OLED Display Module
Quick Demo
- Firstly, install the Modus Toolbox IDE from the official website.
Before starting, ensure you have the following. PC with USB port & UART terminal software such as Tera Term. Open the UART terminal software and connect to the kit's USB-UART COM port with the settings: Baud rate: 115200, Data: 8 bit, Parity: None, Stop bit: 1 bit, Flow control: None
- Ensure the jumper J14 is at position 2-3 to select 3.3V • Connect the KitProg3 USB connector (J6) to your PC
- Wait for the driver installation to complete and Press the XRES switch (SW1) to reset the device.
- Now the PSoC 6 example is active. Press Enter to turn on/off the blinking of LED8 on the Pioneer kit.
- Open the serial terminal on your PC.
- Select Baud rate - 115200, Data bit - 8, Parity - None, and Stop bit - 1
Reset the PSoC using the SW1 button. Now you can see the serial message on Tera Term. The User LED will blink when you press the enter key. You can find the serial reply from the pioneer kit on the tera term.
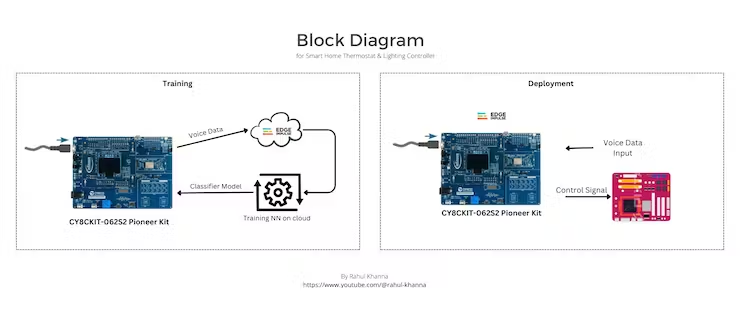
Workflow & Connection DiagramThe Flowchart for this project is shown below.
Edge Impulse is used to create and deploy machine learning models for edge devices. PSoC6 supports voice classification using Edge Impulse. To create a voice classifier, we need to collect and label voice data using the PSoC6 microphone and the Edge Impulse Data Forwarder, design and train a neural network using the Edge Impulse Studio, test and optimize the model using the Edge Impulse Live Classification, and deploy your model to your PSoC6 device using the Edge Impulse Firmware Library.
We established an API connection between the PSoC62S2 and Edge Impulse to acquire data. We integrated a voice dataset containing commands like "lightson, " "lightsoff, " "increase, " "decrease, " and "nan." To process this data, we employed the Audio MFE block for input and utilized the Keras classifier to recognize the commands. During the model training phase, we achieved an impressive 96% accuracy.
At present, the Edge Impulse Studio lacks support for the PSoC6 target. However, there is an alternative option available for generating a C++ library using the Edge Impulse Studio deployment page. I placed it within the ModusToolbox project directory under the 'sources' folder, and for organization purposes, I created a fresh folder named 'ei-library' to house it.
<Include voice gif>
Output Video


Comments
Please log in or sign up to comment.