What is the main use of HomeBeta?
1. Get to know and address people coming to home through a digital panel from anywhere across the globe, though not being present at home.
2. Crime reduction – At times, anonymous takes advantage of lonely people at home through interactions and further rob/murder for belongings. This device helpsto overcome such situations.
Who might require HomeBeta?
Lonely people at home are at the risk of getting hurt and murdered by anonymous where mostly the attackers intrude into the home through easy interactions.
Elders at home, lonely women, and adult age children are mostly impacted through these crimes.
With the advancement of AI, technology solutions could be designed to overcome such situations by means of digital panels.
People who belong to a particular residence can make use of this device where they can address the anonymous through a mobile app, from anywhere. Mobile app and the digital panel mounted at main door would help in online interaction.
Any earlier crime cases, where HomeBeta could be implemented?
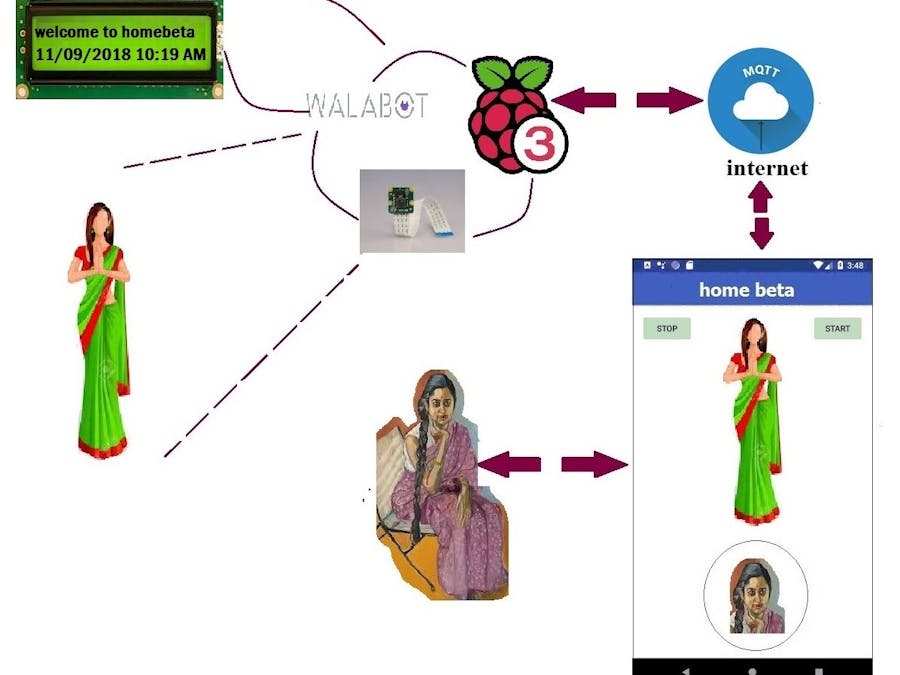
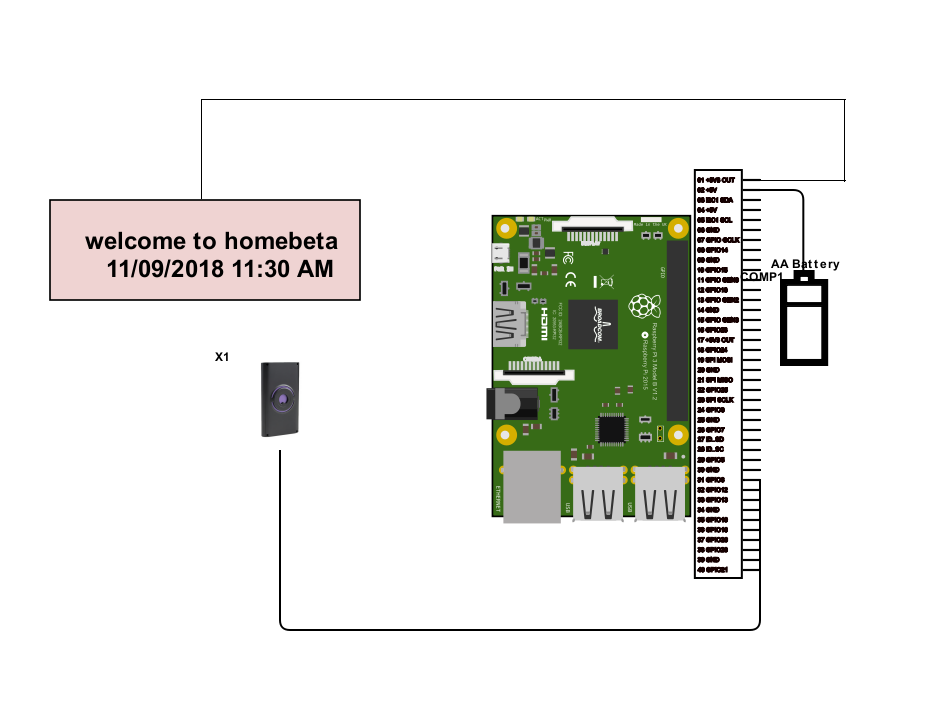
Mechanism of HomeBetaIntegrate a Walabot sensor, D1 with a Raspberry Pi, D2.
The Raspberry Pi, D2 will also be added with a Camera module, D3 and an LCD display, D4.
Whenever D1 encounters a person, ie., PERSON1 in front of it, D2 gets activated. It sends the image of the PERSON1 to D2.
The D2 will send an intimation message to a mobile app, D5 to PERSON2 in a specific format.
On receiving the message D5, live streams enabling the PERSON1 to interact with PERSON2.
Technical Entities - HomeBetaWalabot | Raspberry Pi | Camera | LCD Display Panel
Walabot, as it has the capability to sensor a target object the module serves to trace out the presence of human being in its vicinity and indicate it to the Raspberry Pi.
Camera Module, attached to the Raspberry Pi gets activated and take the picture image of the person whom it encounters.
LCD Display Panel, will help to provide communication to the target object (here the human being) on connecting with the meeting person. This will also provide information about connection failure, connection successful, connection establishment, etc.
Raspberry Pi, which in turn receives the indication from Walabot and the picture image from the camera module would embed them both and send it across to the cloud through MQTT.
WalabotMQTT: Python Publisher | MQTT Broker | Android App
WalabotMQTT - Python publisher, an interface for developing a Walabot publisher, running on a remote device (e.g. Raspberry Pi).
MQTTbroker - Local Broker, for running on your own device.
WalabotMQTT - Android App, an Interface for developing an Android app, using data received from the Walabot Python publisher.
Technical Process (Step-by-step)My machine is Windows 8 - 64-bit processing.
1. Walabot: Install the walabot SDK from the link below:
https://walabot.com/getting-started
2. Install Walabot API Python library, for Windows from :
https://api.walabot.com/_pythonapi.html#_onWindows
3. Test run SensorTargets.py from the library below:
https://github.com/Walabot-Projects/Walabot-SensorTargets
4. Set up Walabot - MQTT by following instructions as below:
https://github.com/Walabot-Projects/WalabotMQTT
Walabot MQTT Python publisher
MQTT Broker
WalabotMQTT- Android app
Please refer the code section.


_copy_P5AWOdT4dX.png?auto=compress%2Cformat&w=48&h=48&fit=fill&bg=ffffff)


Comments
Please log in or sign up to comment.