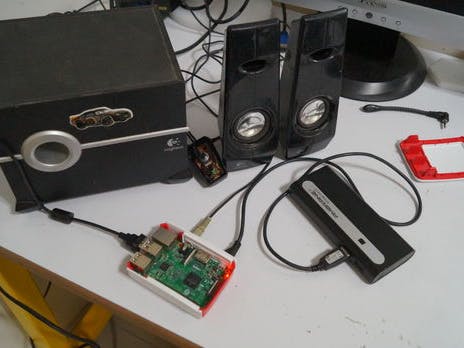
Alexa is Amazon's digital assistant built into devices such as the Amazon Echo. The Echo itself is a speaker with a built-in microphone. Alexa is Amazon's virtual assistant, like Siri from Apple's iPhone.
Fortunately Amazon made this entire Alexa open source, so we can make our own Alexa in Raspberry Pi.
Items required:
- Raspberry Pi 3
- Speakers (with 3.5 mm jack)
- USB web-cam (for microphone)
- Power bank (to power Raspberry Pi)
- Have a monitor to set up Raspberry Pi (you can use your laptop also)
Register on amazon developer account in: https://developer.amazon.com/
- Log into your Amazon Developer Account.
- Click on the Alexa Tab.Click Register a Product Type > Device.Name your device type and display name (We chose “Raspberry Pi” for both).
- Click Next. On the Security Profile screen
- Click “Create new profile.”Under the General tab, next to “Security Profile Name” name your profile.
- Do the same for the description.
- Click Next. Make a note of the Product ID, Client ID, and Client Secret that the site generates for you.
- Click the Web Settings tab, then click the Edit button next to the profile dropdown. Next to Allowed Origins,
- Click, “Add Another” and type in: https://localhost:3000. Next to Allowed Return URLs, click “Add Another” and type in: https://localhost:3000.Next Click Next when you’re done.
- The Device Details tab is next. It doesn’t matter much what you enter here. Pick a category, write a description, pick an expected timeline, and enter a 0 on the form next to how many devices you plan on using this on.
- Click Next. Finally, you can choose to add in Amazon Music here. This does not work on the Pi powered device, so leave it checked as “No.” Click Save.
- Open terminal (command window)
- Enter "sudo su" and press enter (for root)
- Enter "cd Desktop" and press enter to set directory into your desktop
- Enter the "git clone https://github.com/alexa/alexa-avs-sample-app.git... and press enter
- Go to your desktop and check whether a folder named " alexa-avs-sample-app" is there.
- Rename the "alexa-avs-sample-app" to Alexa for easy use.
- Open terminal (command window) and type "sudo su" (for root)
- Type "cd Desktop" and press enter
- Type "cd alexa" and enter
- Type " cd samples" and enter
- Type " nano automated_install.sh" and enter, nano command is used to edit the automated_install_sh file.
- Here, you’ll need to enter your ProductID, ClientID, and ClientSecret that you notes in the step above. Use the arrow keys to navigate to each entry. Enter each detail after the = sign as noted in the image above. When you’re done, tap CTRL+X to save and press enter to exit.
- To get client id and clientSecret id go to amazon developer console and copy both of them and paste it in automated_install.sh
- Save the automated_install.sh and exit by pressing CTRL+X and press enter.
- Now enter ". automated_install.sh" and press enter (take care of the dot before the automated_install)
- Select the 3.5 mm audio output while installation.
To run the server, follow these instructions:
- Open new terminal window
- Enter "cd Desktop/alexa/samples/companionService" and press enter
- Now enter "npm install" and press enter
- Then in the web browser " https://developer.amazon.com/lwa/sp/overview.html... open this link
- Near the top of the page, select your security profile from the drop down menu and click Confirm.
- Enter a privacy policy URL beginning with
http://orhttps://.For this example, you can enter a fake URL such ashttp://or Optionally, you can choose to upload an image, which will be shown on the Login with Amazon consent page. Click Save.
- Next to Security Profile, click Show Client ID and Client Secret. This will display your client ID and client secret. copy these values.
- Open new terminal (command window) and enter "
cd Desktop/alexa/samples/companionService" and press enter
- Now enter "nano config.js"
- And edit the clientId: Copy and paste your Client ID from the developer console. This value must be a string.clientSecret: Copy and paste the Client Secret from the developer console. This value must be a string. save it and exit.
- In your terminal window, run the following: "
npm start".'(leave that terminal like that don't close the terminal)
- Open a new terminal and enter "
cd Desktop/alexa/samples" and press enter
- Now enter "
cd javaclient && mvn exec:exec" and press enter
- A window will pop up asking you to authenticate your device. Click Yes. This opens up a browser window. A second pop-up will appear in the Java app asking you to click Ok. Do not click this yet.
- Log into your Amazon account in the browser use (chrome)
- You’ll see an authentication screen for your device. Click Okay. Your browser will now display “device tokens ready.”
Finally, open a third Terminal window (File > New Window). Here, you’ll start the wake word engine. This makes it so you can say “Alexa” to make your Raspberry Pi start listening to you. You have two options for wake word software, Sensory and KITT.AI. Both are free, but Sensory expires after 90 days, so let’s use KITT ins
- Type "
cd Desktop/alexa/samples" and press Enter.
- Type in "
cd wakeWordAgent/src && ./wakeWordAgent -e kitt_ai" and press enter
That’s it, your DIY Echo is now running. Go ahead and try it out by saying “Alexa.” You should hear a beep indicating that it’s listening. When you hear that beep, ask a question like, “What’s the weather?” or “What’s the time? or any freaking questions...
Step 7: How to Use Usb Webcam As Microphone for Your AlexaYou can refer the YouTube link:
That's it guys...enjoy your project!


Comments
Please log in or sign up to comment.