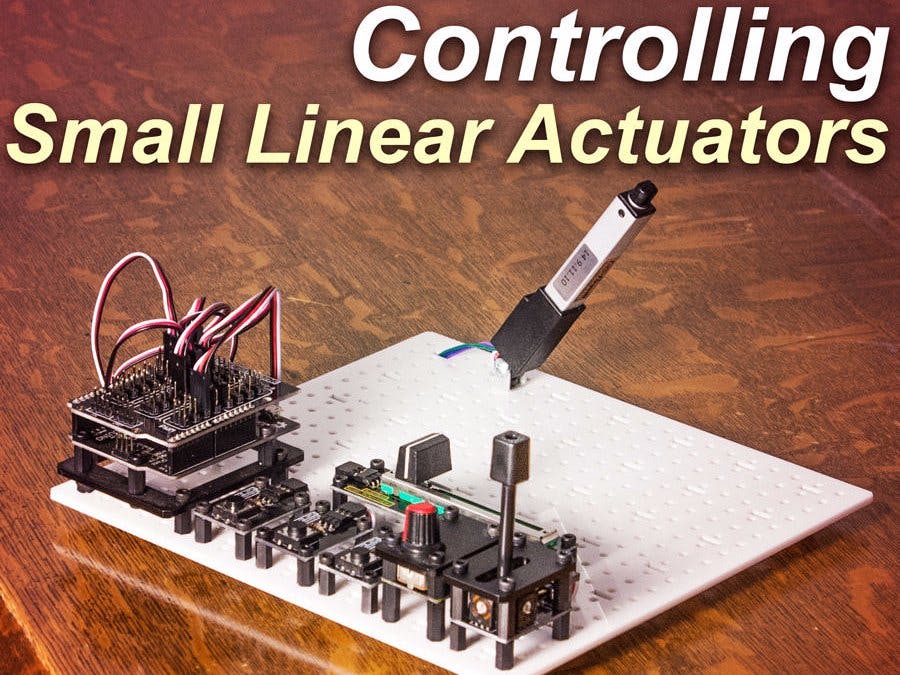
This Arduino Linear Actuator Tutorial shows how to control a Firgelli Small Linear Actuator using an Arduino compatible board and various input sensors, including a Slider and Rotation Knob for direct control, Joystick for incremental movement, and three buttons with preset positions (preset in the code with each position assigned to a button, so when a user pushes a button the small linear actuator moves to that position).
For Arduino Linear Actuator projects the small linear actuators by Firgelli are excellent. These linear actuators have an internal controller which allows them to be operated just like a servo. By using the Arduino Servo Library we can simply send out the desired position to the actuator and it moves to the position.
All of the parts can be found together in the RobotGeek Arduino Linear Actuator Experimenter's Kit, or obtained individually.
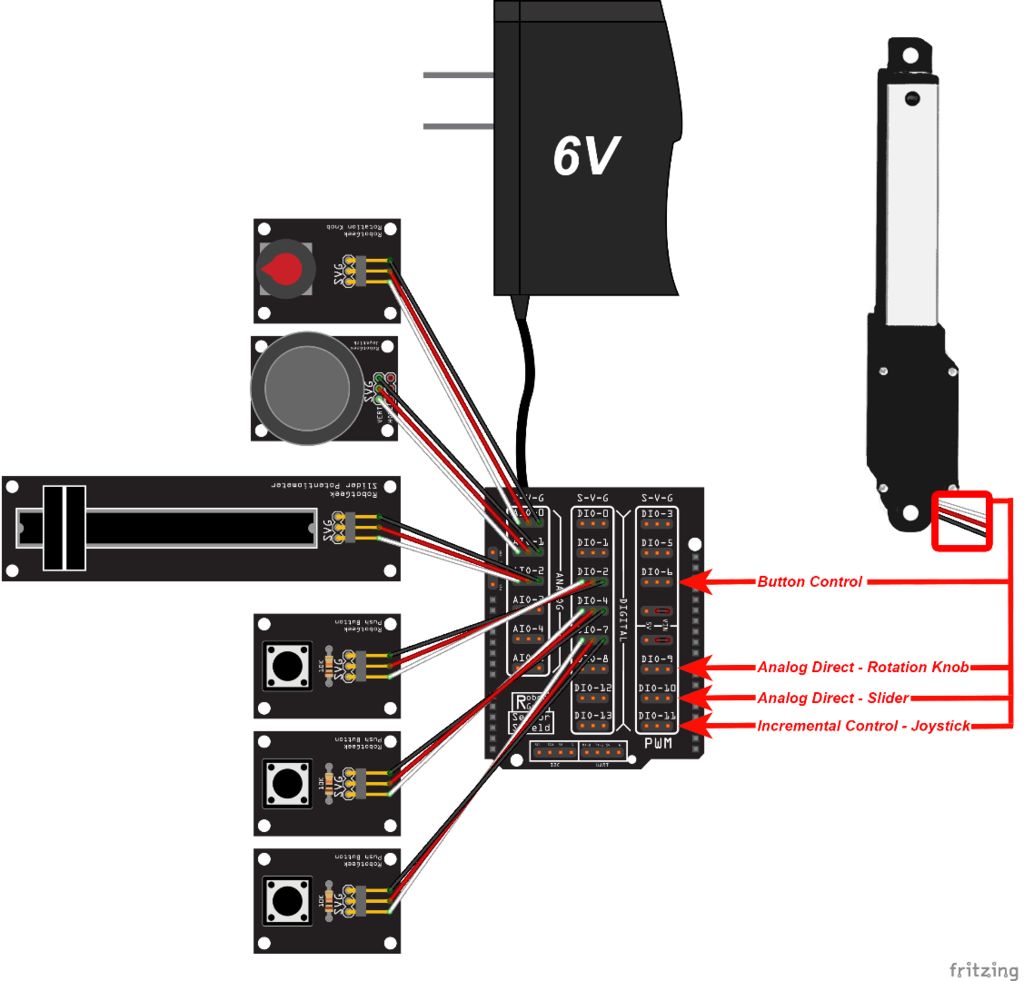
Step 1: WiringNotice that you'll have to physically plug the linear actuator into different ports in order to move it with the different controls. If you have multiple linear actuators, you can control up to 4 simultaneously with this code.
Step 2: Upload the code to your ArduinoYou can find this Demonstration Code in the RobotGeek Libraries and Tools under:
RobotGeekSketches -> Demos -> LinearActuator -> linearActuatorExpDemo -> linearActuatorExpDemo.ino
This code will get us through the next three sections. You will be asked to plug the linear actuator into different pins based on the section of the tutorial you're working on.
/***********************************************************************************
 *           RobotGeek Linear Actuator Experimenter's Kit Demo
 *        ________
 *       |        \---------\___________________________
 *     __|                  |                          ||--------------------|__
 *    (o |  FIRGELLI        |                        o ||____________________| o)
 *       |__________________/--------------------------||
 *
 *
 *  The following sketch will allow you to control a Firgelli Linear actuator using
 *  the RobotGeek Slider, RobotGeek Knob, RobotGeek Joystick, and RobotGeek Pushbuttons
 *
 *  http://www.robotgeek.com/robotgeek-experimenters-kit-linear-actuator
 *
 *
 *  Wiring
 *    Linear Actuator - Digital Pin 6, 9, 10, and/or 11
 *
 *    Knob            - Analog Pin 0
 *    Joystick        - Analog Pin 1
 *    Slider          - Analog Pin 2
 *
 *    Pushbutton      - Digital Pin 2
 *    Pushbutton      - Digital Pin 4
 *    Pushbutton      - Digital Pin 7
 *
 *    Jumpers for pins 3/5/6 and 9/10/11 should be set to 'VIN'
 *
 *
 *  Control Behavior:
 *    Moving the slider or knob will move the linear actuator keeping absolute position.
 *    Moving the joystick will move the linear actuator incrementally.
 *    Pressing one of the buttons will move the linear actuator to a predetermined position.
 *
 ***********************************************************************************/
//Includes
#include  //Servo Library can be used for Firgelli Mini Linear Actuators
//Linear Actuator Pins
const int LINEARPIN_BUTTON = 6;        //Linear Actuator on Digital Pin 6
const int LINEARPIN_KNOB = 9;          //Linear Actuator on Digital Pin 9
const int LINEARPIN_SLIDER = 10;       //Linear Actuator on Digital Pin 10
const int LINEARPIN_JOYSTICK = 11;     //Linear Actuator on Digital Pin 11
//Analog Input Pins
const int KNOB_PIN = 0;       //Knob on Analog Pin 0
const int JOYSTICK_PIN = 1;   //Joystick (vertical) on Analog Pin 1
const int SLIDER_PIN = 2;     //Slider on Analog Pin 2
//Digital Input Pins
const int BUTTON1_PIN = 2;     //Button 1 on Digital Pin 2
const int BUTTON2_PIN = 4;     //Button 2 on Digital Pin 4
const int BUTTON3_PIN = 7;     //Button 3 on Digital Pin 7
//Generic deadband limits - not all joystics will center at 512, so these limits remove 'drift' from joysticks that are off-center.
const int DEADBAND_LOW = 482;   //decrease this value if drift occurs, increase it to increase sensitivity around the center position
const int DEADBAND_HIGH = 542;  //increase this value if drift occurs, decrease it to increase sensitivity around the center position
//Max/min pulse values in microseconds for the linear actuators
const int LINEAR_MIN = 1050;
const int LINEAR_MAX = 2000;
// variables will change:
int button1State = 0;         // variable for reading the pushbutton status
int button2State = 0;         // variable for reading the pushbutton status
int button3State = 0;         // variable for reading the pushbutton status
Servo linearKnob, linearSlider, linearButton, linearJoystick;  // create servo objects to control the linear actuators
int knobValue, sliderValue, joystickValue;                     //variables to hold the last reading from the analog pins. The value will be between 0 and 1023
int valueMapped;                                               // the joystick values will be changed (or 'mapped') to new values to be sent to the linear actuator.
//variables for current positional value being sent to the linear actuator.
int linearValue_Knob = 1500;
int linearValue_Slider = 1500;
int linearValue_Button = 1500;
int linearValue_Joystick = 1500;
int speed = 2;
void setup()
{
  //initialize linear actuators as servo objects
  linearKnob.attach(LINEARPIN_KNOB);      // attaches/activates the linear actuator as a servo object
  linearSlider.attach(LINEARPIN_SLIDER);  // attaches/activates the linear actuator as a servo object
  linearButton.attach(LINEARPIN_BUTTON);  // attaches/activates the linear actuator as a servo object
  linearJoystick.attach(LINEARPIN_JOYSTICK);  // attaches/activates the linear actuator as a servo object
  //Analog pins do not need to be initialized

  //use the writeMicroseconds to set the linear actuators to their default positions
  linearKnob.writeMicroseconds(linearValue_Knob);
  linearSlider.writeMicroseconds(linearValue_Slider);
  linearButton.writeMicroseconds(linearValue_Button);
  linearJoystick.writeMicroseconds(linearValue_Joystick);
}
void loop()
{
//Preset Positions for Button Control
  // if the pushbutton is pressed set the linear value
  button1State = digitalRead(BUTTON1_PIN);
  if (button1State == HIGH) {
    // set the position value
    linearValue_Button = 1300;
  }
  button2State = digitalRead(BUTTON2_PIN);
  if (button2State == HIGH) {
    // set the position value
    linearValue_Button = 1500;
  }
  button3State = digitalRead(BUTTON3_PIN);
  if (button3State == HIGH) {
    // set the position value
    linearValue_Button = 1700;
  }
//Analog Direct Control
  //read the values from the analog sensors
  knobValue = analogRead(KNOB_PIN);
  sliderValue = analogRead(SLIDER_PIN);
  linearValue_Knob = map(knobValue, 0, 1023, LINEAR_MAX, LINEAR_MIN); //Map analog value from the sensor to the linear actuator
  linearValue_Slider = map(sliderValue, 0, 1023, LINEAR_MAX, LINEAR_MIN); //Map analog value from the sensor to the linear actuator
//Incremental Joystick Control
  joystickValue = analogRead(JOYSTICK_PIN); //read the values from the joystick
  //only update if the joystick is outside the deadzone (i.e. moved oustide the center position)
   if(joystickValue > DEADBAND_HIGH || joystickValue < DEADBAND_LOW)
   {
     valueMapped = map(joystickValue, 0, 1023, speed, -speed); //Map analog value from native joystick value (0 to 1023) to incremental change (speed to -speed).
     linearValue_Joystick = linearValue_Joystick + valueMapped; //add mapped joystick value to present Value

     linearValue_Joystick = constrain(linearValue_Joystick, LINEAR_MIN, LINEAR_MAX);  //
   }
//Use the writeMicroseconds to set the linear actuator to its new position
  linearKnob.writeMicroseconds(linearValue_Knob);
  linearSlider.writeMicroseconds(linearValue_Slider);
  linearButton.writeMicroseconds(linearValue_Button);
  linearJoystick.writeMicroseconds(linearValue_Joystick);
  delay(10);
}
For this section:
To use the Rotation Knob, plug your Linear Actuator into Digital Pin 9
To use the Slider, plug your Linear Actuator into Digital Pin 10
So what's going on here? We're mapping the absolute position from the analog sensors to the actuator position. It makes sense, you move the rotation knob or slider into a position, and the linear actuator matches that position.
Want to see some nonsense? Plug your Joystick into Analog Pin 0
, and your Linear Actuator into Digital Pin 9
. The joystick always returns to center position, causing the linear actuator to match and return to its center value. Not really all that useful if you wanted to use the joystick to move the linear actuator to a position other than center, which leads us to our next section. Make sure to return your sensors to their original pins before moving on.
If you would like a sketch that covers only this section of the tutorial, you can find it here.
Step 4: Incremental ControlFor this section:
To use the Joystick, plug your Linear Actuator into Digital Pin 11
So what's going on here? This time, instead of mapping directly to the value of the joystick, we are using the joystick to increment the position of the linear actuator, allowing us to let go of the joystick and have the linear actuator stay where we put it last.
If you would like a sketch that covers only this section of the tutorial, you can find it here.
Step 5: Preset ControlsFor this section:
To use the Buttons, plug your Linear Actuator into Digital Pin 6
So what's going on here? In this part, we are using button presses that send the linear actuator to pre-defined positions. This is simple and incredibly useful for when you know what position you'd like the linear actuator to be in under a circumstance defined by an input.
If you would like a sketch that covers only this section of the tutorial, you can find it here.
Step 6: What's next?Now you know three ways to control your linear actuator. Can you think of projects that would benefit from this? Do you have a box that you'd like to automatically open? How would you use a linear actuator to do that? All the muscles in the human body are biological linear actuators. Could you make a robotic arm that mimics this? What about making a table that can tilt? We'd love to hear about your project! Go forth and create!


_ztBMuBhMHo.jpg?auto=compress%2Cformat&w=48&h=48&fit=fill&bg=ffffff)


Comments
Please log in or sign up to comment.