“My soul shacked. What could I do to succeed, to have money, a lot of money?” Roberto Arlt, El Juguete Rabioso.
A friend of mine was an early Bitcoin adopter with a hold strategy using paper wallets. He stored his paper wallets inside an Altoids Tin, and the Altoids tin inside a safe. After several years, the ink started to fade. My friend doesn't trust commercial hardware wallets (“Black boxes, you know...”) and online platforms (“Didn't we learn something after MtGox?”).
So I’ve decided to give it a try and develop a basic experimental cold hardware wallet with the following requirements:
#1 Little enhancement over paper wallets
#2 Should fit the same Altoids tin
After a few days... I've came out with the Alt Wallet.
Important: this project was made to replace a fading BTC paper wallet inside a safe. This hardware cold wallet should still be stored inside a safe. The pin you will see in the video is just an additional layer. Also, this project is experimental, meaning a starting point to learn how to make a simple cold hardware wallet with known parts and readable code (open and small) and of course, no guarantess of any kind.
Parts are generic, easy to get and cheap.
- Arduino Pro Micro
- Nokia 5110 screen
- Rotary encoder
- Altoids Tin
- 2 3d printed parts
- DC female connector (you can also power the wallet with microUSB)
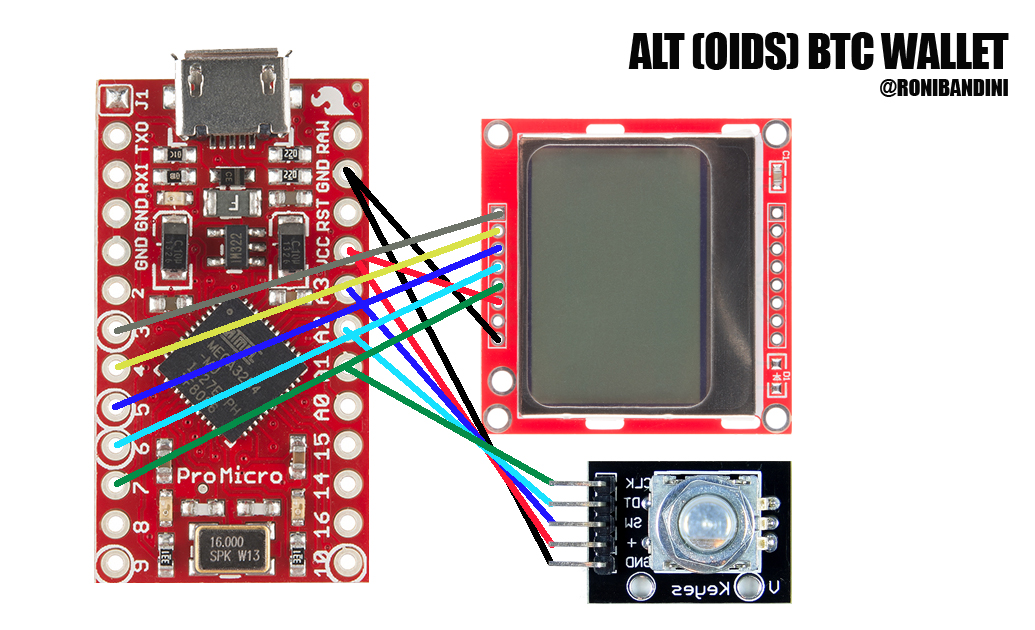
Nokia screen to Arduino: pin 7 - SCLK // pin 6 - (DIN) // pin 5 - (D/C) // pin 4 - (CS) // pin 3 -(RST) // GND pin to Nokia GND // VCC pin to Nokia VCC.
Rotary encoder pin GND to Rotary GND // pin VCC to Rotary + // pin 21 to Rotary BTN // pin 20 to Rotary DT, pin 19 to Rotary CLK=19
Finally connect DC Female to GND and VCC in Arduino (also connected to Rotary and screen)
There are 2 printed parts in Alt Wallet. The wallet front and the rotary encoder knob.
Download from Thingiverse. Print with PLA.
Enter the PIN using the rotary encoder. Rotate numbers turning the knob and push it to select. With a correct entry you will get the public QR printed on screen. If you long push you will get the private key for a few seconds.
If you want to migrate from a fading paper wallet, you will have to scan both paper QRs, scale them to 48x48px, convert them to bytearray and upload those bytearrays to the Arduino. All of this, completely offline in a clean computer.
To make things easier I've also coded Alt Loader, a Python script for Raspberry Pi with a Cam that will do all these tasks and will also let you upload the sketch to Arduino. More information about Alt Loader
FAQsWhy you didn’t use Progmem to store the keys?
Arduino Pro Micro memory was enough, so I did choose SRAM over Flash.
Why you didn’t use encryption?
Encryption could be easily added with Aeslib, but I've decided to provide a simple, easy to understand code. And again: Alt wallet is a replacement for a physical secured paper wallet. If you open the safe, you will get the money and the BTCs. A little enhancement is included in the latest version: you have to enter a PIN to read the keys or take your time to hack the SRAM.
Why you didn’t use batteries?
Batteries and long term storage don't do well. And of course I had Altoids tin space limitations. Any external USB power bank or 5v DC power supply can be used. If you still want to try with batteries, just add TP4056 charger and a small 3.7v LIPO.
Why you didn't use an Altoids tin in good condition or at least calibrated your 3d printer?
I did find 4 equal screws, though.
How much does it cost to make the ALT BTC wallet?
If you are in a budget, you can do it for around $15. With an original Arduino Pro Micro, it will cost a little more.
What about commercial hardware wallets
I do like Ledger Nano and Trezor but you have to trust custom hardware and several pieces of proprietary software. Also, not so fun as making your own device.
DemoEnglish closed captions available.
Interested in other projects with Altoids tin?Social media


_t9PF3orMPd.png?auto=compress%2Cformat&w=40&h=40&fit=fillmax&bg=fff&dpr=2)


Comments
Please log in or sign up to comment.