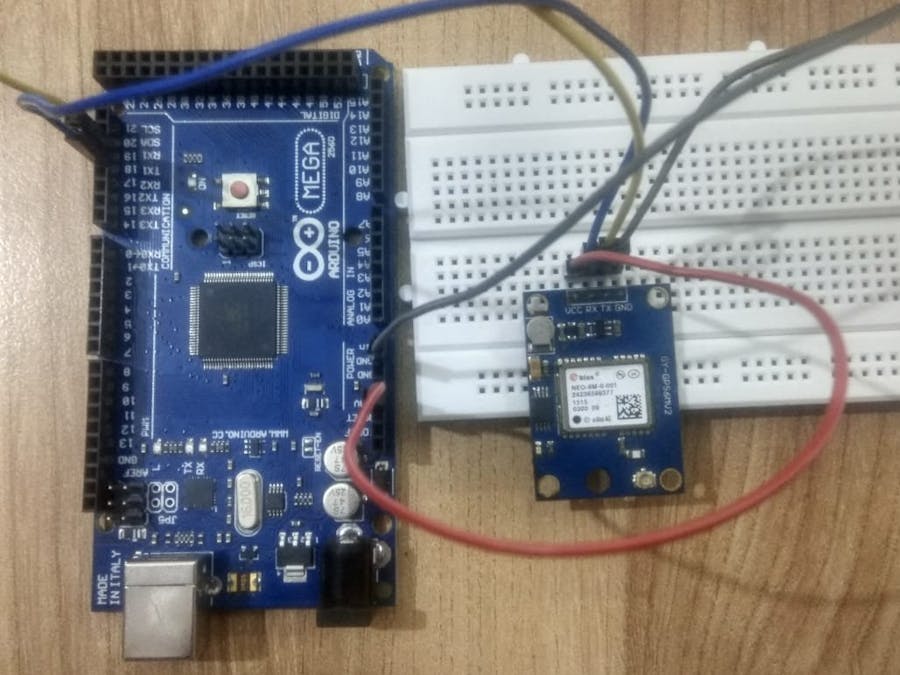
What I found is there is no tutorial for interfacing of Arduino Mega with NEO-6M GPS module so I decided to make one. Hope you like it!
Components NeededHardware
- Arduino Mega ==> $ 30
- Neo-6M GPS module ==> $ 30
Software
- Arduino IDE
The total cost of the project is $60.
Information About GPSWhat is GPS?
The Global Positioning System (GPS) is a satellite-based navigation system made up of at least 24 satellites. GPS works in any weather conditions, anywhere in the world, 24 hours a day, with no subscription fees or setup charges.
How GPS works
GPS satellites circle the Earth twice a day in a precise orbit. Each satellite transmits a unique signal and orbital parameters that allow GPS devices to decode and compute the precise location of the satellite. GPS receivers use this information and trilateration to calculate a user's exact location. Essentially, the GPS receiver measures the distance to each satellite by the amount of time it takes to receive a transmitted signal. With distance measurements from a few more satellites, the receiver can determine a user's position and display it.
To calculate your 2-D position (latitude and longitude) and track movement, a GPS receiver must be locked on to the signal of at least 3 satellites. With 4 or more satellites, the receiver can determine your 3-D position (latitude, longitude and altitude). Generally, a GPS receiver will track 8 or more satellites, but that depends on the time of day and where you are on the earth. Once your position has been determined, the GPS unit can calculate other information, such as
- Speed
- Bearing
- Track
- Trip dist
- Distance to destination
What is signal
GPS satellites transmit at least 2 low-power radio signals. The signals travel by line of sight, meaning they will pass through clouds, glass and plastic but will not go through most solid objects, such as buildings and mountains. However, modern receivers are more sensitive and can usually track through houses. A GPS signal contains 3 different types of information
- Pseudorandom code
It is an I.D. code that identifies which satellite is transmitting information. You can see which satellites you are getting signals from on your device's satellite page.
- Ephemeris data
Ephemeris data is needed to determine a satellite's position and gives important information about the health of a satellite, current date and time.
- Almanac data
Almanac data tells the GPS receiver where each GPS satellite should be at any time throughout the day and shows the orbital information for that satellite and every other satellite in the system.
Neo-6M GPS ModuleThe NEO-6M GPS module is shown in the figure below. It comes with an external antenna and does not come with header pins. So you will need to solder it.
- NEO-6M GPS Chip
The heart of the module is a NEO-6M GPS chip from u-blox. It can track up to 22 satellites on 50 channels and achieves the industry’s highest level of sensitivity i.e. -161 dB tracking, while consuming only 45mA supply current. The u-blox 6 positioning engine also boasts a Time-To-First-Fix (TTFF) of under 1 second. One of the best features the chip provides is Power Save Mode(PSM). It allows a reduction in system power consumption by selectively switching parts of the receiver ON and OFF. This dramatically reduces power consumption of the module to just 11mA making it suitable for power sensitive applications like GPS wristwatch. The necessary data pins of NEO-6M GPS chip are broken out to a "0.1″ pitch headers. This includes pins required for communication with a microcontroller over UART.
Note:- The module supports baud rate from 4800bps to 230400bps with default baud of 9600.
Position Fix LED Indicator
There is an LED on the NEO-6M GPS Module which indicates the status of Position Fix. It’ll blink at various rates depending on what state it’s in
- No Blinking ==> means It is searching for satellites
- Blink every 1s – means Position Fix is found
- 3.3V LDO Regulator
The operating voltage of the NEO-6M chip is from 2.7 to 3.6V. But, the module comes with MIC5205 ultra-low dropout 3V3 regulator from MICREL. The logic pins are also 5-volt tolerant, so we can easily connect it to an Arduino or any 5V logic microcontroller without using any logic level converter.
Battery & EEPROM
The module is equipped with an HK24C32 two wire serial EEPROM. It is 4KB in size and connected to the NEO-6M chip via I2C.The module also contains a rechargeable button battery which acts as a super-capacitor.
An EEPROM together with battery helps retain the battery backed RAM (BBR). The BBR contains clock data, latest position data (GNSS or bit data) and module configuration. But it is not meant for permanent data storage.
As the battery retains clock and last position, time to first fix (TTFF) significantly reduces to 1s. This allows much faster position locks.
Without the battery the GPS always cold-start so the initial GPS lock takes more time. The battery is automatically charged when power is applied and maintains data for up to two weeks without power.
Pinout
- GND is the Ground Pin and needs to be connected to GND pin on the Arduino.
- TxD (Transmitter) pin is used for serial communication.
- RxD (Receiver) pin is used for serial communication.
- VCC supplies power for the module. You can directly connect it to the 5V pin on the Arduino.
Arduino is an open-source electronics platform based on easy-to-use hardware and software. Arduino boards are able to read inputs - light on a sensor, a finger on a button, or a Twitter message - and turn it into an output - activating a motor, turning on an LED, publishing something online. You can tell your board what to do by sending a set of instructions to the microcontroller on the board. To do so you use the Arduino programming language (based on Wiring), and the Arduino Software (IDE), based on Processing.
Arduino Mega 2560 is a Microcontroller board based on Atmega2560.
- There are 54 digital I/O pins and 16 analog pins incorporated on the board that make this device unique and stand out from others.Out of 54 digital I/O, 15 are used for PWM (pulse width modulation).
- A crystal oscillator of 16MHz frequency.
- The board comes with USB cable port that is used to connect and transfer code from computer to the board.
- DC power jack is coupled with the board that is used to power the board.
- The board comes with two voltage regulator i.e. 5V and 3.3V which provides the flexibility to regulate the voltage as per requirements.
- There is a reset button and 4 hardware serial port called USART which produces a maximum speed for setting up communication.
- There are three ways to power the board. You can either use a USB cable to power the board and transfer code to the board or you can power it up using Vin of the board or through Power jack or batter.
Specifications
Pinout
- 5V & 3.3V ==>This pin is used to provide output regulated voltage around 5V. This regulated power supply powers up the controller and other components on the board. It can be obtained from Vin of the board or USB cable or another regulated 5V voltage supply. While another voltage regulation is provided by 3.3V pin. Maximum power it can draw is 50mA.
- GND ==>There are 5 ground pins available on the board which makes it useful when more than one ground pins are required for the project.
- Reset ==> This pin is used to reset the board. Setting this pin to LOW will reset the board.
- Vin ==> It is the input voltage supplied to the board which ranges from 7V to 20V. The voltage provided by the power jack can be accessed through this pin. However, the output voltage through this pin to the board will be automatically set up to 5V.
- Serial Communication ==> RXD and TXD are the serial pins used to transmit and receive serial data i.e. Rx represents the transmission of data while Tx used to receive data. There are four combinations of these serial pins are used where Serail 0 contains RX(0) and TX(1), Serial 1 contains TX(18) and RX(19), Serial 2 contains TX(16) and RX(17), and Serial 3 contains TX(14) and RX(15).
- External Interrupts ==> Six pins are used for creating external interrupts i.e interrupt 0(0), interrupt 1(3), interrupt 2(21), interrupt 3(20), interrupt 4(19), interrupt 5(18). These pins produce interrupts by a number of ways i.e. providing LOW value, rising or falling edge or changing value to the interrupt pins.
- LED ==> This board comes with built-in LED connected to digital pin 13. HIGH value at this pin will turn the LED on and LOW value will turn it off.
- AREF ==> AREF stands for Analog Reference Voltage which is a reference voltage for analog inputs.
- Analog Pins ==> There are 16 analog pins incorporated on the board labeled as A0 to A15. It is important to note that all these analog pins can be used as digital I/O pins. Each analog pin comes with 10-bit resolution. These pins can measure from ground to 5V. However, the upper value can be changed using AREF and analogReference() function.
- I2C ==>Two pins 20 and 21 support I2C communication where 20 represents SDA (Serial Data Line mainly used for holding the data) and 21 represents SCL(Serial Clock Line mainly used for providing data synchronization between the devices)
- SPI Communication ==> SPI stands for Serial Peripheral Interface used for the transmission of data between the controller and other peripherals components. Four pins i.e. 50 (MISO), 51 (MOSI), 52 (SCK), 53 (SS) are used for SPI communication.
Here I am assuming you already installed Arduino IDE.
1. Download the required library given below
2. After downloading it. Extract it and move it to folder C:\Users\...\Documents\Arduino\libraries make sure there is no (-).
3. Open the Arduino IDE and copy the code from program section.
4. Then select board for that go to Tools ==> Boards ==> select board here we are using Arduino Mega 2560.
5. After selecting board select port for that go to Tools ==> Ports.
6. After selecting board and port click upload.
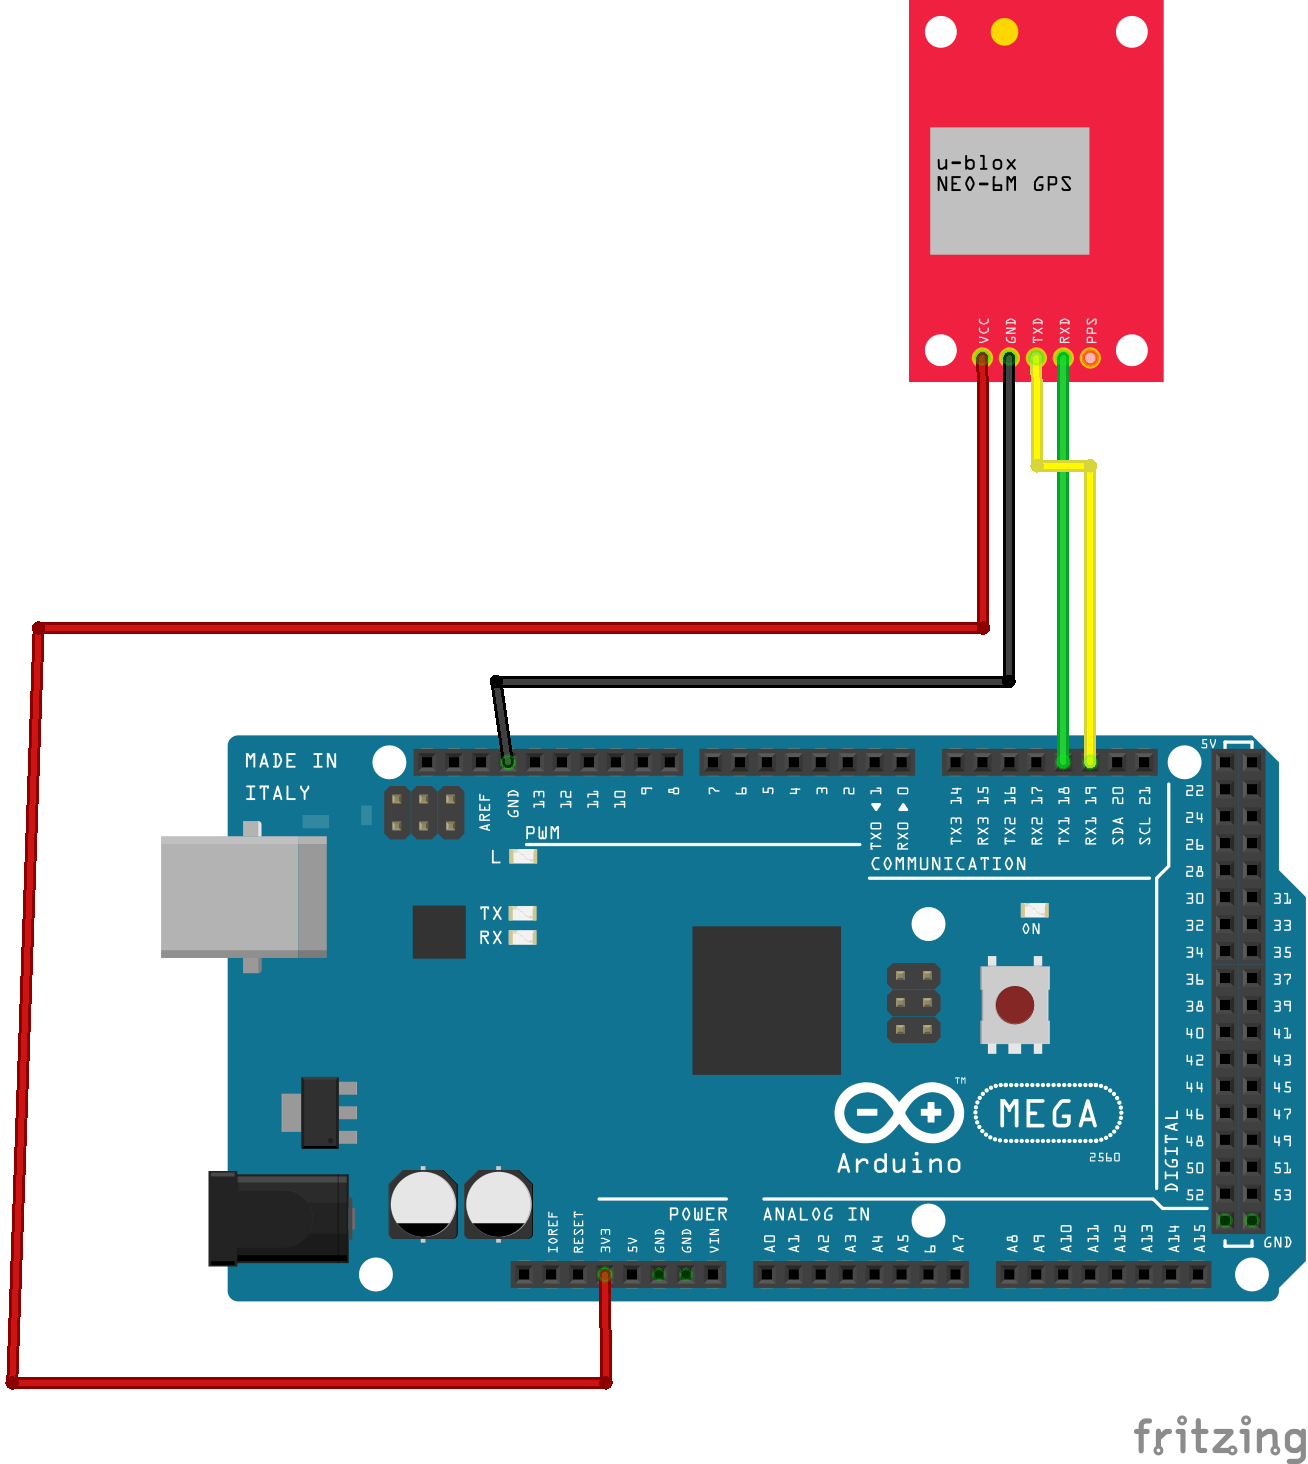
Arduino MEGA ==> NEO-6M GPS
- 3.3V ==> VCC
- GND ==> GND
- Tx1 (18) ==> Rx
- Rx1 (19) ==> Tx
You can also use Serial2 or Serial3 instead of Serial1
Serial2 pins
- Tx2 (16) ==> Rx
- Rx2 (17) ==> Tx
Serial3 pins
- Tx3 (14) ==> Rx
- Rx3 (15) ==> Tx


_wzec989qrF.jpg?auto=compress%2Cformat&w=48&h=48&fit=fill&bg=ffffff)


Comments
Please log in or sign up to comment.