rudraksh2008
Published © GPL3+

Connecting LDR (PhotoResistor) with Arduino

LDR is a resistor which works because of light. Remember that LDR is an analog device.

IntermediateFull instructions provided2,406
Connecting LDR (PhotoResistor) with Arduino

Things used in this project

Hardware components

Arduino UNO
Arduino UNO
×1
Resistor 10k ohm
Resistor 10k ohm
×1
Male to male wires
×1
LDR, 5 Mohm
LDR, 5 Mohm
×1
5 mm LED: Red
5 mm LED: Red
×1
Resistor 220 ohm
Resistor 220 ohm
×1

Software apps and online services

Arduino IDE

Story

Read more

Schematics

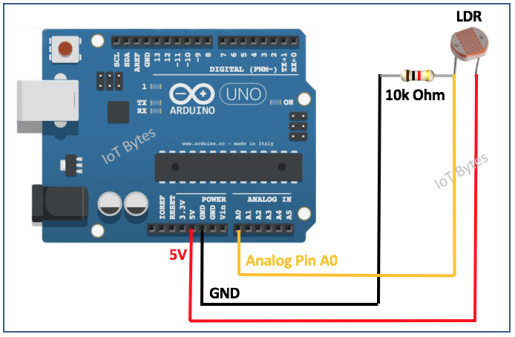
LDR with Arduino UNO connection

Connect LDR with arduino with this diagram and also connect a LED with 220Ω to Arduino digital pin number '11' and you can connect buzzer also!

Code

Code to see results and to connect LDR with arduino

C/C++
This is Arduino code. Upload this code and see results!
int ledPin = 11; // connect LED to digital pin 11
int ldrPin = A0; // connect LDR to analog pin A0
int buzzerPin = 12; // connect buzzer to digital pin 12

void setup() {
  pinMode(buzzerPin, OUTPUT);
  pinMode(ldrPin, INPUT);       // declare buzzer, LED as INPUT and LDR as OUTPUT
  pinMode(ledPin, OUTPUT);
}

void loop() {
  int ldrStatus = analogRead(ldrPin); // connect LDR with Arduino

  if (ldrStatus<=300) { // assign a threshhold value
    digitalWrite(11, HIGH);
    tone(buzzerPin, 4000);
    delay(100);                    // Condition in which, when the threshhold value is bigger and smaller is the value coming from LDR
    digitalWrite(11, LOW);         // then the buzzer will beep and the LED will blink!
    noTone(buzzerPin);
    delay(100);
  }
  else {
    digitalWrite(11, LOW);  // If the value coming from LDR is bigger and smaller is the threshhold value, then the buzzer will not
    noTone(buzzerPin);      // beep and the LED will not blink!
  }
}

Credits

rudraksh2008

rudraksh2008

4 projects • 1 follower

Comments