


Hardware components | ||||||
| × | 1 | ||||
 |
| × | 1 | |||
 |
| × | 1 | |||
| × | 1 | ||||
| × | 1 | ||||
| × | 1 | ||||
| × | 1 | ||||
| × | 1 | ||||
| × | 1 | ||||
| × | 4 | ||||
Software apps and online services | ||||||
| ||||||
 |
| |||||
| ||||||
Hand tools and fabrication machines | ||||||
 |
| |||||
 |
| |||||
 |
| |||||
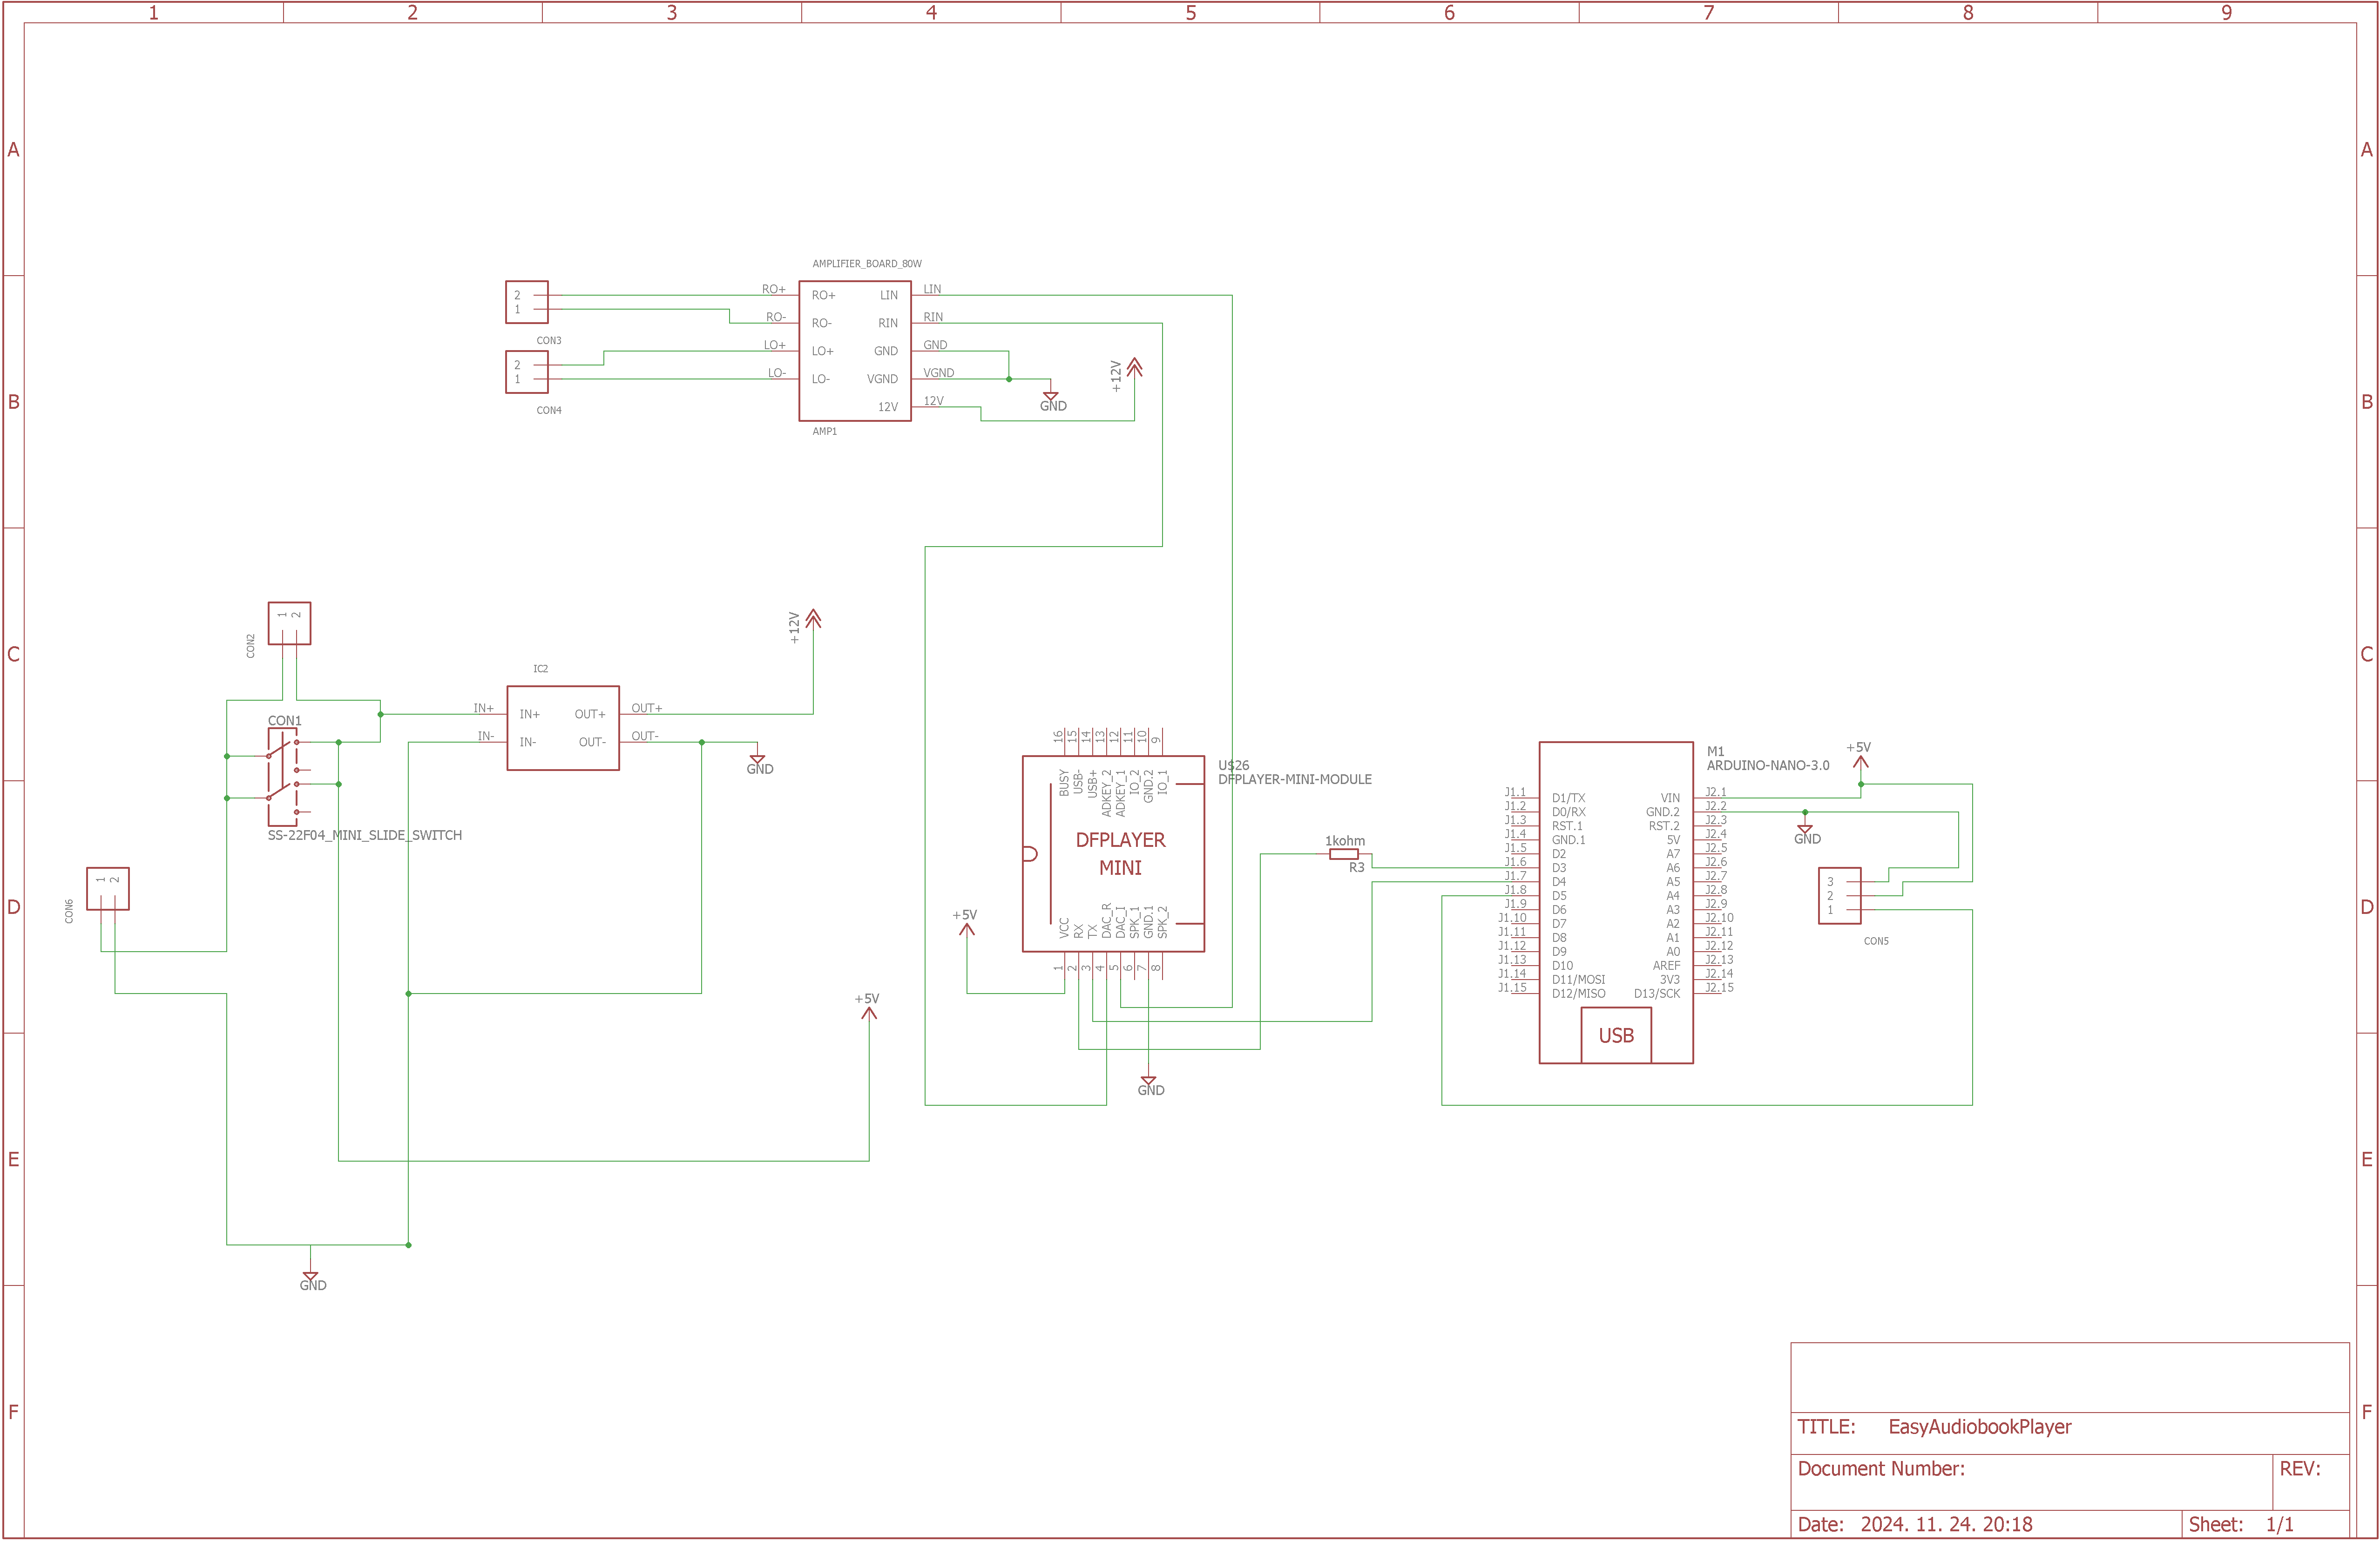
For the hardware assembly for this project, I designed a PCB circuit but it's a very simple circuit so it can be easily built on breadboards.
The Arduino detects the button press and controls the mp3 player module. The analogue signal coming out of the module is amplified by the amplifier and played through the speaker. The system gets power from a five-volt phone charger, but the amplifier is 12 volts so I had to use a DC-DCconverter to convert the incoming voltage to the amplifier.
Preapere mp3 filesIn order for the device to know where it is in the playback, the audiobooks need to be converted, so I created a Python code to break the audio files into smaller pieces so that the SD card is loaded with max. five minute mp3 files.
Download the Python code from the GitHub link: https://github.com/rundhall/Easy-Audiobook-Player
Using the Python code is very simple: copy all the mp3 files into the input directory \mp3_to_mp3chunks\mp3_files\ run the Python code mp3_to_mp3chunks\mp3_to_mp3chunks.bat and then copy the files from the output directory mp3_to_mp3chunks\mp3_files\ to the sd card "01" folder.
This script processes all MP3 files in a given directory, splits them into smaller MP3 files with a maximum duration of 5 minutes each, and names them sequentially, starting from `0001.mp3`. The script is designed to work with the EasyAudiobookPlayer. The generated files should be copied to an SD card formatted as FAT32 in a folder named `01`.
For example:
F:/01/0001.mp3
## How to Use
1. Install Python
- Download and install Python from [https://www.python.org/downloads/](https://www.python.org/downloads/).
2. Prepare Directories
- Place all your MP3 files into a folder named `mp3_files`.
3. Run the Script
- Execute the script by running the `mp3_to_mp3chunks.bat` file.
4. Copy Generated Files
- After the script completes, copy the files from the `output_files` folder to the `01` folder on the SD card.
5. Organize Processed Files
- Move all MP3 files from the `mp3_files` folder to the `done_mp3` folder to clean up for the next batch.
## Additional Notes
- Ensure that the SD card is formatted as FAT32 before copying the files.
- If the `done_mp3` folder does not exist, create it manually before running the script.
- The script processes all subdirectories within the `mp3_files` folder, ensuring no MP3 files are missed.
- If the `output_files` folder already contains files, the numbering will continue from the last file found in that folder.
### Example Directory Structure
Before running:
mp3_files/
file1.mp3
file2.mp3
output_files/
done_mp3/
After running:
mp3_files/
output_files/
0001.mp3
0002.mp3
### Troubleshooting
- If the script fails to process a file, check that the input MP3 files are not corrupted and are in a supported format.
- Ensure Python and required libraries like `pydub` are properly installed. You can install `pydub` by running:
pip install pydub
- Make sure `ffmpeg` or `libav` is installed on your system, as `pydub` depends on one of these for processing audio files.
Upload code to ArduinoTo program the Arduino, connect the module to the computer with a usb cable and download the program from Github https://github.com/rundhall/Easy-Audiobook-Player Run the Visual Studio Code, install the platformIO add-on open the EasyAudiobookPlayer_Arduino directory. Change the platformio.ini file if necessary set the type of the Arduino and the serial port.
Modify the source code to your liking EasyAudiobookPlayer_Arduino\src\main.cpp then upload it to the Arduino module.
### Requirements
- A USB cable to connect the Arduino module to your computer.
- Visual Studio Code with the PlatformIO add-on installed.
- The EasyAudiobookPlayer Arduino project files from GitHub.
### Steps to Upload the Program
1. Download the Project
- Clone or download the EasyAudiobookPlayer Arduino project files from GitHub.
2. Install Required Software
- Install [Visual Studio Code](https://code.visualstudio.com/).
- Open Visual Studio Code and install the PlatformIO add-on.
3. Open the Project
- Open the `EasyAudiobookPlayer_Arduino` directory in Visual Studio Code.
4. Configure PlatformIO
- Open the `platformio.ini` file in the project directory.
- Modify the configuration to match your Arduino module type and serial port:
“ [env:nanoatmega328]
platform = atmelavr
board = nanoatmega328
framework = arduino
monitor_speed = 115200
lib_deps =
xoseperez/DebounceEvent@^2.0.5
prosenb/EEPROMWearLevel@^2.1.0
dfrobot/DFRobotDFPlayerMini@^1.0.6 “
- Replace ` nanoatmega328` with the correct Arduino model (e.g., `pro16MHzatmega328`).
- Add this line: upload_port = your_serial_port if you know the serial port belongs to the Arduiono. Replace `your_serial_port` with the appropriate COM port (e.g., `COM3` on Windows).
5. Modify the Source Code (Optional)
- If needed, edit the file `EasyAudiobookPlayer_Arduino\src\main.cpp` to customize the functionality.
6. Upload the Program
- Connect the Arduino module to your computer via USB.
- In Visual Studio Code, click the PlatformIO: Upload button or use the shortcut to upload the program to the Arduino.
### Program Overview
The structure of the program is very simple: it initializes the mp3 player module and sets up the button press method in the setup() function. In the loop() function it monitors the button press and if an mp3 file is finished. If it detects a keypress, it switches from play to pause and from pause to play again. In the case that a currently playing mp3 has finished, it saves the current mp3 sequence number to the EEPROM so that it can resume playback from there when the mp3 is restarted.
The program is structured as follows:
1. Initialization in `setup()`
- The MP3 player module is initialized.
- Button press functionality is configured.
2. Looping in `loop()`
- Continuously monitors:
- Button presses:
- Toggles between play and pause modes.
- MP3 playback status:
- If an MP3 finishes, the program:
- Saves the current MP3 sequence number to the EEPROM.
- Ensures playback can resume from this sequence number upon restarting the device.
### Notes
- Ensure the Arduino module is compatible with the selected settings in the `platformio.ini` file.
- The program uses the EEPROM to save and retrieve the MP3 sequence number, allowing it to resume playback seamlessly after a power cycle or reset.
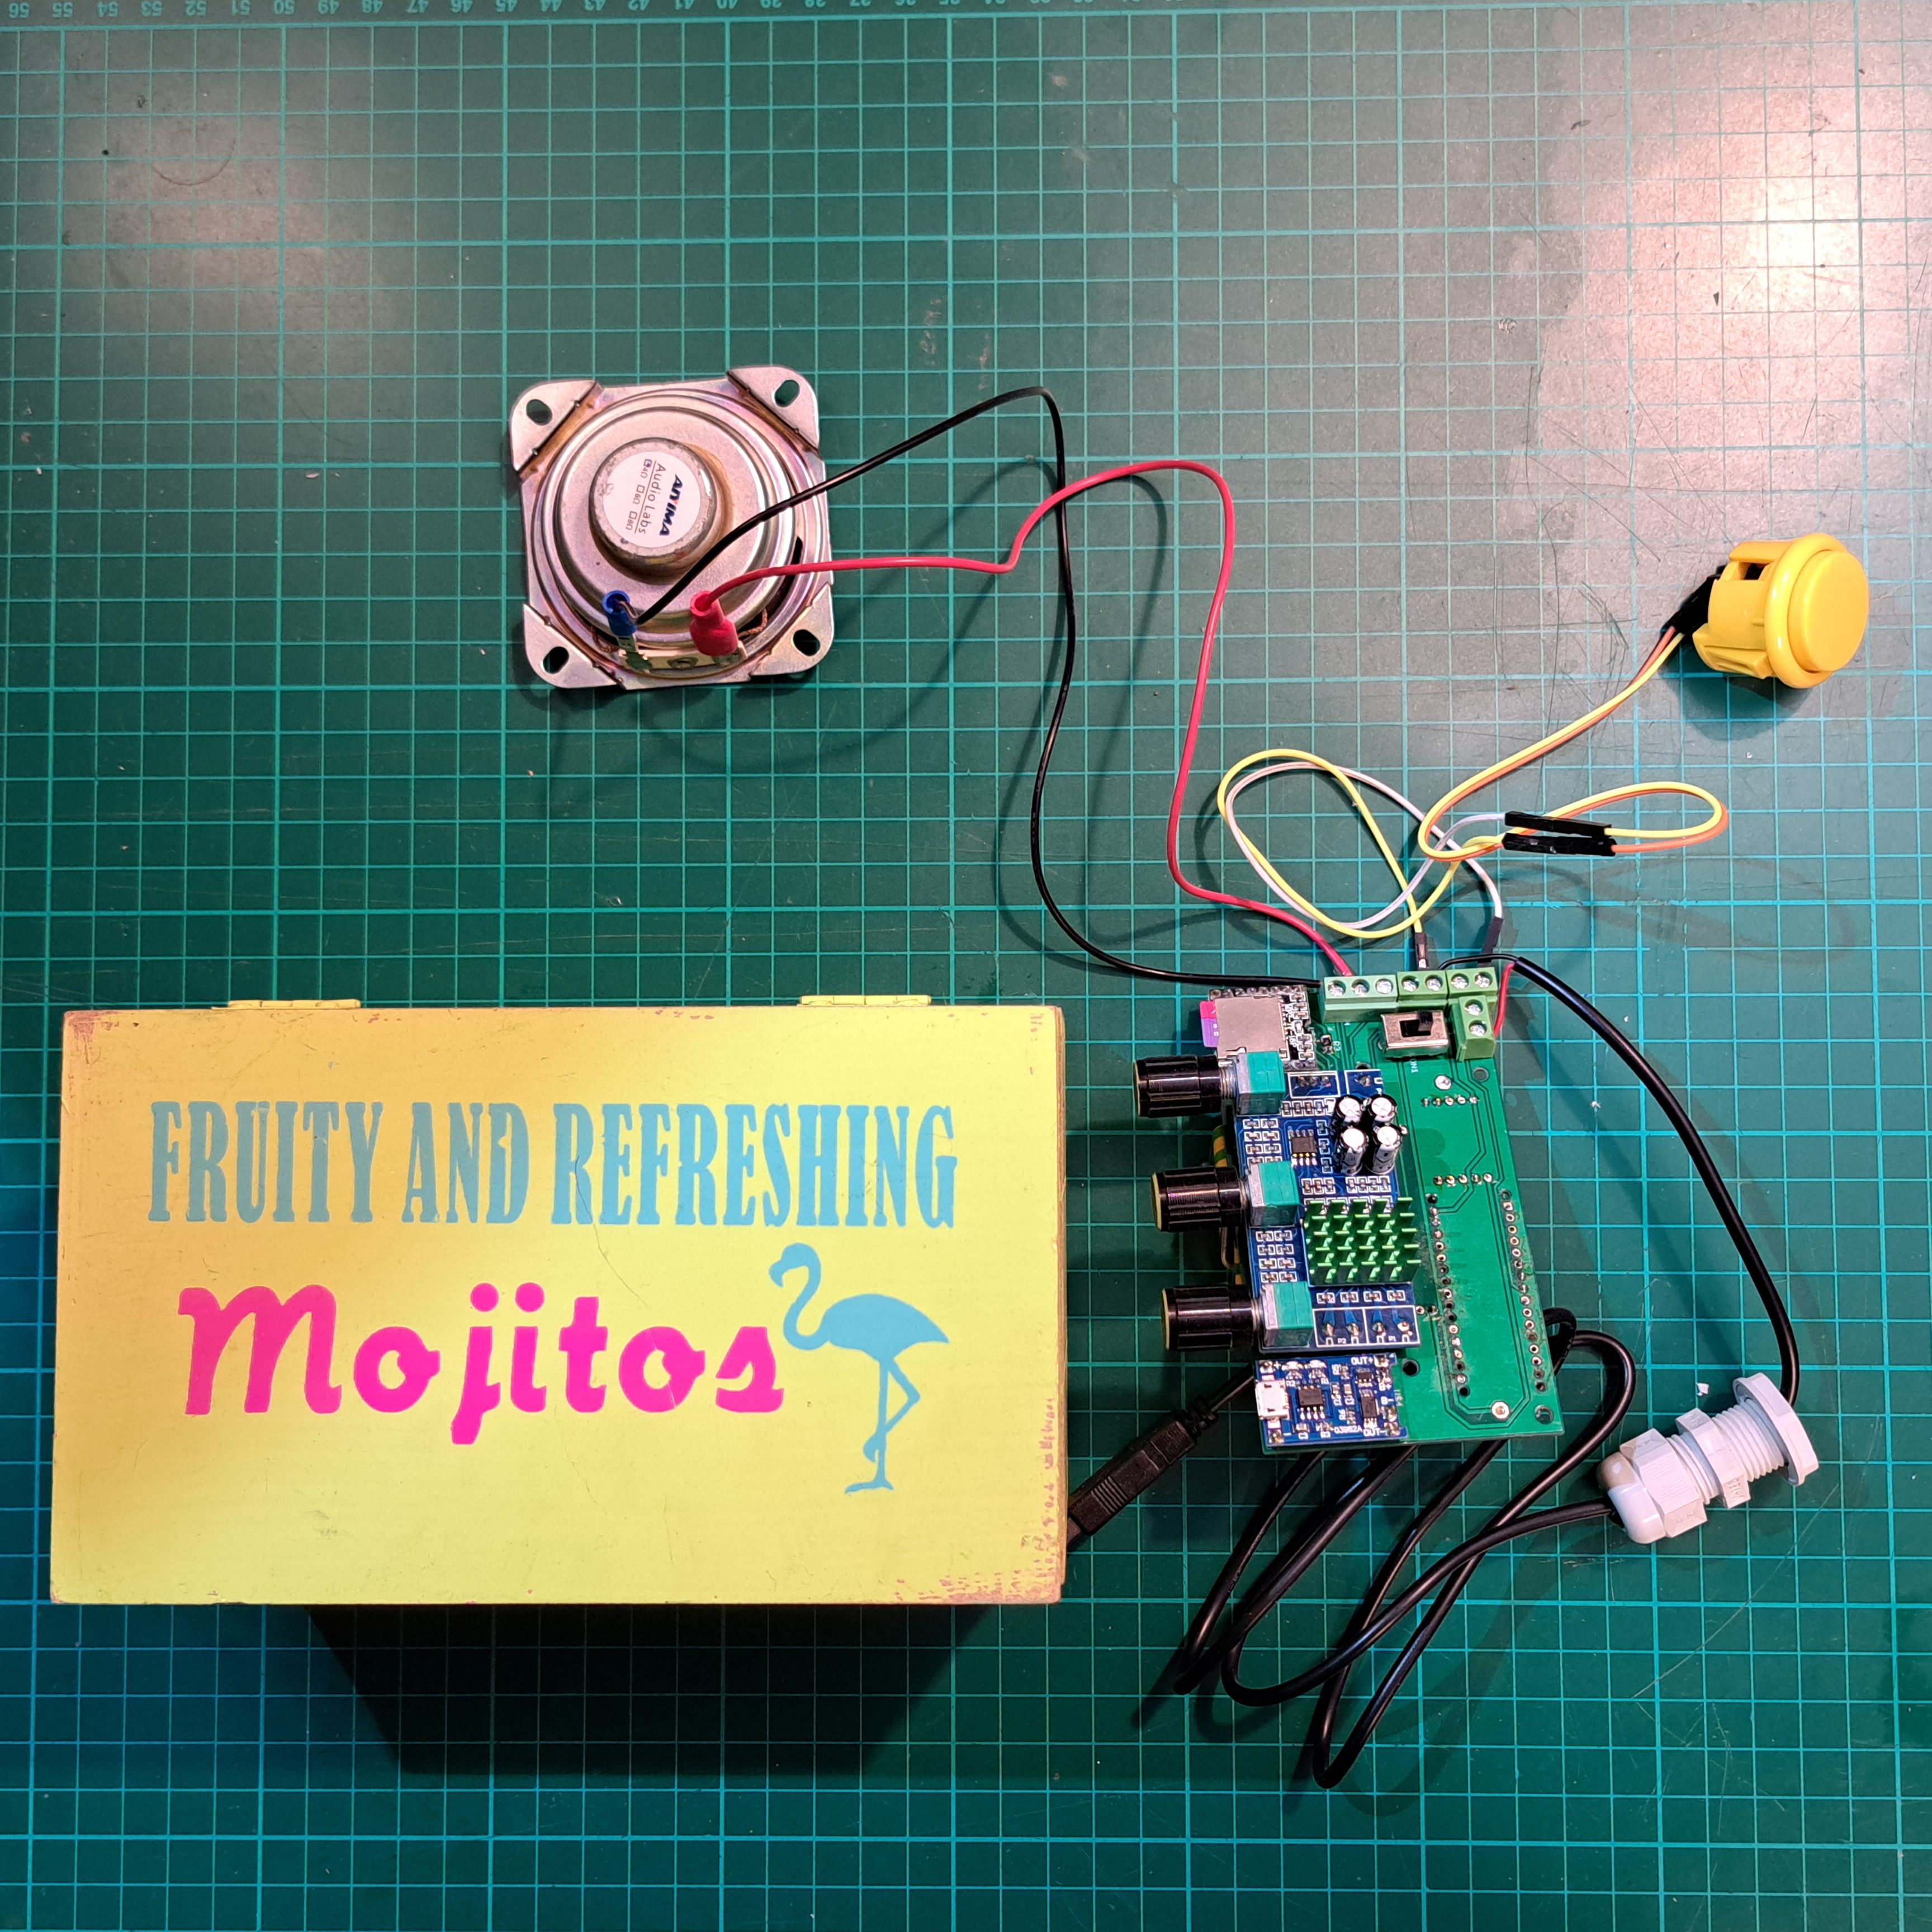
After the Arduino was programmed and the components were connected, the SD card was loaded with the mp3 files, now I just had to encase the whole system, I bought a wooden box, and I made a hole in the side of the box for the speaker, drilled a hole in the top of the box for the push button and attached the electronics to the side of the box, the charger cable was fed through a cable entry.
All you have to do is plug in the system, and you are ready to use your audiobook player. I hope others will also build this player and that many grandmothers will have a joyful Christmas surprise
Have a nice day!


Comments