Hello,
In this instruction, I will show you how I created a DIY remote controller for an android based teleprompter.
Recently because of the COVID-19 pandemic, I had to record a lot of presentations. Making a presentation with a teleprompter is much easier. This device makes it possible to constantly look at the camera while I am reading the text of my presentation. There are many applications available to use the phone as a teleprompter. The only problem is that the speed of the text is sometimes to slow, sometimes too quick. I needed a tool to control the speed remotely. I bought a Bluetooth remote controller, but it was too noisy, every time I used it, it made a clicking sound, which was noticeable in the recording. My goal was to build a Bluetooth remote which is silent and easy to customise.
In this video I show how to use the device, and how to build it.
How to useThe remote controller has a switch on the top of the enclosure. With that, the unit can be turned on or off. It has 5 buttons; each button can be configured as any keyboard button. Before the first use, it has to be paired with the phone (like in this video: https://www.youtube.com/watch?v=Yg9GyRbeIaA&ab_channel=Techboomers ). At Bluetooth settings search for new Bluetooth devices, it will pop up in the list as “BLE_Teleprompter”. After a successful connection, a teleprompter application should be started. I used this app: https://play.google.com/store/apps/details?id=com.ayman.elegantteleprompter
If the teleprompter application is configured correctly, it can be controlled immediately.
I used the following settings:
The thumb finger starts and stops the text. The connected key: MEDIA_PLAY_PAUSE.
The Index finger moves the text forward with one paragraph. The connected key: VOLUME_MUTE.
The middle finger moves text backward with one paragraph. The connected key: VOLUME_UP.
The ring finger increases speed of text. The connected key: VOLUME_DOWN
The little finger decreases speed of text. The connected key: ESCAPE
To change this setting there are two ways. Either the teleprompter application has a settings menu, where the functions and keyboards connections can be changed, or keyboard settings can be changed in the Arduino code before uploading to the ESP32 devboard.
The battery charger needs a 5V phone charger with USB Micro connector. The LED is red if the battery is charging and blue colour LED means that it is fully charged. After switching off, purple LED indicates that charging has been stopped.
Before reviewing the code more closely, let’s look at how to build the hardware.
3D printingDownload and print out the enclosure body and the top cover for the Bluetooth remote for teleprompter.
https://www.thingiverse.com/thing:4707745
If you change any components the housing should be modified accordingly. I designed it in fusion 360 and used PETG filament and an Ender 3 pro to print it, without any support and used Cura (https://ultimaker.com/software/ultimaker-cura) to slice and send to my printer.
Insert the injection nuts, if it is to tight use a hammer or a rasp
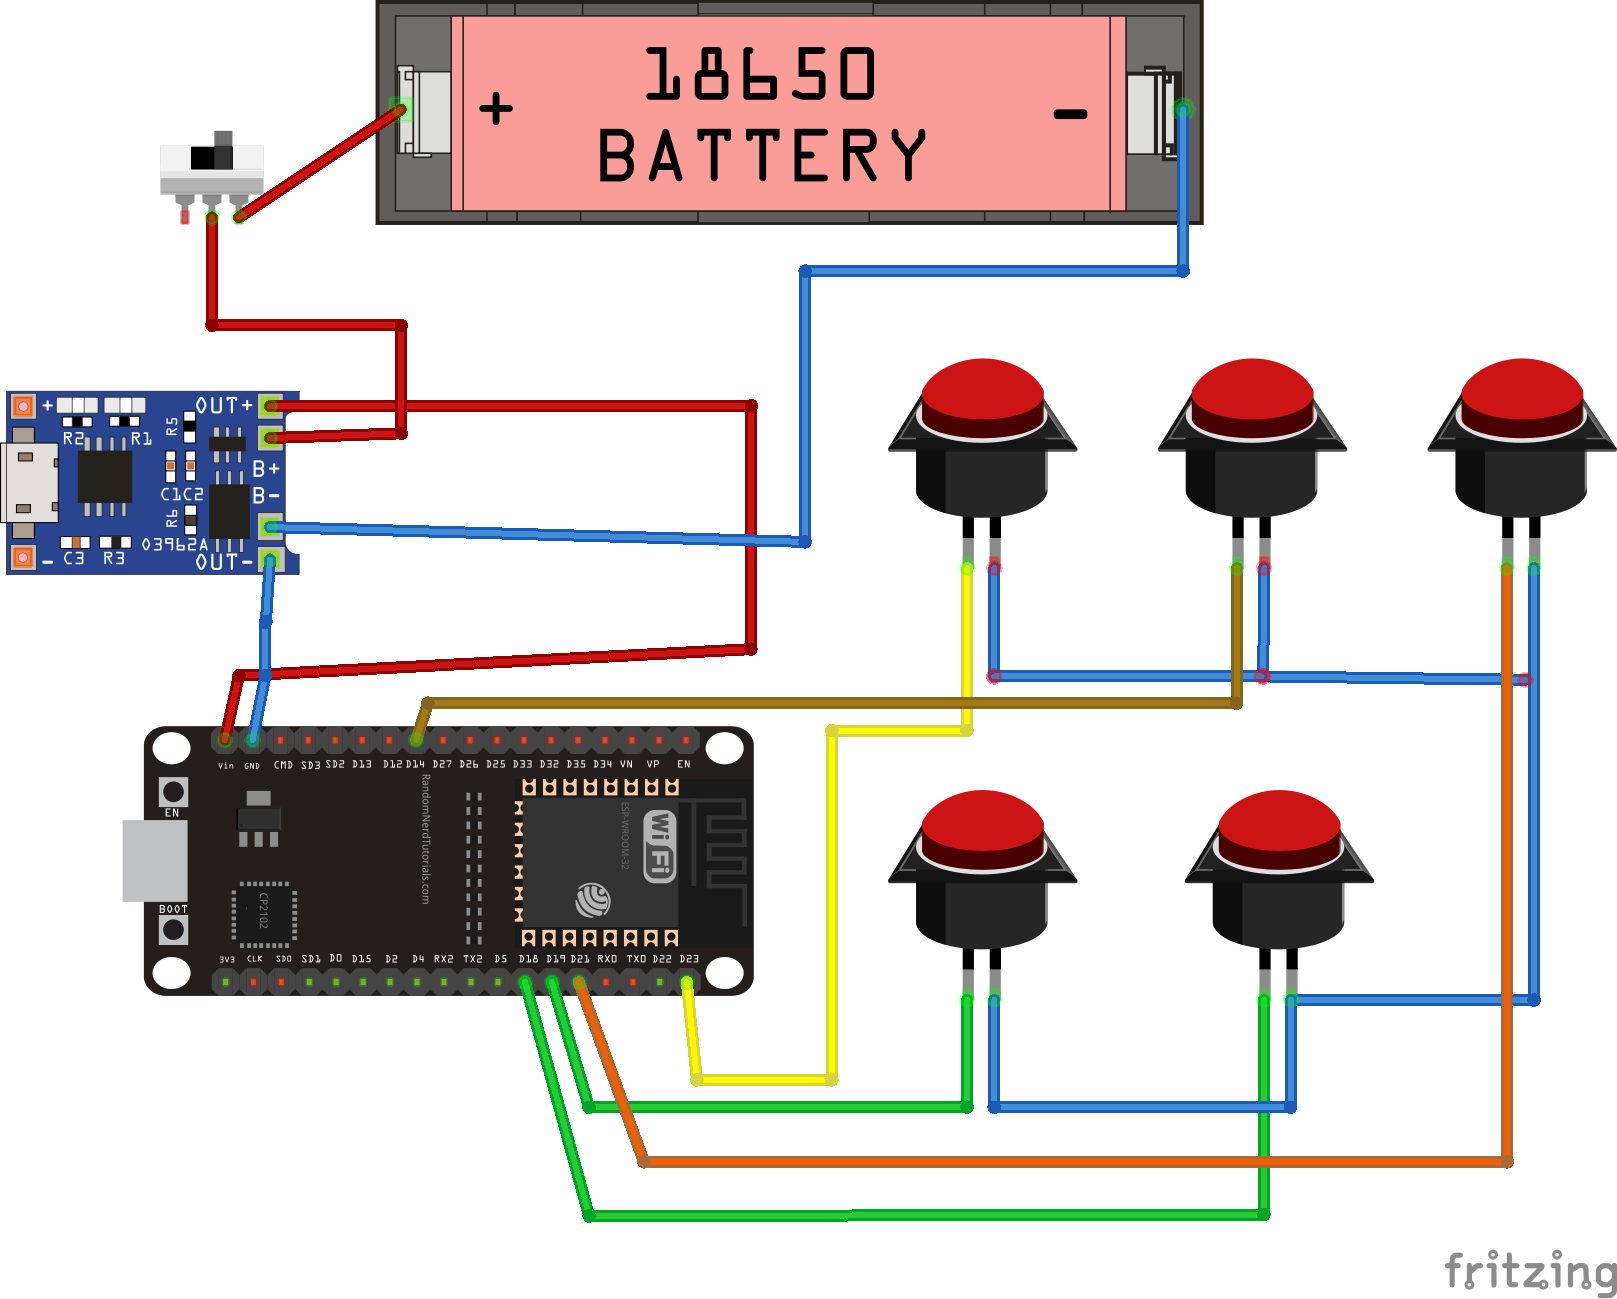
WiringConnect the components according to the schematic. The buttons and the switch should be connected to the wires before assembling to the enclosure. Use wire wrap tool to fix the wires to the PINs of the ESP32 dev board.
Upload the code to the Arduino board with the help of Visual Studio Code software (https://code.visualstudio.com/) with PlatformIO extension https://platformio.org/ and a Micro USB cable.
Connect Micro USB cable to the USB port of a PC and to the ESP 32 board
After installing Visual Studio, click on the Extension Manager
Search for official PlatformIO IDE extension
Install PlatformIO IDE.
Clone repository from my Github site: https://github.com/rundhall/BLE_Teleprompter_remote
Change keyboard keys for the buttons at BLE_Teleprompter_remote\src\main.cpp, if you prefer different button settings. You can find available keyboard keys here: BLE_Teleprompter_remote\.pio\libdeps\esp32dev\ESP32 BLE Keyboard\BleKeyboard.h
The code is using the BLELibrary extended library for ESP32 https://github.com/T-vK/ESP32-BLE-Keyboard Thanks for T-vK.
Compile and upload th code to the ESP32
Remove the micro USB connector and close the enclosure. You can now use the remote controller. The program waits in the main loop, until it gets a serial command from the PC’s serial port or a button is pressed.
Serial port commands is only for debugging purposes.:
“1, a”: MEDIA_PLAY_PAUSE.
“2, a”: VOLUME_MUTE.
“3, a”: VOLUME_UP.
“4, a”: VOLUME_DOWN
“5, a”: ESCAPE
Test it, and use it. Do not forget to turn it off and charge it sometimes.
Have a nice day!


Comments
Please log in or sign up to comment.