


Hardware components | ||||||
 |
| × | 1 | |||
| × | 1 | ||||
| × | 2 | ||||
| × | 1 | ||||
Software apps and online services | ||||||
| ||||||
| ||||||
In this story, I'll tell you an easy way of building a connected Geiger counter device using the MySensors library and SensorOcean platform as a controller to collect, manage, and publish the sensor's measurements to a public map.
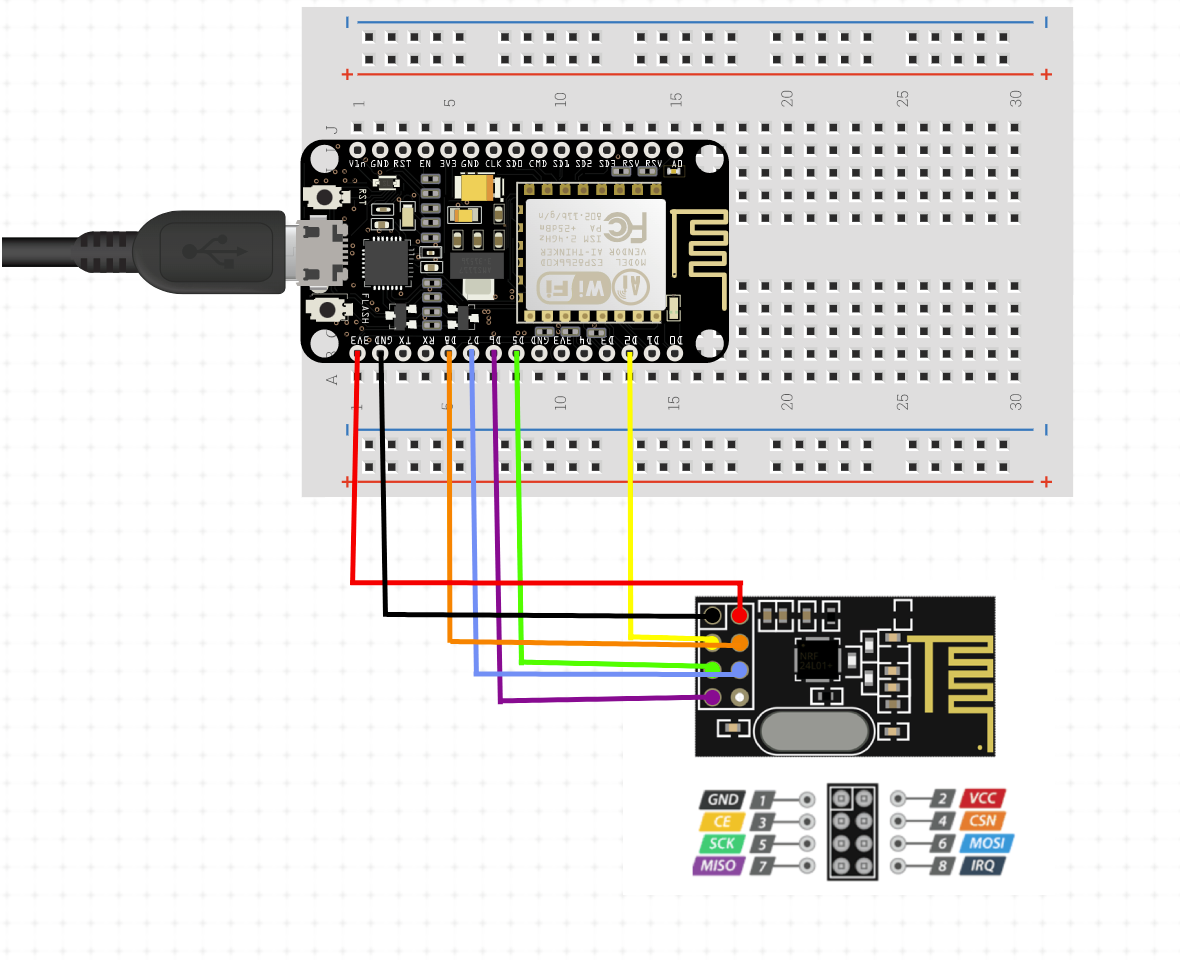
DeviceWe will use the MySensors approach to build and connect the Geiger counter: the device (the Geiger counter board + Arduino Nano) will communicate †o a gateway (ESP8266) via a radio network through the nRF24L01 modules.
You can read more about the MySensors components at https://www.mysensors.org/about/components.
Also, there is a good schema with an explanation at https://github.com/sensorocean/support/wiki/Platform-Components-(Architecture).
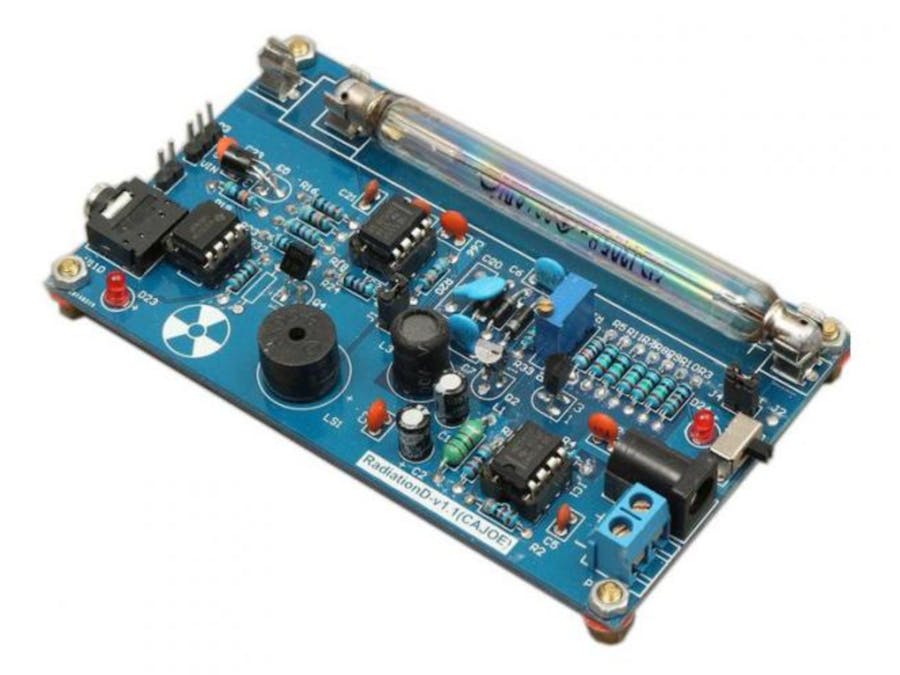
As a Geiger Counter component, you can use many of the boards available on the market, for example, this one
https://www.aliexpress.com/item/4001260288440.html
The wiring is pretty simple and well described on the Internet. Nevertheless, I am attaching the wiring schemas below.
The sketch for the Arduino Nano is based on this particular Geiger Board. Please, pay attention to the CONV_FACTOR constant, which depends on the type of Geiger tube used in the component. In my case, it was J305, which has the "0.008120370" factor value.
GatewayI used a Node MCU board which is based on the ESP8266 crystal. Actually, any ESP8266 based board can be used. You just need to wire it with the nRF24L01 module. Also, you can use a Raspberry Pi as a gateway.
Please, be sure that both sketches use the same MY_RF24_CHANNEL.
The sketch for the ESP8266 based gateway is taken from the SensorOcean examples at https://github.com/sensorocean/support/blob/master/examples/gateway/esp8266/esp8266_wifimanager/esp8266_wifimanager.ino
The sketch uses the WiFiManager library that makes configuration of the gateway an easy process, through a WiFi Access Point. Read more at https://github.com/tzapu/WiFiManager
Connecting to SensorOceanSensorOcean is an easy-to-use IoT platform that is compliant with MySensors solutions. It can be used as a free online controller for the MySensors edge devices.
The platform provides features to make our Geiger Counter prototype a complete application with features such as automation (workflow), data charts, sharing, and more. Besides, using webhooks we can connect our device to practically any other platform or application!
SensorOcean has a basic free-of-charge account that supports processing up to 500, 000 records from up to 10 networks of sensors a month. It must be enough for most of DIY projects. And they have paid in-platform packages should you need more.
It is an intuitive and easy to use platform, just follow the steps!
1. Register in the SensorOcean platform
To register on the platform you need a redeem code. Simply send a request to support@sensorocean.com, describe in a few words your project, and ask for a redeem code. Once you get it continue to the registration process at https://cloud.sensorocean.com. To enable your account you need to confirm the email address.
2. Get the Gateway ID
Once logged in, create a network on the Networks page, and copy its Gateway ID, you need it to connect your gateway to the SensorOcean's MQTT broker.
3. Configure the Gateway
Switch on the gateway, connect to its WiFi network ("ESP Gateway") and configure it with the SensorOcean parameters: credentials (username and password) and the Gateway ID. Use mqtt.sensorocean.com and 1883 for host and port.
Save.
That's it. After your gateway goes online, you can get back to the SensorOcean and check your Geiger Counter!
The data you have in the SensorOcean is not public. To publish it to a third-party app (we consider the radmon.org) you need to define a workflow. Just go to the Networks page, click the Edit icon of the network, and select the Workflow tab in the popup window.
We need to define three steps (processes):
Process 1: input
Define conditions when to trigger the workflow, it is the first step by default.
Process 2: Calculate CPM
We need to make a simple calculation to convert the uSvh we receive from the sensor to CPM, which is accepted by the radmon.org API.
function main(obj) {
  var result = {};
  // Your code here

  const factor = 0.008120370;
  var uSvh = obj.payload;

  var cpm = Math.round( uSvh / factor );

  result["cpm"] = cpm;
  return result;
}Process 3: Publish
Publish the calculated CPM to the radmon.org API. It is a simple GET request:
{
    "url": "http://radmon.org/radmon.php?function=submit&user=your_username&password=your_data_sending_password&value={context.cpm}&unit=CPM",
    "method": "GET",
    "headers": {},
    "data": {},
    "response_key": ""
}The "your_username" and "your_data_sending_password" are defined in the radmon.org profile as well as GPS coordinates of the sensor and alerts.
The {context.cpm} refers to the CPM value calculated at the previous step.
After saving the workflow, we can check its status on the Controller tab. As a result, our Geiger Counter device has been published to the radmon.org list and updated regularly.
By the way, using the SensorOcean workflow you can send an email notification when the measurements go beyond a defined threshold. Or pass the measurement to another device in the same network, for example, to an LCD device. Or you can call a webhook from the IFTTT.com... Investigate it! There are many options and methods available to run your scenarios.
ResultWe have published measurements from our Geiger Counter device. By adding other components to the solution (like LCD, LED, sound signals, etc) you can easily extend its capabilities. Just follow the approach described!
ReferencesThese links helped me get started on SensorOcean:
https://github.com/sensorocean/support/wiki
https://github.com/sensorocean/support/tree/master/examples/gateway/esp8266/esp8266_wifimanager
https://www.mysensors.org/about/components
Need help?If you require professional help with your IoT and software projects, don't hesitate to contact us at info@edgica.com. Thank you!


Comments
Please log in or sign up to comment.