


Hardware components | ||||||
_ztBMuBhMHo.jpg?auto=compress%2Cformat&w=48&h=48&fit=fill&bg=ffffff) |
| × | 1 | |||
 |
| × | 1 | |||
 |
| × | 1 | |||
In this project I will assume you have some very basic knowledge of electronics and uploading code to the Arduino. This is a really easy project so I'm sure you will not have any issues.
Step 1: Gather the PartsFor this project use an Arduino Uno micro controller connected to a solderless breadboard.
- 1 - Andruino
- 1 - Solderless Breadboard
- 3 - Resistors (220 Ohm)
- 1 - 8-ohm Mini Speaker
- 2 - 5mm LED Lights
- 3 - Short Jumper Wires (1 cm)
- 4 - Longer Jumper Wires (6 - 10 cm)
- 1 - USB Cable
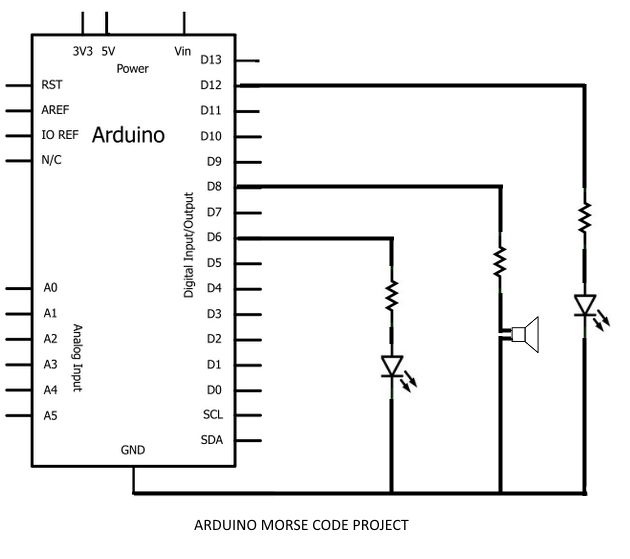
First setup the breadboard to connect the two LEDs and one speaker as seen in the wiring diagram. Connect the small jumper from the ground to one row. On a second row connect a longer jumper cable and a resistor. The LED light or speaker will bridge these two rows. When connecting the LEDs, the positive leg (longer of the two wires coming out of the LED) should be connected to the line with the resistor and the negative leg will be on the grounded row.
Step 3: Connecting the ArduinoNow that you have the breadboard wired you will connect this to the Arduino. In the code we will be using output pins six and twelve for the LED lights and pin eight for the audio. Connect the two longer jumper wires with the LEDs inline to pin six and twelve on the Arduino. Connect the longer jumber wire with the speaker to pin eight. Finally, connect the GND pin to the ground bus at the top of the breadboard.
Step 4: Uploading the Codehttps://gist.github.com/8bdc1a7af33b027a78ebcae97543d4ff.git
--------------------------------------------------------------------------------------------------------------------------
Step 5: Testing the ProjectShare:

Comments
Please log in or sign up to comment.