WARNING! DO AT YOUR OWN PERIL, THIS WILL DEFINITELY VOID THE WARRANTY FOR THE ECHO DOT AND MIGHT BRICK THE DEVICE. On the other hand your loss is limited to $30, that's what Amazon is charging now for the device, and you are working with low currents, so no electric shock risk :-)
UPDATE 1/2/2018I did brick the Echo, so do what I say but don't do what I do :-) Nevertheless, got a new one and completed the project, now being more careful with soldering (must have shorted something previously). See the video below. At the end I added the description of the solution as well (with the code)
What's the problem to sort outAt $30 the Echo Dot is a steal as a music streamer, as it has an 3.5mm audio jack (as well as Bluetooth, if that's what you prefer). The internal speaker is good for only command-response stuff, I wouldn't self-inflict listening music on it. The challenge is that when the 3.5mm jack is plugged in it silences the internal speaker; unless you have an always-on amplifier you'd end up missing Alexa responses. The typical use case in my opinion (and my case) is an amplifier that's used for various inputs (music streaming, record player but could be TV, CD, etc) and that I switch into stand-by when not used. As such there is no guarantee that when you talk to Alexa the amplifier would be both on and connected to the right input; with the internal speaker silenced always when the 3.5mm plugged in it is a lottery to hear the responses.
Options- Plug in the 3.5mm jack when listening to the music, plug out when you done. This is a simple, low-tech solution but with the convenience factor of zero.
- Use Bluetooth if your amp supports (or with external Bluetooth adapter). This is somewhat better as you can ask Alexa to connect to Bluetooth device when you want to listen to music; definitely better that plugging in/ out a cable but still an extra step. Additionally, you get somewhat lower audio quality and depending on the device configuration (e.g. when using an external Bluetooth adapter), even when the amplifier is off the Bluetooth might be still connected thus routing the audio again to nowhere.
- My proposed solution is one when I gain control of the internal speaker behavior. This involves modifications to Alexa, so might not be for everyone. But gives the most flexibility.
The Echo Dot is using a 3.5mm connector that disconnects two pair of pins when the jack plugged in. The solution is relatively simple: run cables to those pin pairs and decide when to activate the internal speaker. There are various options that can be pursued, depending on your configuration and sophistication:
- Short the two pairs permanently. For this you can actually simplify the project and avoid any mechanical modifications to the the device by simple shorting those pins directly on the PCB. The drawback is that the internal speaker will be always on, so if for instance you want to hear listen to the music on your super-duper hi-fi audiophile equipment, you'll have an annoying echo music from the Echo speaker (or shall I say buzzer, as calling it a speaker is almost a joke).
- If your amplifier has a 12V output trigger that can be configured with a specified input (so the voltage is only present when the amplifier is on AND the specific input where Echo Dot is connected to is selected) then probably the easiest solution would be to buy a 2-channel 12V relay steered through the amplifier output trigger. My amplifier while it has an output trigger, it can be only configured to on/off of the amplifier as a whole, for any input. So in my case I need a different setup.
- UPDATE 1/2/2018 THIS OPTION IS NOW IMPLEMENTED, GO TO END FOR DESCRIPTION. What I'm planning to implement, but not in scope of this project (might document later on), is to use an external microcontroller. I have the benefit of having one already connected to the amplifier; see my project https://www.hackster.io/saka/alexa-voice-control-for-almost-any-amplifier-tv-cd-dvd-87fff1 | The controller already knows when I select the input where Echo Dot is connected, as such it is a straightforward thing to activate then a pin on the Particle Photon that would steer a 2-channel relay, disconnecting the internal speaker when the stereo is active.
Taking apart the Dot is actually not that difficult. But things will never be the same again afterwards; there is a sticky rubber pad that you can put back but it will show has been removed (though this is at the bottom of the device so not visible at all). Also, there is some drilling, soldering, cutting involved. And as I warned at the beginning, this involves working with delicate electronics, so you always risk to brick the device. Now that you have been warned...
Gently remove the rubber pad at the bottom. Pry it delicately and it will peel off.
Once the rubber mat removed there is still a transparent foil glued to the bottom. In order to access the screws I simply drilled holes through that foil. Using a Torx screwdriver, remove the screws. Delicately open the device.
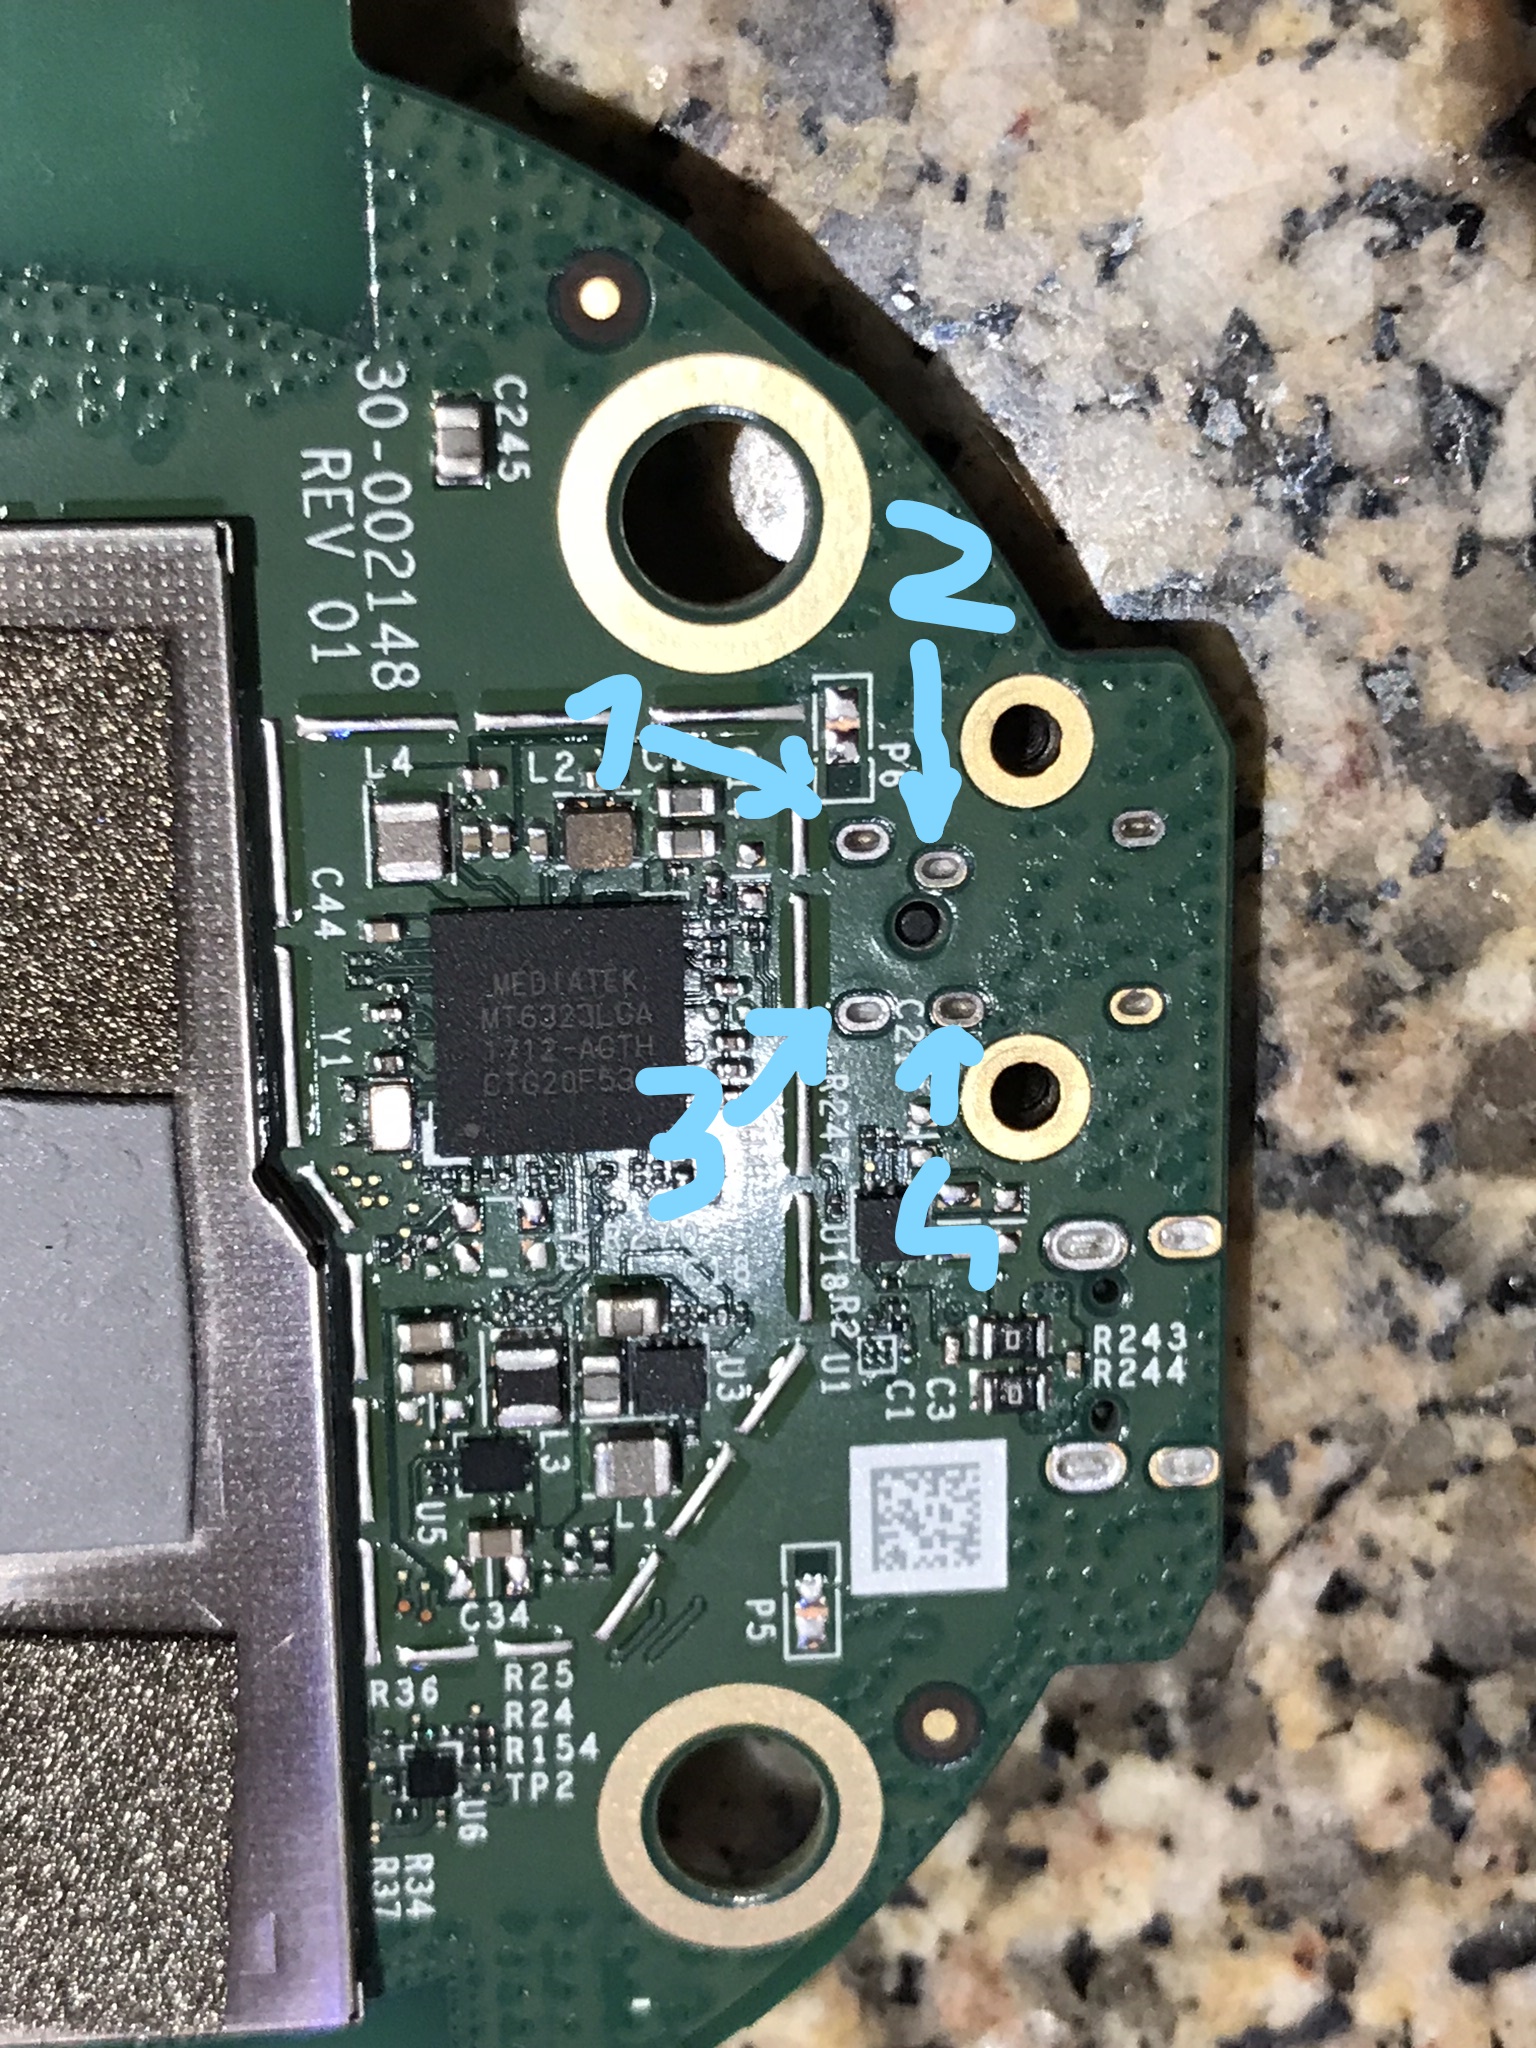
SolderingNow comes the tricky part. The pins for the 3.5mm connector are very small so be very careful. The cables need to be soldered to the the pins marked 1-4 in the photo above. If you short pins 1&2 and 3&4, the internal speaker will be on, even if a 3.5mm jack is plugged in. As I described in the "My Solution" section, there are various options how and when to turn on/off the internal speaker.
Same view with the cables soldered.
Some mechanical work...In order to get the cables out there are few modifications that are necessary.
Firstly, the internal skeleton is of something that looks like a magnesium alloy (BTW quite remarkable for a device at this price point). It is necessary to remove a little underneath where the connector sits to let the cables out. I used a Dremel but whatever works.
Next there is a need to cut on opening in the plastic enclosure to let the cables out.
Just to make sure the cable stays firmly I put a little glue, and an isolation on top
Eventually, assemble it altogether
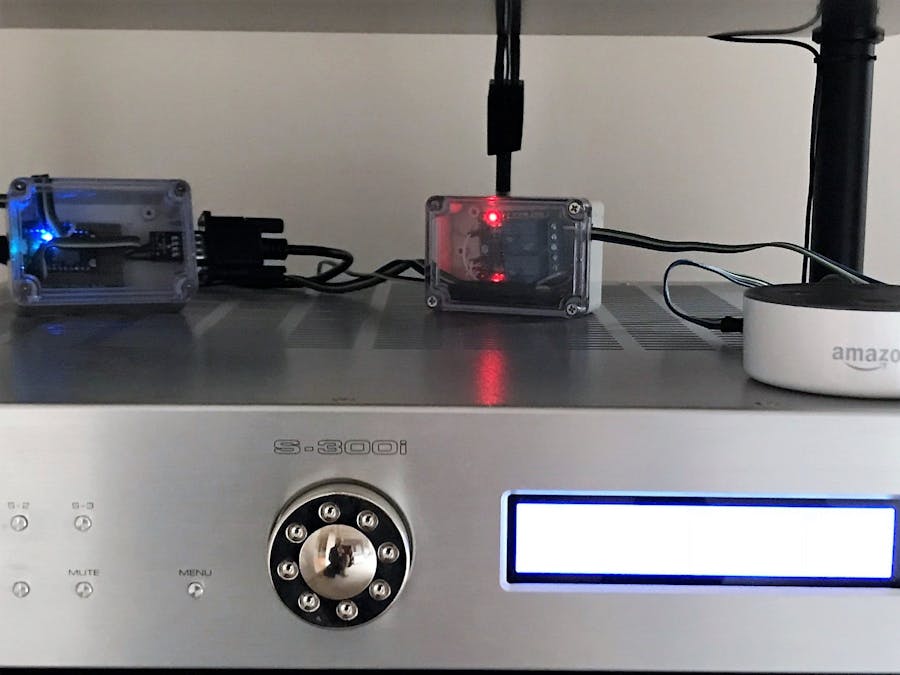
I'm using a Sunfounder 2 Channel 5V relay
Connected as follows (relay -> Photon), please note that the jumper RY-VCC/VCC MUST be removed in this configuration:
- VCC -> 3.3V
- RY-VCC -> VIN
- IN1 -> GPIO D4
- IN2 -> GPIO D4 (I'm steering both from the same GPIO; if you want to play it safe to avoid too high load you might steer this from e.g. D5, just program the pin to mirror D4)
- GND -> GND
Then with Alexa connect what I marked as 1&2 to J1 1&2 and 3&4 to J2 1&2 (these are normally closed, so even if power down, the internal speaker would be active).
I'm not documenting here the Photon part, is part of a serial controller described here https://www.hackster.io/saka/automate-bluesound-s-node-with-amplifier-and-alexa-control-3fbc9e.
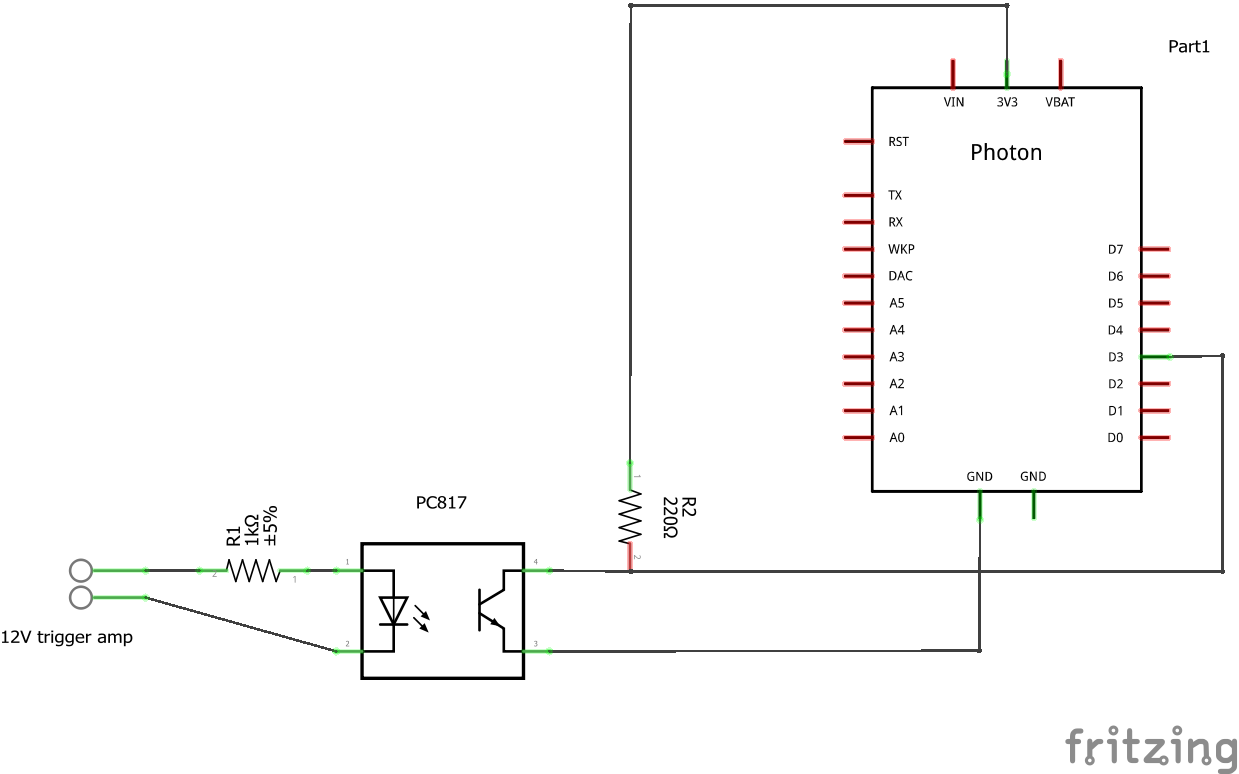
Additionally, I'm using the amplifier 12V trigger. This ensures that when e.g. the amplifier is switched off manually, it resets Alexa to the internal speaker.


Comments
Please log in or sign up to comment.