


Hardware components | ||||||
| × | 1 | ||||
| × | 1 | ||||
| × | 1 | ||||
| × | 3 | ||||
| × | 3 | ||||
| × | 1 | ||||
Software apps and online services | ||||||
 |
| |||||
| ||||||
Keyboard Capacitive Touch Disc Pad (https://robotdyn.com/capacitive-touch-disk-pad.html) consists of 15 touch buttons. This compact, inexpensive keyboard can be connected to any capacitive module. It is a full-featured touch keyboard that can be easily integrated into a professional control system or microcontroller application. Touch panels are numbered from 1 to 15. Buttons can be marked with a marker pen. Included: Board and jumper and FF wires 150mm long.
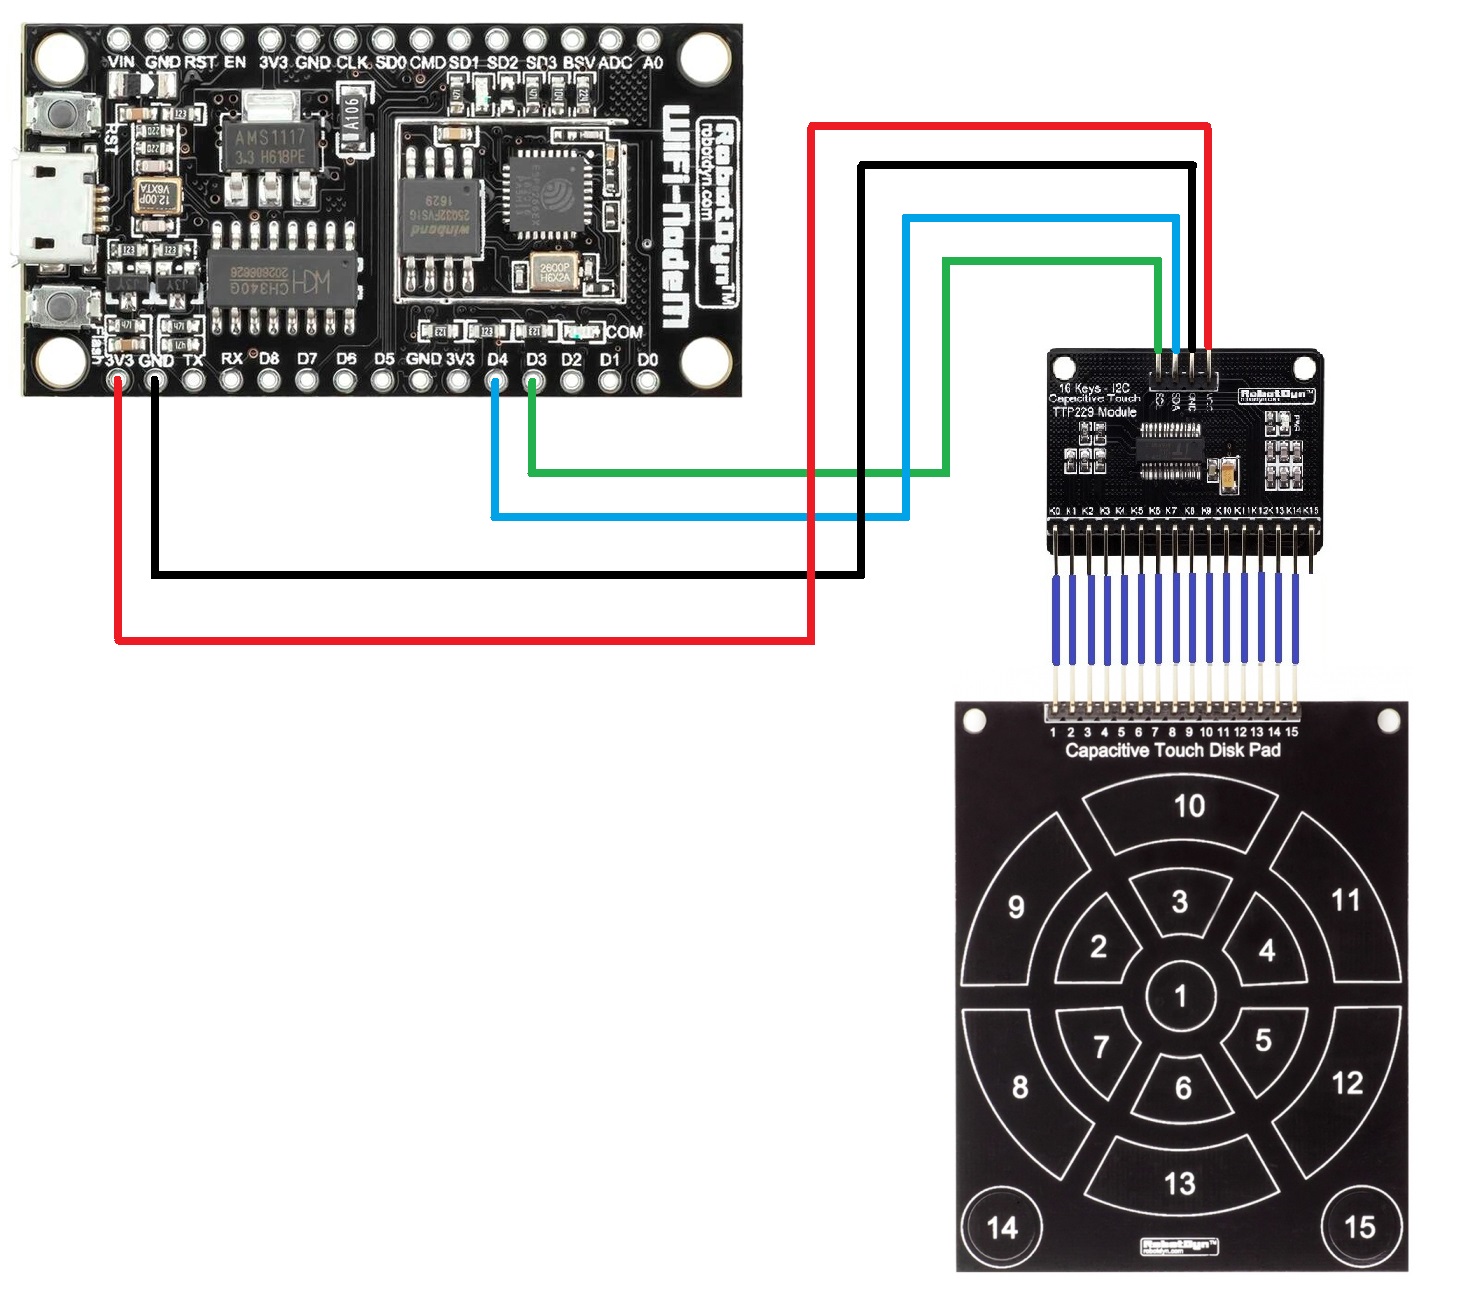
Consider connecting the keyboard to the WI FI Modem Board on the ESP8266 module (https://robotdyn.com/wifi-nodem-esp8266-32m-flash-ch340g.html). To connect, we will use a 16-key capacitive touch module 16 Keys Capacitive touch HTTP 229 I2C module (https://robotdyn.com/16-keys-capacitive-touch-ttp229-i2c-module.html), which connects to the microcontroller over the I2C bus.
Connection according to the connection diagram:
Let's write a sketch to determine the pressed keys on the touch keyboard and output them to the serial port. The contents of the sketch:
// include libraries
#include "Wire.h"
/ / TTP229 address
#define TTP229_LSF 0x57

void setup() {
   // start I2C
   Wire.begin(0,2);
   // starting the serial port
   Serial.begin(9600);
}
// getting I2C data
void getTTP229data(byte *a, byte *b) {
   // request 2 bytes from TTP229
   Wire.requestFrom(TTP229_LSF, 2);
   int dataN = 0;
   while(Wire.available())
      {
      // getting bitwise
      char c = Wire.read();
      if (dataN == 0) *a = c;
   if (dataN == 1) *b = c;
   dataN++;
   }
}
/ / show received data
void showTTP229data() {
   byte aa,bb = 0;
   getTTP229data(&aa,&bb);
   Serial.println();
   printByte(aa);
   printByte(bb);
   delay(1000);
}
void loop() {
   showTTP229data();
}
// binary output function
void printByte (byte bytePrint) {
   for (unsigned int mask = 0x80; mask; mask >>= 1) {
      if (mask & bytePrint) {
         Serial.print('1');
      }
      else {
         Serial.print('0');
      }
   }
}
Load the sketch to the Node MCU ESP8266 Board, open the serial port monitor and view the keyboard status output using the 1-15 button (1-pressed, 0-pressed):
The Arduino development environment is not the only way to program with ESP8266. Another option is microbion. Python Python 3, C C, which is optimized for microcontrollers.
Documentation for getting started with micropython for ESP8266 - https://docs.micropython.org/en/latest/esp8266/tutorial/intro.html
Let's write a script to detect the pressed keys on the touch keyboard and output them to the terminal. The contents of the script:
// import libraries
from machine import I2C, Pin
import time

data = bytearray(2)
/ / displays a list of keystrokes
def getkeys(data):
   arr=[0.15,14,13,12,11,10,9,8,7,6,5,4,3,2,1]
   str1="click "
   mask=0x0001
   for i in range(1,16):
      if (mask<<i) & data > 0:
         str1=str1+str(arr[i])+" "
   printf(str1)

i2c =I2C(scl=machine.Pin(2), sda=machine.Pin(0))
while True:
   // reading data from the Capacitive touch TTP229 I2C module
   data = i2c.readfrom(0x57,2)
   word=data[0]<<8 | data[1]
   if word !=0 :
      getkeys(word)
   time.sleep(0.5)
Load the script to the Node MCU ESP8266 Board, open the serial port terminal and view the output of the pressed keys:
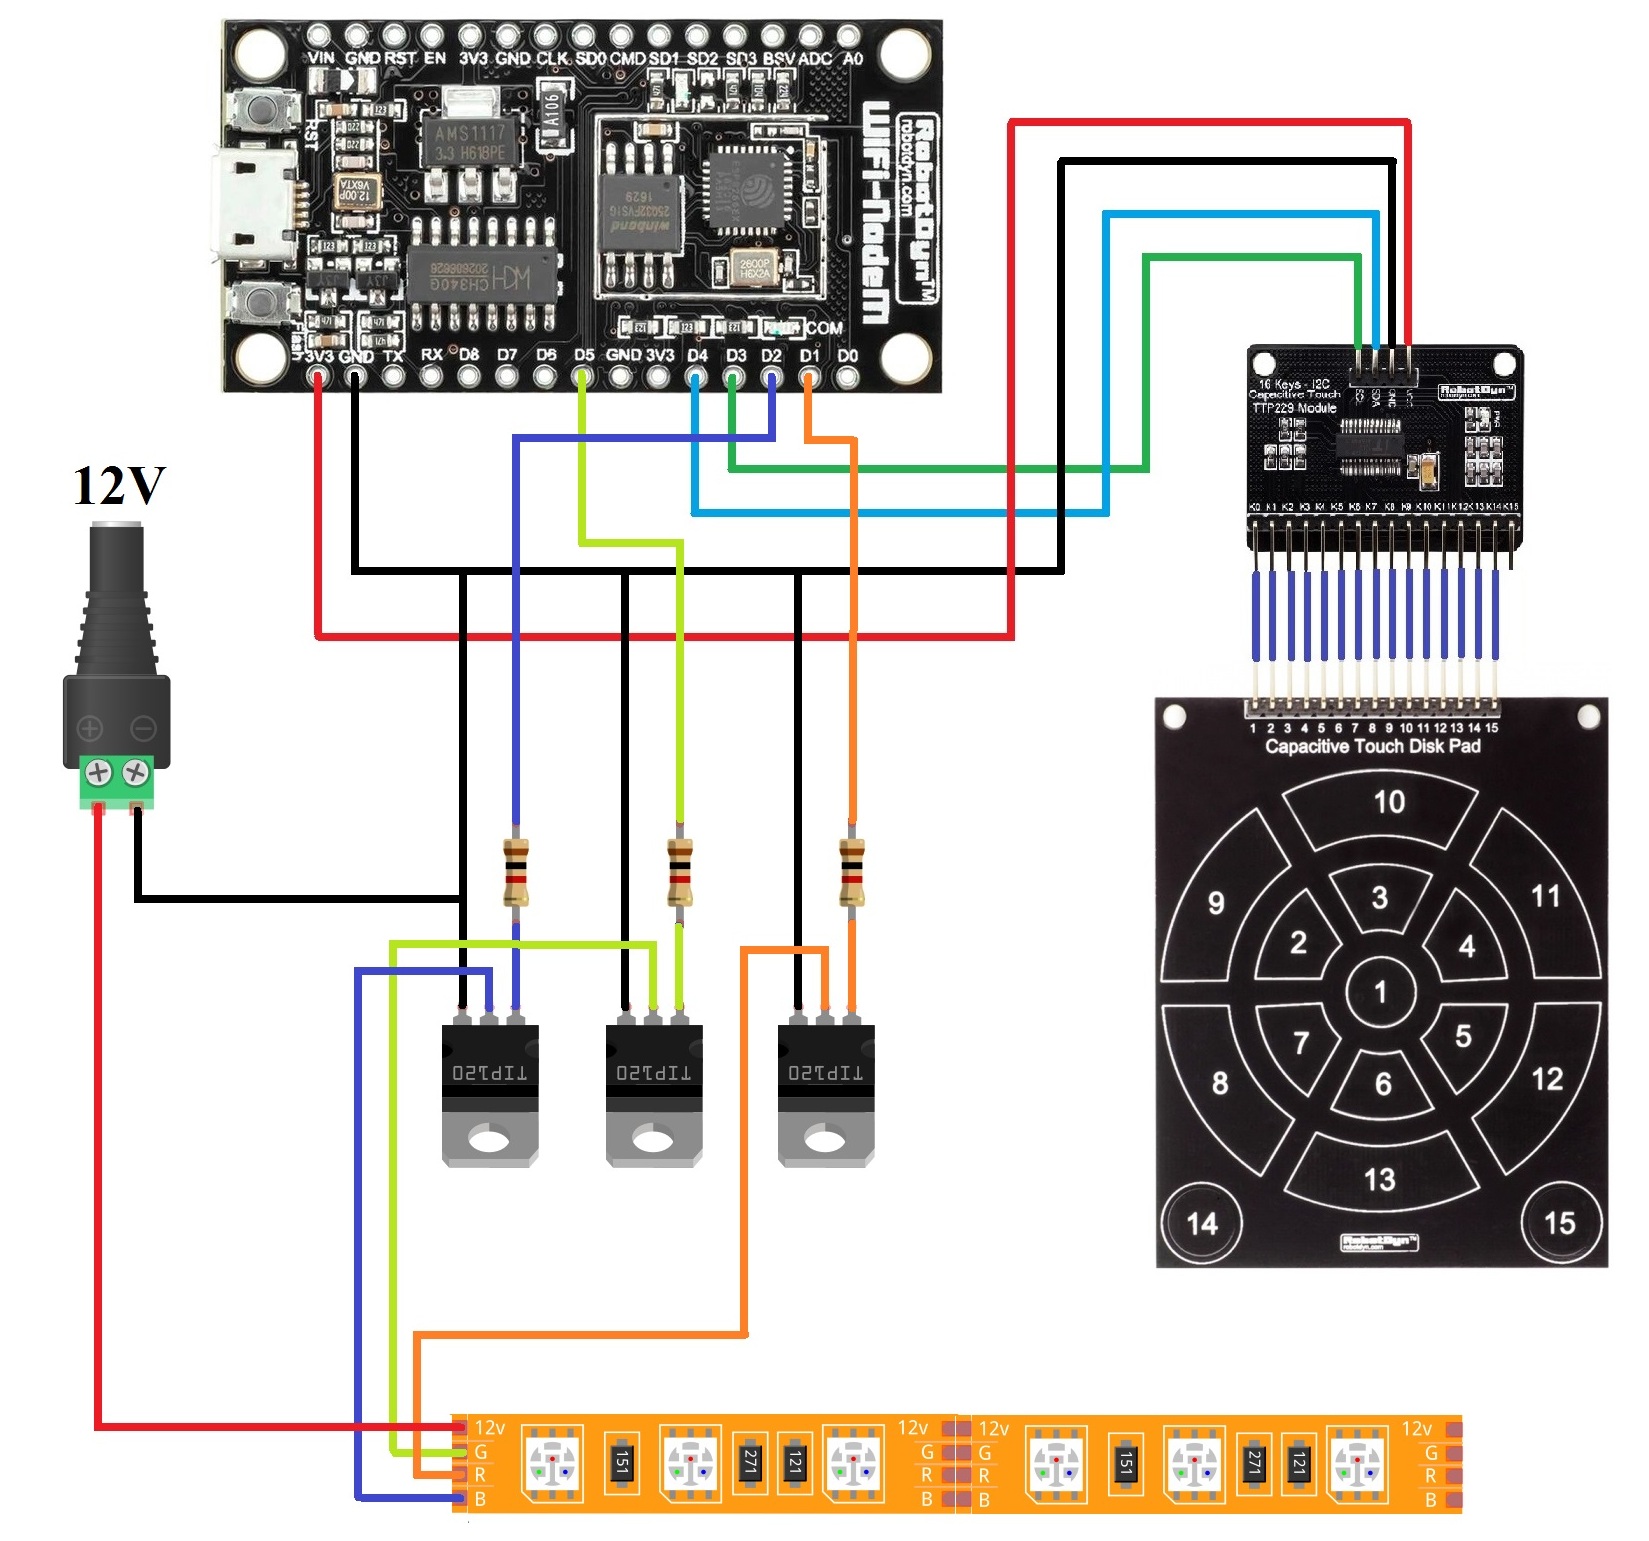
As a usage example, let's create a project to set the RGB color of the led strip using the Capacitive Touch Disk Pad keyboard.
We will use the following components:
- WIFI NodeM ESP8266 (https://robotdyn.com/wifi-nodem-esp8266-32m-flash-ch340g.html) - 1;
- Keyboard Capacitive Touch Disk Pad – 1 ;
- 16 Keys Capacitive touch TTP229 I2C module – 1;
- Transistor Tip122 – 3 r;
- Resistor 1 kOm-3;
- Power supply unit 12V 2A-1;
- Wires.
Component connection diagram:
Assigning buttons to the Capacitive Touch Disk Pad keyboard.
Define the purpose of the keyboard keys.
Sketch for setting the color of the led strip in the C programming language for the Arduino IDE programming environment:
// connecting the library
#include "Wire.h"
#define TTP229_LSF 0x57

// contacts for connecting led rgb
int pwmRED=4;
int pwmGREEN=14;
int pwmBLUE=5;

// colors for led rgb
int colors[][3]={{0,0,0},{0,0,0},
{100,0,0},{100,100,0},{0,100,0},
{0,100,100},{0,0,100},{100,0,100},
{255,0,255},{255,0,0},{255,255,0},
{0,255,0},{0,255,255},{0,0,255},
{60,60,60},{150,150,150}};

void setup() {
   // start I2C
   Wire.begin(0,2);
   // operation mode of led rgb - OUTPUT connection contacts
   pinMode(pwmRED, OUTPUT);
   pinMode(pwmGREEN,OUTPUT);
   pinMode(pwmBLUE,OUTPUT);
   // turn off led rgb
   analogWrite(pwmRED,0);
   analogWrite(pwmGREEN,0);
   analogWrite(pwmBLUE,0);
}
// receive data on I2C
void getTTP229data(byte *a, byte *b) {
   // request 2 bytes from TTP229
   Wire.requestFrom(TTP229_LSF, 2);
   int dataN = 0;
   while(Wire.available())
      {
      // getting bitwise
      char c = Wire.read();
      if (dataN == 0) *a = c;
      if (dataN == 1) *b = c;
      dataN++;
      }
}
/ / determining the number of the pressed key
int getKey()
{
   byte aa,bb = 0;
   unsigned int mask=0x01;
   int key=0;
   getTTP229data(&aa,&bb);

   for(int i=0;i<8;i++) {
      if(((mask<<i) & aa) > 0) {
         key=8-i;
         i=8;
      }
   }
   for(int i=0;i<8;i++) {
      if(((mask<<i) & bb) > 0) {
         key=16-i;
         i=8;
      }
   }
   return key;
}

void loop() {
   int k=getKey();
   if(k>0) {
      analogWrite(pwmRED,colors[k][0]);
      analogWrite(pwmGREEN,colors[k][1]);
      analogWrite(pwmBLUE,colors[k][2]);
   }
   delay(500);
}
Upload the sketch to the Node MCU ESP8266 Board and check the program operation
9. Writing a Python scriptScript for setting the color of the led strip in the python programming language:
// importing libraries
from machine import I2C, Pin, PWM
import time

/ / creating objects
i2c =I2C(scl=machine. Pin(2), sda=machine. Pin(0))
pwmRED=PWM (Pin (4))
pwmGREEN=PWM(Pin (14))
pwmBLUE=PWM (Pin (5))
data = bytearray(2)

/ / returns the number of the pressed key
def getkeys(data):
   arr=[0.15,14,13,12,11,10,9,8,7,6,5,4,3,2,1]
   str1="click "
   mask=0x0001
   for i in range(1,16):
      if (mask<<i) & data > 0:
         print("i=",arr[i])
         return arr[i]

// setting pwm values for RGB
def setRGB(key):
   colors=[[0,0,0],[0,0,0],
      [512,0,0],[512,512,0],[0,512,0],
      [0,512,512],[0,0,512],[512,0,512],
      [1023,0,1023],[1023,0,0],[1023,1023,0],
      [0,1023,0],[0,1023,1023],[0,0,1023],
      [200,200,200], [500,500,500]]
   pwmRED.duty(colors[key][0])
   pwmGREEN.duty(colors[key][1])
   pwmBLUE.duty(colors[key][2])

while True:
   data = i2c.readfrom(0x57,2)
   word=data[0]<<8 | data[1]
   if word !=0 :
      k=getkeys(word)
      setRGB(k)
   time.sleep(0.5)
Upload the script to the Board and check the program operation.

Comments
Please log in or sign up to comment.