


Hardware components | ||||||
| × | 1 | ||||
| × | 1 | ||||
 |
| × | 1 | |||
| × | 1 | ||||
Software apps and online services | ||||||
| ||||||
.png?auto=compress%2Cformat&w=48&h=48&fit=fill&bg=ffffff) |
| |||||
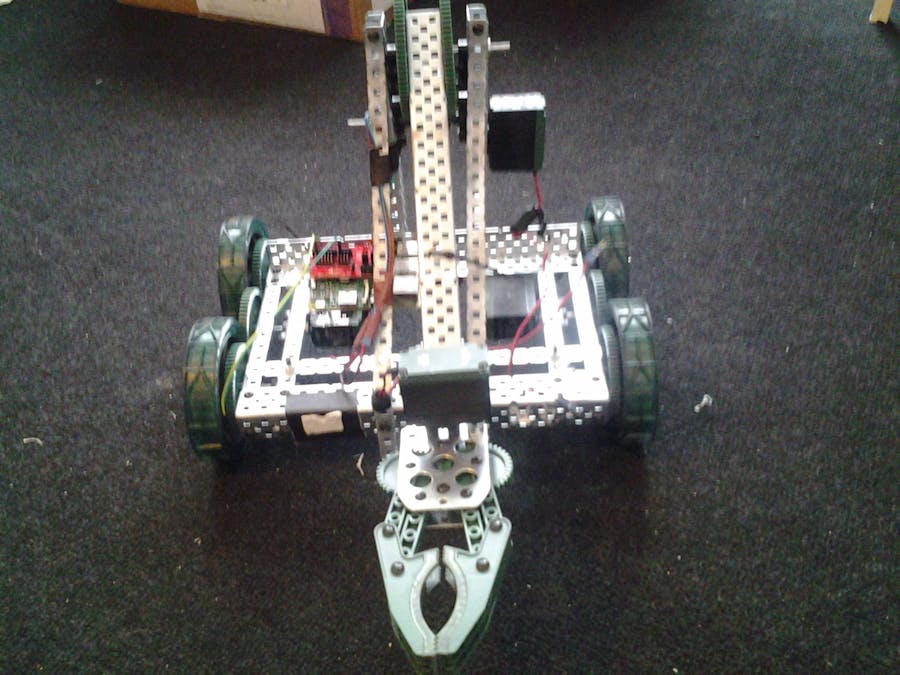
Building the Robot: The robot was made from a Vex Robotics classroom/competition kit that I assembled during Resino.io Hackathon event at London Google Campus.
To make a connection to the Resin.io cloud, the Raspberry Pi 3 will need to be flashed with a special Linux based image that you need to download from your Resin.io account. So in nutshell:
Resin.io Account: This needed so go to https://resin.io/ and create a ccount. This part will not be covered here in order to keep the length of this project down to a reasonable size. It will also create a Git hub link for your account. This is useful as you don't need to worry about pushing your code to your device remotely.
A Github account: Create a Github account at: https://github.com/ You need this if you want to keep a repository for your code, system images, etc. for future usage.
Next login into your account:
You will be presented a project dashboard as shown below. Your will be blank if this is your first time and first project unlike mine below:
There is an excellent "Getting Started" guide available at: https://docs.resin.io/raspberrypi/nodejs/getting-started/. Please following it as it more detailed than what is covered here.
Next create your application: to do this type in a name, select the Raspberry Pi 3 type from the drop down list and click the create button. You should now be taken to the dashboard of your newly created application: I am using Raspberry Pi 3 but you can use any hardware that can work with Resin.io and your Vex Robot
The dashboard where all of the devices connected to your application will be shown, along with their statuses and logs.
Click the Download resinOS
button to get the resin.io operating system (resinOS) image for your application.
Note: The .img
may seem large, but your browser will download a compressed version and decompress it on the fly using http compression, so the download will be much, much faster than you expect!
Before your resinOS download begins, a prompt will appear asking you to specify how your device will connect to the internet. Currently there are two connectivity options:
- Ethernet cable, this option requires NO configuration as is the default.
- Wifi, in which case you must specify the network name or
SSIDandpassphrasefor the network your device will connect to.
Once you have selected your connectivity option, click the Download Device OS
button to get the resin.io operating system image configured for your application and network.
When the download completes you should have a .img
file with a name like resin-WaterSeekingRobot-1.1.1-1.7.0-dc6c40fe05aa.img
where "WaterSeekingRobot
" is the name you gave your application on the dashboard. You next step now is to burn the Linux the image onto your SD card for your Raspberry Pi 3.
Now we have to flash the downloaded .img
file onto our SD card. I recommend using Etcher, at: (https://etcher.io/). its very simple, dead easy user friendly, cross platform SD card writer and validator. Head over to the Etcher homepage and get install it, it only takes a few seconds. In fact just unzip and start to use it nothing to install or add to your system's registry.
- Click "Select image" button and find your applications resinOS
.imgfile.
- If you haven't already done so, insert your SD card into your computer. Etcher will automatically detect it. If you have more than one SD card inserted, you will need to select the appropriate one.
- Click the "Flash!" button.
Etcher will now prepare a bootable SD card and validate that it was flashed correctly. Right! time for a spot of tea as flashing the SD card can take roughly 3 or more minutes depending on the quality of your SD card.
Setting Up Your Raspberry Pi 3:Insert the SD card into the Raspberry Pi 3, connect it with PiconZero and to your Vex Robot as shown in the two following pictures. Pi 3 already come with WiFi and Bluetooth on board.
Now power up the Raspberry Pi 3, It will take a minute or two for the Raspberry Pi 3 to load, connect through WiFi gateway and appear on your resin.io dashboard. ResinOS will expand the partitions on your SD card to use all available space, installing a custom Linux environment and establishing a secure connection with Resin.io servers.
Pushing Code into your device (Cloud Push)This is done via Resin.io cloud via Github account connection mentioned previously (above). You already have your Raspberry Pi 3 connected to a Resin.io application, next thing is to deploy your driver code for the PiconZero Dual Motor Shield. This is a Python code to interface with your Raspberry Pi 3 and PiconZero motor shield.
Our next step is to get the Raspberry Pi 3 i2C working, so launch your console/terminal and issue the following command. I am on a Linux box but Windows or Mac OSX will do as long as you know how to use their terminals: We are getting the code from: https://github.com/resin-io-playground/i2c-python Also for this report I may alternate between my Linux box and that of Windows 7 as I use the Windows Paint to cut out unwanted part of images.
The above command will clone the i2c-python project. Next change into that directory e.g cd i2c-python and press enter button. Next add your Resin.io image link to your i2c-python code. resin.io needs to know which device on your dashboard your want to communicate with this code, so copy the image link from the top right corner of your image dashboard.
if everything is done correctly with now errors then your robot should be ready to communicate via your resin.io account. You can make the link to your robot public and send it to your friends so that they can interact remotely with the robot. If you attached a camera to your robot then it can also stream back its location and its environment, water found in the desert, along its path, etc.
Note: On other git clients there may be an alternative way to add a remote repository.
The Vex Robot and the Resin.io cloud are now connect, so log into your Raspberry Pi 3 via your Resin.io dashboard terminal. Click on the icon for your device. Mine is PistoiaPredix.
A detailed inforamtion regarding the log file, robot online status, and access to terminals for running command cli right inside your robot Raspberry Pi 3 MCU is as shown below:
Note:
- Robot connection logging information
- Online status and time being online for
- Robot assigned IP address
- Status Summary and indicator: Green means online, connected and working
- Access to the terminal. Please click on the terminals to issue commands to the robot. Access is using the Docker containerized file mode. Click the terminal, next click on start new terminal:
You should now have Resin.io and the Vex robot connecte, log you into the Raspberry Pi 3 tty console as show below:
Next while inside the console, issue the following command to download our Python driver and test for the PiconZero motor shield.
The bove command will download the library and creates a folder named PicoZero that will contain the Python code. Change into that folder:
Next change into the Python folder inside the PiconZero folder as shown above.
To run the robot, next issue the following command: python motorTest.py and press the enter button. If everything is ok and your robot is well setup then you should receive the message back from your robot as show in the screenshot below:
NOTE:
- Use , or < to slow down robot speed in real-time
- Use . or > to speed up the robot speed in real-time
- Use the arrow keys on your computer keyboard, or mobile-phone or tablet virtual keyboard to drive the robot forward, backward, turn left, turn right in real-time.
- Press Ctrl+c to terminate
Below is a video showcasing the project, showing the control and interaction with the robots via Resin.io dashboard.
I will upload more videos here soon! :)
Summary:
The advantages of Resin.io technology providing facilities to connected devices, smart devices irrespectful of where they were located in any part of the World, or in space as long as those items can be reached via Resin.io cloud.
Possibility is endless. My next project will be to include machine learning and deep learning with Resin.io using various machine learning technology like GE Predix, Microsoft CNTK, H20, Google TensorFlow and Intel Deep Learning. I have already play with Caffe and Lucida (aka Sirius) running on my home server.
I will continue to add more to this project and those that will extend it into other platforms. So stay tuned in.
Reference/Biliography:
Please give comment and feedback.
God bless you!
Best regards,
Sanyaade


Comments
Please log in or sign up to comment.