


Hardware components | ||||||
| × | 1 | ||||
| × | 1 | ||||
| × | 1 | ||||
 |
| × | 1 | |||
| × | 1 | ||||
Software apps and online services | ||||||
 |
| |||||
A sound detector senses sound levels in the environment. In this tutorial, we use a digital sound detector that activates when it detects a certain level of sound. The sensor board includes a small microphone to pick up these sounds.
This tutorial guides you through creating a system with a sound detector that allows you to switch an LED on or off with two quick claps, similar to a commercially available product called the Clapper. The Clapper is a sound-activated switch that can turn lights or other devices on or off in response to clapping.
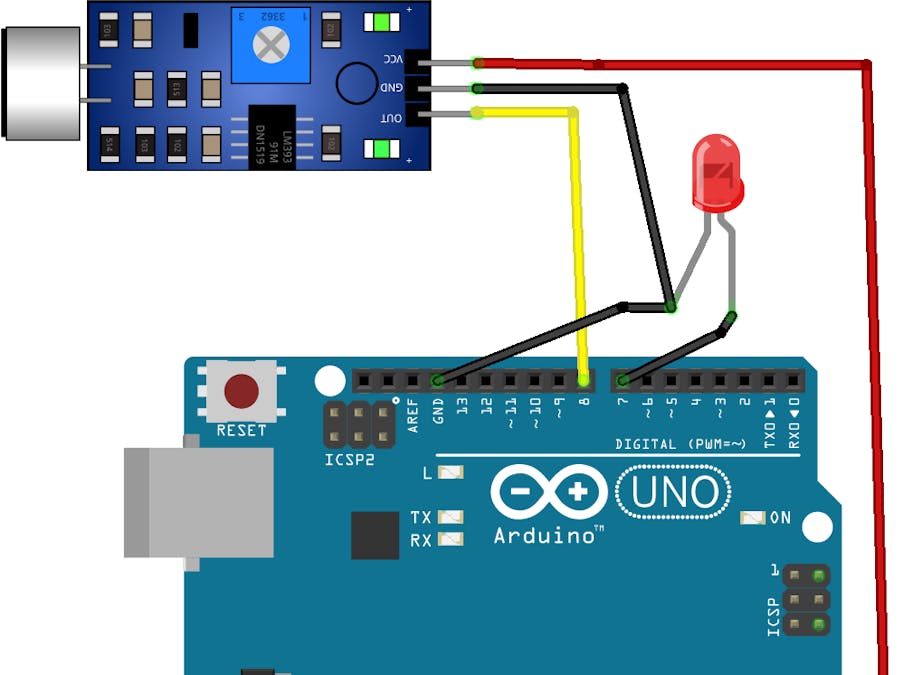
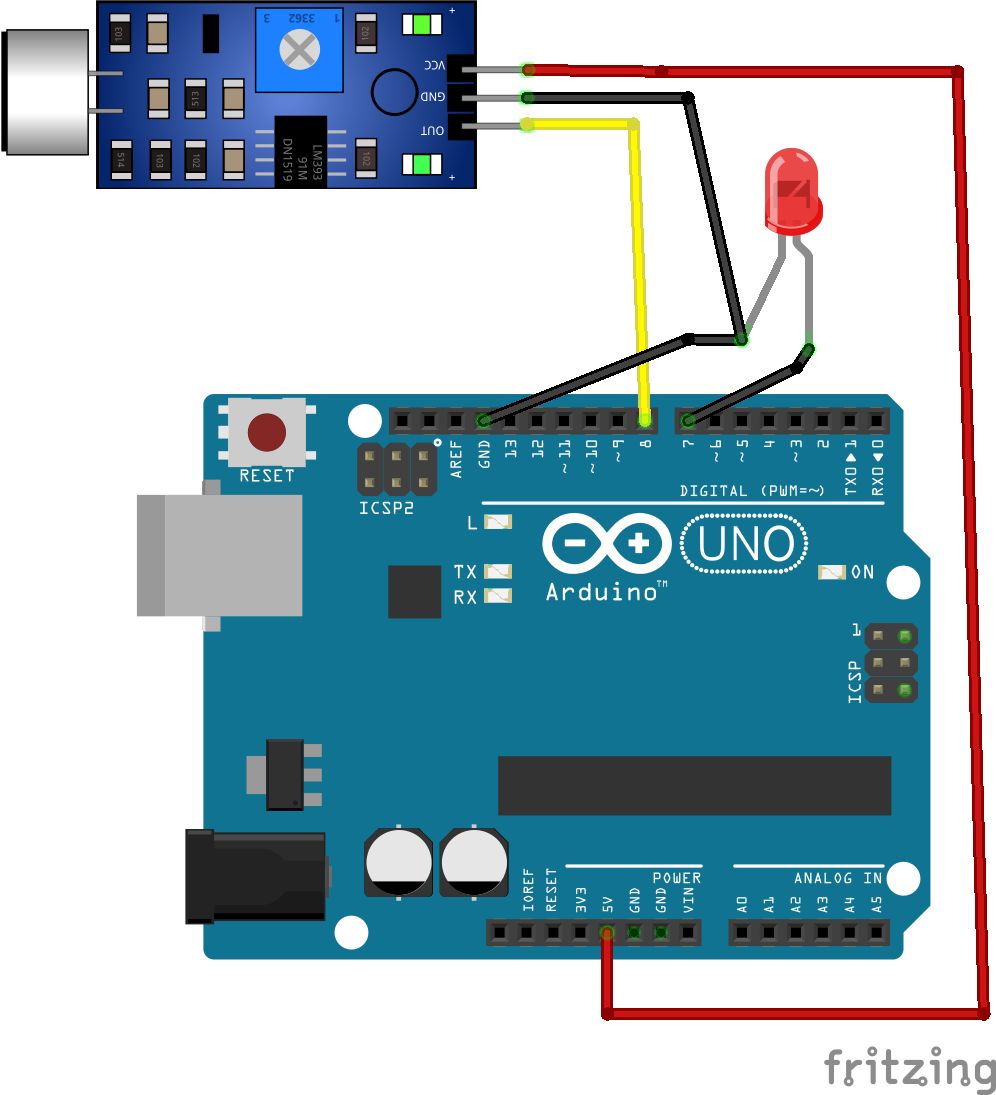
Schematic DiagramConnection instructions for the sound detector and LED setup:
Sound Detector Connections:
- Connect the VCC pin of the sound detector to the 3.3V pin on the Arduino.
- Connect the GND pin of the sound detector to a GND pin on the Arduino.
- Connect the output pin of the sound detector to digital pin 8 on the Arduino.
- Sound Detector Connections:
Connect the VCC pin of the sound detector to the 3.3V pin on the Arduino.
Connect the GND pin of the sound detector to a GND pin on the Arduino.
Connect the output pin of the sound detector to digital pin 8 on the Arduino.
LED Connections:
- Connect the negative terminal of the LED to a GND pin on the Arduino.
- Connect the positive terminal of the LED to digital pin 7 on the Arduino.
- LED Connections:
Connect the negative terminal of the LED to a GND pin on the Arduino.
Connect the positive terminal of the LED to digital pin 7 on the Arduino.
Here's the refined version of your program and analysis, ensuring clarity and professionalism:
Program Code
int NumberSounds = 0;
int SoundPin = 8;
int RawValue = 0;
int NumberClaps = 0;
int LightOn = 0;
unsigned long SoundDetectedTime = 0;
unsigned long PreviousSoundDetectedTime = 0;
int UniqueClapMinTime = 100;
int LEDPin = 7;
unsigned long PreviousClapTime = 0;
unsigned long CurrentClapTime = 0;
unsigned long MaxTimeBetweenClaps = 2000;
void setup() {
pinMode(SoundPin, INPUT);
pinMode(LEDPin, OUTPUT);
Serial.begin(9600);
Serial.println("The Light Clapper ...");
}
int IsSoundPartOfUniqueClap() {
int result = 0;
unsigned long ElapsedTime = SoundDetectedTime - PreviousSoundDetectedTime;
if (ElapsedTime >= UniqueClapMinTime) {
result = 1;
}
return result;
}
int CheckTurnOnOffLight() {
int result = 0;
unsigned long ElapsedTime = CurrentClapTime - PreviousClapTime;
if (ElapsedTime <= MaxTimeBetweenClaps) {
if (NumberClaps == 2) {
result = 1;
NumberClaps = 0;
}
} else {
NumberClaps = 1;
}
return result;
}
void loop() {
RawValue = digitalRead(SoundPin);
if (RawValue == 0) {
Serial.print("SOUND DETECTED ... ");
Serial.print(", Sound Number: ");
Serial.print(NumberSounds);
Serial.print(", RawValue: ");
Serial.println(RawValue);
NumberSounds++;
// Process raw data for claps
PreviousSoundDetectedTime = SoundDetectedTime;
SoundDetectedTime = millis();
if (IsSoundPartOfUniqueClap()) {
NumberClaps++;
// Update Clap Times
PreviousClapTime = CurrentClapTime;
CurrentClapTime = millis();
// Turn Light ON/OFF as needed
if (CheckTurnOnOffLight()) {
LightOn = ~LightOn;
if (LightOn) {
digitalWrite(LEDPin, HIGH);
} else {
digitalWrite(LEDPin, LOW);
}
}
}
}
}
Program Analysis
1. **Number of Sounds Detected:**
- `int NumberSounds = 0;`This variable counts the total number of sounds detected since the program started, initializing at 0.
2. **Sound Detector Pin:**
- `int SoundPin = 8;`This variable assigns the output pin on the sound detector to digital pin 8 of the Arduino.
3. **Raw Value:**
- `int RawValue = 0;`This variable holds the status of the sound detector, initialized at 0.
4. **Number of Claps:**
- `int NumberClaps = 0;`This variable tracks the current count of claps towards the two required to toggle the LED light, starting at 0.
5. **LED Status:**
- `int LightOn = 0;`This variable indicates if the LED is on (non-zero) or off (0), initialized at 0.
6. **Sound Detection Timing:**
- `unsigned long SoundDetectedTime = 0;`This variable stores the time of the last detected sound to help determine distinct claps, initializing at 0.
- `unsigned long PreviousSoundDetectedTime = 0;`This variable holds the time of the previous sound detection to help determine unique claps.
7. **Unique Clap Timing:**
- `int UniqueClapMinTime = 100;`This variable sets the minimum time interval in milliseconds between detected sounds to recognize them as unique claps.
8. **LED Pin:**
- `int LEDPin = 7;`This variable represents digital pin 7, which is connected to the positive terminal of the LED.
9. **Clap Timing:**
- `unsigned long PreviousClapTime = 0;`This variable holds the time of the previous clap in milliseconds, initializing at 0.
- `unsigned long CurrentClapTime = 0;`This variable holds the time of the current clap in milliseconds, initializing at 0.
10. **Maximum Time Between Claps:**
- `unsigned long MaxTimeBetweenClaps = 2000;`This variable specifies the maximum allowed time between two consecutive claps to toggle the LED, set to 2000 milliseconds (2 seconds).
Setup Function
The `setup()` function initializes the program:
1. Sets the pin connected to the sound detector's output as an input.
2. Sets the pin connected to the LED's positive terminal as an output.
3. Initializes the Serial Monitor at 9600 baud rate.
4. Prints a message to the Serial Monitor indicating the program has started.
Unique Clap Detection
The `IsSoundPartOfUniqueClap()` function determines if the detected sound is a new unique clap:
1. Calculates the elapsed time since the previous sound.
2. Returns 1 if the elapsed time is greater than or equal to `UniqueClapMinTime`, indicating a unique clap; otherwise, returns 0.
LED Toggle Check
The `CheckTurnOnOffLight()` function checks if the LED should be toggled:
1. Calculates the elapsed time between the current and previous claps.
2. If the elapsed time is within `MaxTimeBetweenClaps` and two claps are detected, sets the return value to 1 to toggle the LED and resets the clap count.
3. If the elapsed time exceeds `MaxTimeBetweenClaps`, resets the clap count to 1 for a new sequence.
Main Loop
The `loop()` function reads the sound detector output, processes claps, and toggles the LED if necessary:
1. Reads the status of the sound detector.
2. If a sound is detected (`RawValue == 0`), prints debug information to the Serial Monitor.
3. Updates the timing variables for sound detection.
4. Checks if the sound is part of a unique clap and updates the clap count.
5. If two consecutive claps are detected within 2 seconds, toggles the LED status and updates the LED output accordingly.
Conclusion
In this project, we developed a sound-activated LED system using an Arduino, a digital sound detector, and an LED. This system detects claps and toggles the LED based on a specific sequence of claps, emulating the functionality of a commercially available Clapper device.
Here's a summary of the key components and functionalities:
1. **Sound Detection:**
- The digital sound detector senses sound levels in the environment and sends a signal to the Arduino when a sound exceeds a certain threshold.
2. **Clap Detection:**
- The system differentiates between unique claps and continuous noise by measuring the time interval between sound detections.
- A minimum time interval (`UniqueClapMinTime`) is set to ensure only distinct claps are considered.
3. **Clap Sequence Processing:**
- The system counts claps and determines if a sequence of two claps occurs within a specified time frame (`MaxTimeBetweenClaps`).
- If the sequence is detected, the LED's state is toggled.
4. **LED Control:**
- The LED is connected to the Arduino and is turned on or off based on the detected clap sequence.
- The system uses a bitwise NOT operation to toggle the LED state.
5. **Debug Information:**
- The program prints debug information to the Serial Monitor, providing insight into the sound detection and processing stages.
This project demonstrates how to use an Arduino to create a simple yet effective sound-activated system, capable of toggling an LED with claps. This system can be extended to control other devices, enhancing its practicality and versatility in various applications.
By completing this project, you gain experience in:
- Interfacing sensors with Arduino.
- Processing real-time input data.
- Implementing time-based logic.
- Controlling output devices programmatically.
This foundational knowledge can be applied to more complex sound-activated systems and other interactive projects.


_3u05Tpwasz.png?auto=compress%2Cformat&w=40&h=40&fit=fillmax&bg=fff&dpr=2)
Comments
Please log in or sign up to comment.