


Hardware components | ||||||
_ztBMuBhMHo.jpg?auto=compress%2Cformat&w=48&h=48&fit=fill&bg=ffffff) |
| × | 1 | |||
In our last project, we adjusted the brightness of an LED using the PWM capabilities of the Atmega chip. Now, we'll use these capabilities to create an RGB mood lamp that can mix red, green, and blue colors to create any color we desire.
Required Components for RGB Mood LampThis book will help you to gain more knowledge about Arduino: Beginning Arduino
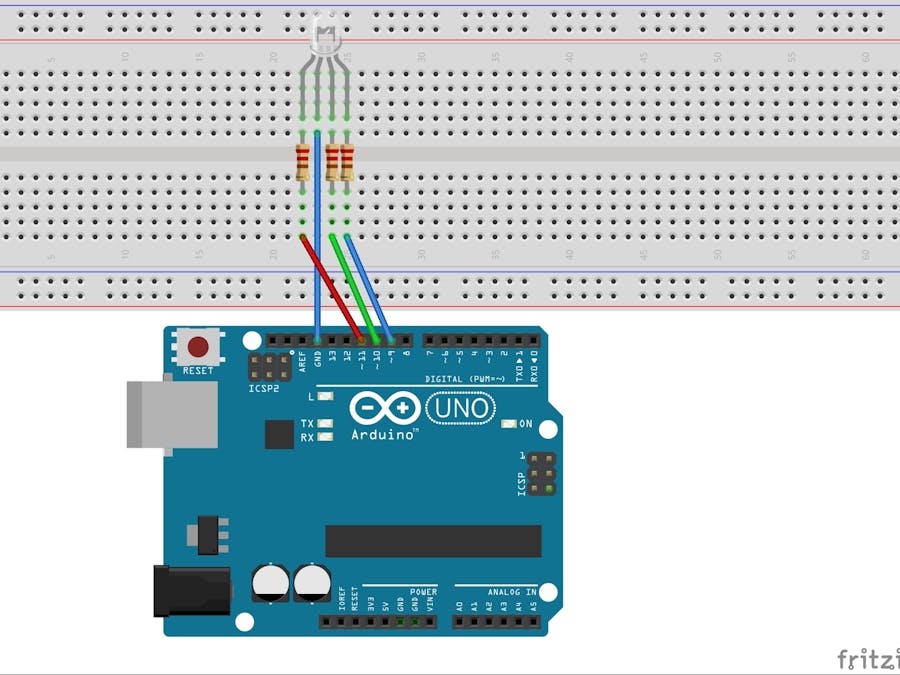
Circuit Diagram for Arduino RGB Mood LampConnect your RGB LED to the Arduino as shown in the figure. Make sure your Arduino is powered off by unplugging it from the USB cable before connecting the components.
Code for Arduino RGB Mood Lamp
float RGB1[3];
float RGB2[3];
float INC[3];
int red, green, blue;
int RedPin = 11;
int GreenPin = 10;
int BluePin = 9;

void setup() {
  Serial.begin(9600);
  randomSeed(analogRead(0));
  RGB1[0] = 0;
  RGB1[1] = 0;
  RGB1[2] = 0;
  RGB2[0] = random(256);
  RGB2[1] = random(256);
  RGB2[2] = random(256);
}

void loop() {
  randomSeed(analogRead(0));
  for (int x = 0; x < 3; x++) {
    INC[x] = (RGB1[x] - RGB2[x]) / 256;
  }
  for (int x = 0; x < 256; x++) {
    red = int(RGB1[0]);
    green = int(RGB1[1]);
    blue = int(RGB1[2]);
    analogWrite(RedPin, red);
    analogWrite(GreenPin, green);
    analogWrite(BluePin, blue);
    delay(100);
    RGB1[0] -= INC[0];
    RGB1[1] -= INC[1];
    RGB1[2] -= INC[2];
  }
  for (int x = 0; x < 3; x++) {
    RGB2[x] = random(556) - 300;
    RGB2[x] = constrain(RGB2[x], 0, 255);
    delay(1000);
  }
}
When you run this code, you will see the colors slowly change, creating a soothing mood lamp effect.
Explanation of the CodeIn this project, we used an RGB LED, which is a single 5mm LED with four legs (some may have more). One leg is either a common anode (positive) or common cathode (negative), and the other three legs are connected to the opposite terminal of the red, green, and blue LEDs inside the lamp.
An RGB value of 255, 0, 0 would give us pure red. A value of 0, 255, 0 would give pure green, and 0, 0, 255 would give pure blue. By mixing these values, we can get any color we like. This is the additive color model.
Variable Declarations:
float RGB1[3];
float RGB2[3];
float INC[3];
int red, green, blue;
These arrays and variables store our RGB values and increment values.
Variable Declarations:


float RGB1[3];
float RGB2[3];
float INC[3];
int red, green, blue;- These arrays and variables store our RGB values and increment values.
Setup Function:
void setup() {
  Serial.begin(9600);
  randomSeed(analogRead(0));
  RGB1[0] = 0;
  RGB1[1] = 0;
  RGB1[2] = 0;
  RGB2[0] = random(256);
  RGB2[1] = random(256);
  RGB2[2] = random(256);
}
The randomSeed command creates pseudo-random numbers by reading a value from analog pin 0, which is used as a seed for generating random numbers. We initialize RGB1 to all zeros and RGB2 to random values between 0 and 255.
Setup Function:


void setup() {
  Serial.begin(9600);
  randomSeed(analogRead(0));
  RGB1[0] = 0;
  RGB1[1] = 0;
  RGB1[2] = 0;
  RGB2[0] = random(256);
  RGB2[1] = random(256);
  RGB2[2] = random(256);
}
The randomSeed command creates pseudo-random numbers by reading a value from analog pin 0, which is used as a seed for generating random numbers. We initialize RGB1 to all zeros and RGB2 to random values between 0 and 255.
Main Loop:
void loop() {
  randomSeed(analogRead(0));
  for (int x = 0; x < 3; x++) {
    INC[x] = (RGB1[x] - RGB2[x]) / 256;
  }
  for (int x = 0; x < 256; x++) {
    red = int(RGB1[0]);
    green = int(RGB1[1]);
    blue = int(RGB1[2]);
    analogWrite(RedPin, red);
    analogWrite(GreenPin, green);
    analogWrite(BluePin, blue);
    delay(100);
    RGB1[0] -= INC[0];
    RGB1[1] -= INC[1];
    RGB1[2] -= INC[2];
  }
  for (int x = 0; x < 3; x++) {
    RGB2[x] = random(556) - 300;
    RGB2[x] = constrain(RGB2[x], 0, 255);
    delay(1000);
  }
}
The main loop calculates increment values for the RGB channels and uses a for loop to gradually change the colors from RGB1 to RGB2 in 256 steps, creating a smooth transition. After each transition, new random RGB values are generated for the next transition.
Main Loop:


void loop() {
  randomSeed(analogRead(0));
  for (int x = 0; x < 3; x++) {
    INC[x] = (RGB1[x] - RGB2[x]) / 256;
  }
  for (int x = 0; x < 256; x++) {
    red = int(RGB1[0]);
    green = int(RGB1[1]);
    blue = int(RGB1[2]);
    analogWrite(RedPin, red);
    analogWrite(GreenPin, green);
    analogWrite(BluePin, blue);
    delay(100);
    RGB1[0] -= INC[0];
    RGB1[1] -= INC[1];
    RGB1[2] -= INC[2];
  }
  for (int x = 0; x < 3; x++) {
    RGB2[x] = random(556) - 300;
    RGB2[x] = constrain(RGB2[x], 0, 255);
    delay(1000);
  }
}
The main loop calculates increment values for the RGB channels and uses a for loop to gradually change the colors from RGB1 to RGB2 in 256 steps, creating a smooth transition. After each transition, new random RGB values are generated for the next transition.
By following this guide, you can create a beautiful RGB mood lamp that changes colors smoothly, providing a calming and aesthetically pleasing effect.


Comments
Please log in or sign up to comment.