


Basic Stepper Motor Control with Arduino: A Step-by-Step Guide**
**Introduction:**
Stepper motors offer precise control over rotation, making them ideal for various applications such as robotics, 3D printers, and CNC machines. In this tutorial, we'll learn how to control a stepper motor using an Arduino board, covering the basics of wiring, coding, and understanding stepper motor behavior.
**Required Components:**
6. Breadboard
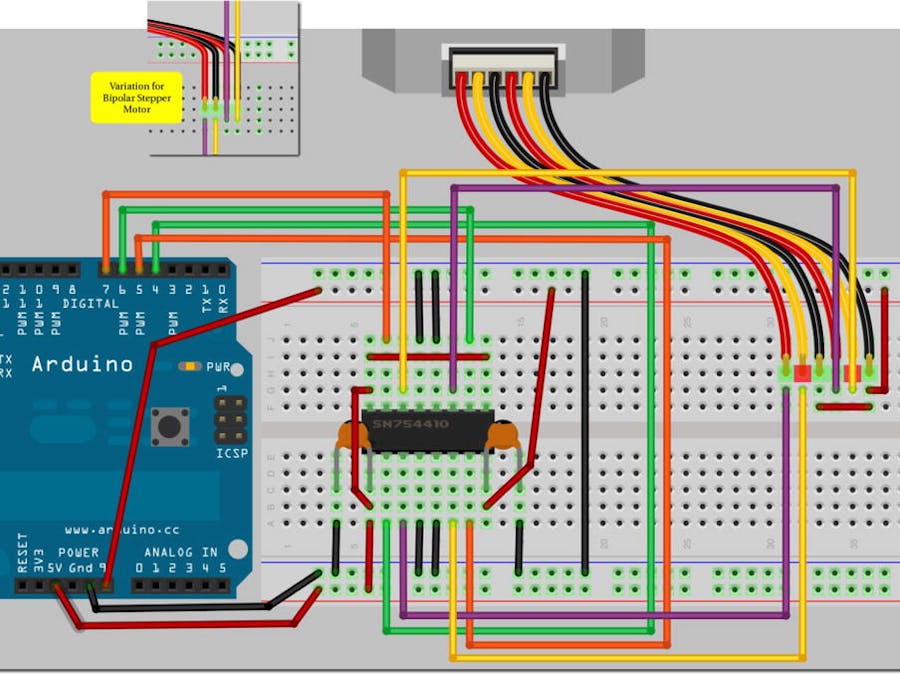
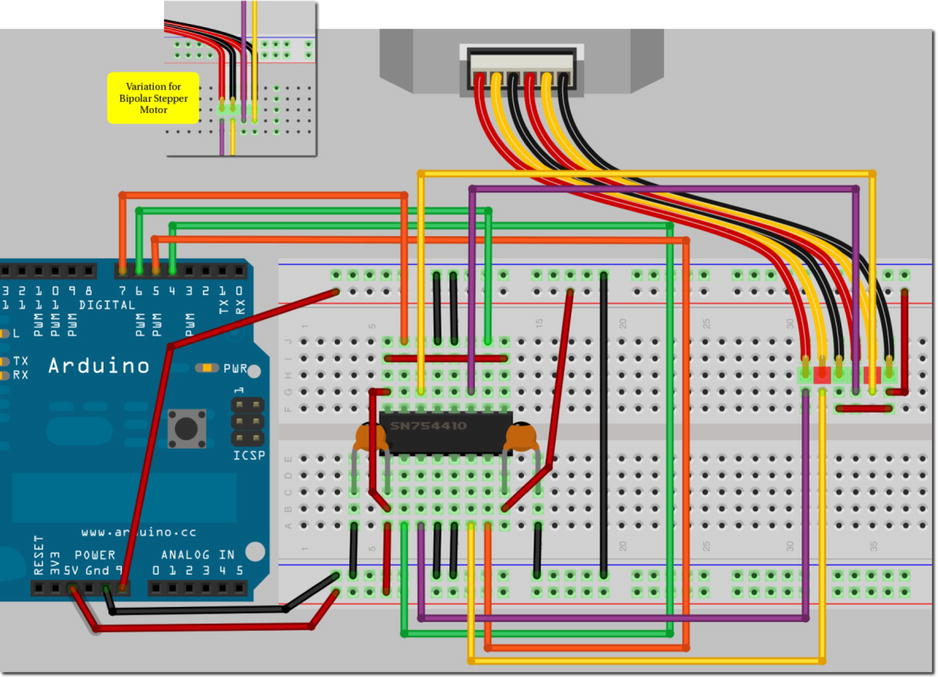
**Circuit Diagram:**
Explain the circuit setup with clear connections between the Arduino, SN754410 motor driver IC, and the stepper motor. Mention the importance of external power for the motor driver to avoid overloading the Arduino.
**Code Explanation:**
#include <Stepper.h>
// Define the number of steps per revolution
#define STEPS 200
// Create a stepper motor object
Stepper stepper(STEPS, 4, 5, 6, 7);
void setup() {
// No setup needed for this basic example
}
void loop() {
// Set speed and rotate clockwise 360 degrees
stepper.setSpeed(60);
stepper.step(200);
delay(100);
// Set slower speed and rotate counterclockwise 90 degrees
stepper.setSpeed(20);
stepper.step(-50);
delay(100);
}
Explanation:
- **Stepper Library:** Includes the Stepper library for easier motor control.
- **STEPS:** Defines the number of steps per revolution of your stepper motor (200 steps for most common stepper motors).
- **Stepper Object:** Initializes a stepper motor object on digital pins 4, 5, 6, and 7 of the Arduino.
- **setup() Function:** Typically empty for basic stepper motor control.
- **loop() Function:** Controls the motor's movement:
- **stepper.setSpeed(60):** Sets the speed of the motor in revolutions per minute (RPM).
- **stepper.step(200):** Rotates the motor 200 steps clockwise (equivalent to 360 degrees for a 200-step motor).
- **delay(100):** Pauses for 100 milliseconds between movements.
- **stepper.setSpeed(20):** Sets a slower speed.
- **stepper.step(-50):** Rotates the motor 50 steps counterclockwise (equivalent to 90 degrees for a 200-step motor).
- **delay(100):** Another pause before repeating the loop.
**Explanation and Functionality:**
- **Stepper Motor Basics:** Discuss how stepper motors work, with rotation divided into discrete steps.
- **Motor Driver IC:** Explain the role of SN754410 in providing sufficient current and voltage for the motor.
- **Code Breakdown:** Step-by-step explanation of the provided Arduino sketch, covering speed adjustment, step control, and direction changes.
- **Physical Setup Tips:** Provide practical advice on connecting the components, including power considerations and the use of capacitors for stability.
**Conclusion:**Mastering basic stepper motor control lays the foundation for more complex projects involving precise motion control. With Arduino and the SN754410 motor driver, you can implement various applications requiring accurate positioning and speed control.
**Further Learning:**- Suggest additional projects or advanced topics related to stepper motors and Arduino.
- Recommend resources or books for further exploration, such as "Beginning Arduino."
**Final Note:**
With this guide, you should now have a solid understanding of how to control a stepper motor using Arduino. Experiment with different speeds, step counts, and directions to see how these variables affect motor behavior.

Comments
Please log in or sign up to comment.