Dual Servo Control Using Arduino
In this tutorial, we'll explore how to control two servo motors using Arduino and commands sent through the serial monitor. Servo motors are versatile actuators commonly used in robotics and automation for precise angular control. By the end of this guide, you'll learn how to set up and control two servos independently, adjusting their positions based on commands received via serial communication.
Required Components
Before we begin, ensure you have the following components ready:
1. Arduino board (such as Arduino Uno or Arduino Mega)
3. Potentiometer (for testing and control)
4. Resistors (220 ohms for connecting servos)
6. Breadboard
7. External power supply or battery pack (for the servos, separate from Arduino's 5V supply)
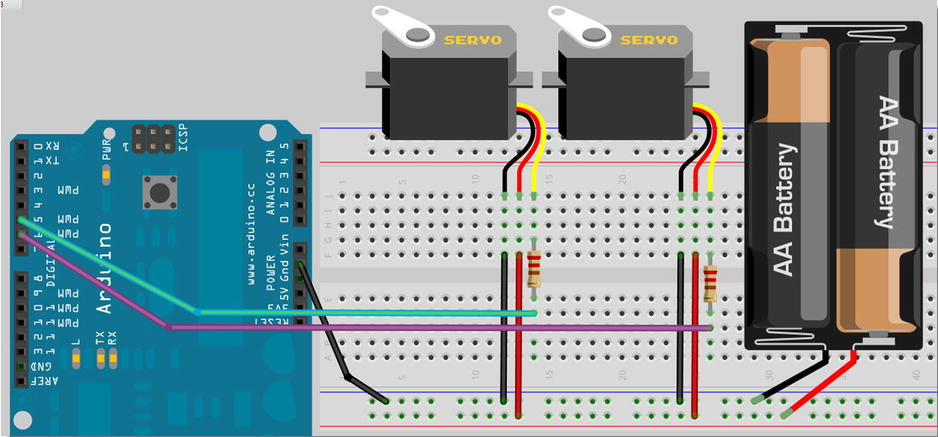
Circuit Diagram
Setting up the circuit involves connecting the servos and potentiometer to the Arduino as follows:
- **Servo 1**: Connect its control wire (typically white, yellow, or orange) to digital pin 5 through a 220-ohm resistor.
- **Servo 2**: Connect its control wire similarly to digital pin 6 through another 220-ohm resistor.
- **External Power Supply**: Ensure each servo is powered by its own power supply (typically 5V), connected to Arduino's ground to avoid ground loops.
- **Potentiometer**: Optional; use a potentiometer to vary servo angles manually for testing.
### Code Explanation
Below is the Arduino sketch to control two servos via serial commands. Let's break down each part of the code:
#include <Servo.h>
char buffer[11];
Servo servo1;
Servo servo2;
void setup() {
servo1.attach(5);   // Attach servo 1 to digital pin 5
servo2.attach(6);   // Attach servo 2 to digital pin 6
Serial.begin(9600); // Initialize serial communication
while (Serial.available())
Serial.read();
servo1.write(90);   // Set initial position for servo 1
servo2.write(90);   // Set initial position for servo 2
Serial.println("STARTING...");
}
void loop() {
if (Serial.available() > 0) {
int index = 0;
delay(100);
int numChar = Serial.available();
if (numChar > 10) {
numChar = 10;
}
while (numChar--) {
buffer[index++] = Serial.read();
}
buffer[index] = '\0';
splitString(buffer);
}
}
void splitString(char* data) {
Serial.print("Data entered: ");
Serial.println(data);
char* parameter;
parameter = strtok(data, " ,");
while (parameter != NULL) {
setServo(parameter);
parameter = strtok(NULL, " ,");
}
while (Serial.available())
Serial.read();
}
void setServo(char* data) {
if ((data[0] == 'L') || (data[0] == 'l')) {
int firstVal = strtol(data + 1, NULL, 10);
firstVal = constrain(firstVal, 0, 180);
servo1.write(firstVal);
Serial.print("Servo 1 set to: ");
Serial.println(firstVal);
}
if ((data[0] == 'R') || (data[0] == 'r')) {
int secondVal = strtol(data + 1, NULL, 10);
secondVal = constrain(secondVal, 0, 180);
servo2.write(secondVal);
Serial.print("Servo 2 set to: ");
Serial.println(secondVal);
}
}
### Code Explanation
#### Libraries:
- **Servo.h**: Enables control of servo motors connected to Arduino.
#### Global Variables:
- **buffer[11]**: Stores incoming serial commands.
- **servo1** and **servo2**: Servo objects for controlling two servos.
#### Setup Function:
- **servo1.attach(5)** and **servo2.attach(6)**: Attach servos to digital pins 5 and 6.
- **Serial.begin(9600)**: Initialize serial communication at 9600 baud rate.
- **servo1.write(90)** and **servo2.write(90)**: Set initial positions for servos.
- **Serial.println("STARTING...")**: Print a startup message.
Loop Function:
- Checks for incoming serial data and processes commands using **splitString** and **setServo** functions.
#### splitString Function:
- Tokenizes incoming serial data into individual commands using **strtok** function.
- Passes each command to **setServo** for execution.
#### setServo Function:
- Processes commands ('L' for servo 1 and 'R' for servo 2) received via serial communication.
- Converts command parameters into integers and adjusts servo positions accordingly.
- Limits servo angles to 0-180 degrees using **constrain** function.
- Prints servo positions for debugging purposes.
### Final Note
Controlling servos using Arduino provides foundational skills in robotics and automation. This project demonstrates how to interact with multiple servos independently through serial commands. Experiment with different commands and angles to understand servo behavior and integration possibilities in various projects.
### Further Learning
- **Advanced Servo Control**: Implement smooth motion and position feedback using PID control.
- **Wireless Control**: Integrate Bluetooth or Wi-Fi modules for remote servo operation.
- **Sensor Integration**: Use sensors like ultrasonic or IR sensors to automate servo movements based on environmental conditions.
- **Community and Resources**: Engage with Arduino forums, online tutorials, and books to deepen your understanding and discover new project ideas.
Explore these resources to expand your knowledge and creativity in Arduino-based projects involving servo motors.


_ztBMuBhMHo.jpg?auto=compress%2Cformat&w=48&h=48&fit=fill&bg=ffffff)


Comments
Please log in or sign up to comment.