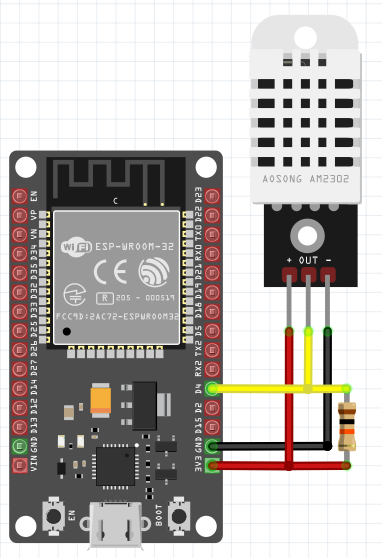
This project uses an ESP32 board along with a DHT sensor (either DHT11 or DHT22) to monitor temperature and humidity inside a greenhouse. The data is uploaded to ThingSpeak, where it can be monitored and visualized in real time. Based on sensor readings, a relay module controls devices such as a fan and water pump to regulate temperature and humidity inside the greenhouse.
Components Required:- ESP32 Board– The microcontroller for IoT applications.
- DHT11 Sensoror DHT22 Sensor– Temperature and humidity sensor.
- Relay Module– Controls the fan and water pump.
- Water Pump– Automated irrigation based on humidity.
- Fan– Cooling system to control temperature.
- Breadboard– For connecting components.
- Jumper Wires– For wiring connections.
- Power Supply– To power the ESP32 and other devices.
- LCD Display (Optional)– To display temperature and humidity values locally.
- Push Button (Optional)– To manually control the fan and water pump.
Connect the DHT Sensor:
- VCC of DHT to 3.3V on the ESP32.
- GND of DHT to GND on the ESP32.
- Data Pin of DHT to Pin D4 on the ESP32
Connect the Relay Module:
- Relay IN Pin to GPIO D5 (or any available pin on the ESP32).
- Relay VCC to 3.3V on the ESP32.
- Relay GND to GND on the ESP32.
- Common (COM) of the relay to the water pump or fan.
- Normally Open (NO) pin to the power supply of the device you want to control.
Optional: LCD Display:
- Connect the LCD Display to the SDA and SCL pins of the ESP32 for I2C communication.
Optional: Push Button:
- Connect the push button to GPIO D2 for manual control of the fan and water pump.
Create a ThingSpeak Account:
- Go to ThingSpeak and sign up for a free account.
Create a Channel:
- After logging in, create a new channel by going to Channels → Create New Channel.
- Add four fields: Temperature (Field 1), Humidity (Field 2), Fan Control (Field 3), and Water Pump Control (Field 4).
Obtain the API Key:
- After creating the channel, go to the Channel Settings section and copy the Write API Key. This key will be used in the code to send data to ThingSpeak.
Optional: Add Widgets for Visualization:
- Under the Apps tab, go to Widgets to add graphical widgets (such as gauges for temperature and humidity) and control widgets for the fan and water pump.
Arduino Code:
#include <WiFi.h>
#include <ThingSpeak.h>
#include <DHT.h>

#define DHTPIN 4     // DHT sensor connected to Pin D4
#define DHTTYPE DHT22 // or DHT11

const char* ssid = "your_SSID";     // Wi-Fi network name
const char* password = "your_PASSWORD"; // Wi-Fi password

unsigned long myChannelNumber = 123456;  // Your ThingSpeak Channel Number
const char * myWriteAPIKey = "your_WRITE_API_KEY"; // Your ThingSpeak Write API Key

WiFiClient client;
DHT dht(DHTPIN, DHTTYPE);

int fanPin = 5;   // Relay pin for fan
int pumpPin = 18; // Relay pin for water pump

void setup() {
  Serial.begin(115200);
  WiFi.begin(ssid, password);

  // Wait for the WiFi connection
  while (WiFi.status() != WL_CONNECTED) {
    delay(1000);
    Serial.println("Connecting to WiFi...");
  }
  Serial.println("Connected to WiFi");

  ThingSpeak.begin(client);

  dht.begin();

  // Set pin modes
  pinMode(fanPin, OUTPUT);
  pinMode(pumpPin, OUTPUT);
}

void loop() {
  float temperature = dht.readTemperature(); // Temperature in Celsius
  float humidity = dht.readHumidity();       // Humidity in percentage

  // Ensure data is valid
  if (isnan(temperature) || isnan(humidity)) {
    Serial.println("Failed to read from DHT sensor!");
    return;
  }

  // Display readings in the serial monitor
  Serial.print("Temperature: ");
  Serial.print(temperature);
  Serial.print(" °C ");
  Serial.print("Humidity: ");
  Serial.print(humidity);
  Serial.println(" %");

  // Control the fan and water pump based on temperature and humidity
  if (temperature > 30) {
    digitalWrite(fanPin, HIGH);  // Turn on fan if temperature is above 30°C
  } else {
    digitalWrite(fanPin, LOW);   // Turn off fan
  }

  if (humidity < 50) {
    digitalWrite(pumpPin, HIGH); // Turn on water pump if humidity is below 50%
  } else {
    digitalWrite(pumpPin, LOW);  // Turn off water pump
  }

  // Upload data to ThingSpeak
  ThingSpeak.setField(1, temperature); // Temperature data
  ThingSpeak.setField(2, humidity);    // Humidity data
  ThingSpeak.setField(3, (digitalRead(fanPin) == HIGH) ? "ON" : "OFF"); // Fan status
  ThingSpeak.setField(4, (digitalRead(pumpPin) == HIGH) ? "ON" : "OFF"); // Water pump status

  ThingSpeak.writeFields(myChannelNumber, myWriteAPIKey); // Write data to ThingSpeak

  // Wait 30 seconds before sending the next update
  delay(30000);
}
Upload the Code:
- Open the Arduino IDE, paste the code, and upload it to your ESP32.
Monitor Serial Output:
- Open the Serial Monitor in the Arduino IDE to view the temperature and humidity readings. It will display values like:
Temperature: 28.4 °C
Humidity: 65.2 %
Check ThingSpeak:
- Go to your ThingSpeak account and check the live data feed. You should see real-time updates for temperature, humidity, and device control (fan and pump).
- The fan and water pump should automatically turn on/off based on the conditions.
If you have added a push button, you can wire it to control the fan or water pump manually. When pressed, the button can toggle the fan or pump status on the ThingSpeak platform.
Conclusion:This ESP32-based Smart Greenhouse Control project allows you to:
- Monitor temperature and humidity in real-time using ThingSpeak.
- Automatically control a fan and water pump to maintain ideal greenhouse conditions.
- Optionally visualize the data using ThingSpeak widgets or add manual control using a push button.
Some of the links provided are affiliate links, meaning I may earn a small commission if you make a purchase through them, at no additional cost to you. Your support helps me continue creating free, useful content. Thank you!


Comments
Please log in or sign up to comment.