


Hardware components | ||||||
 |
| × | 1 | |||
This project explains how to create a smart home motion-activated lighting system using an ESP32 microcontroller, a PIR sensor, and an LED. The system detects motion and automatically controls lighting. It also integrates with the Blynk app for real-time monitoring and control. A web interface further enhances the system, offering live status updates and manual controls using HTML5, CSS3, JavaScript, and the Blynk API.
Components Required- ESP32 Microcontroller – Buy on Amazon
- PIR Sensor – Buy on Amazon
- LED – Buy on Amazon
- Resistor (220 ohms) – Buy on Amazon
- Breadboard – Buy on Amazon
- Jumper Wires – Buy on Amazon
- Power Supply – Buy on Amazon
- Blynk App – Download from Google Play or the App Store.
- Arduino IDE – Download from the Arduino official website.
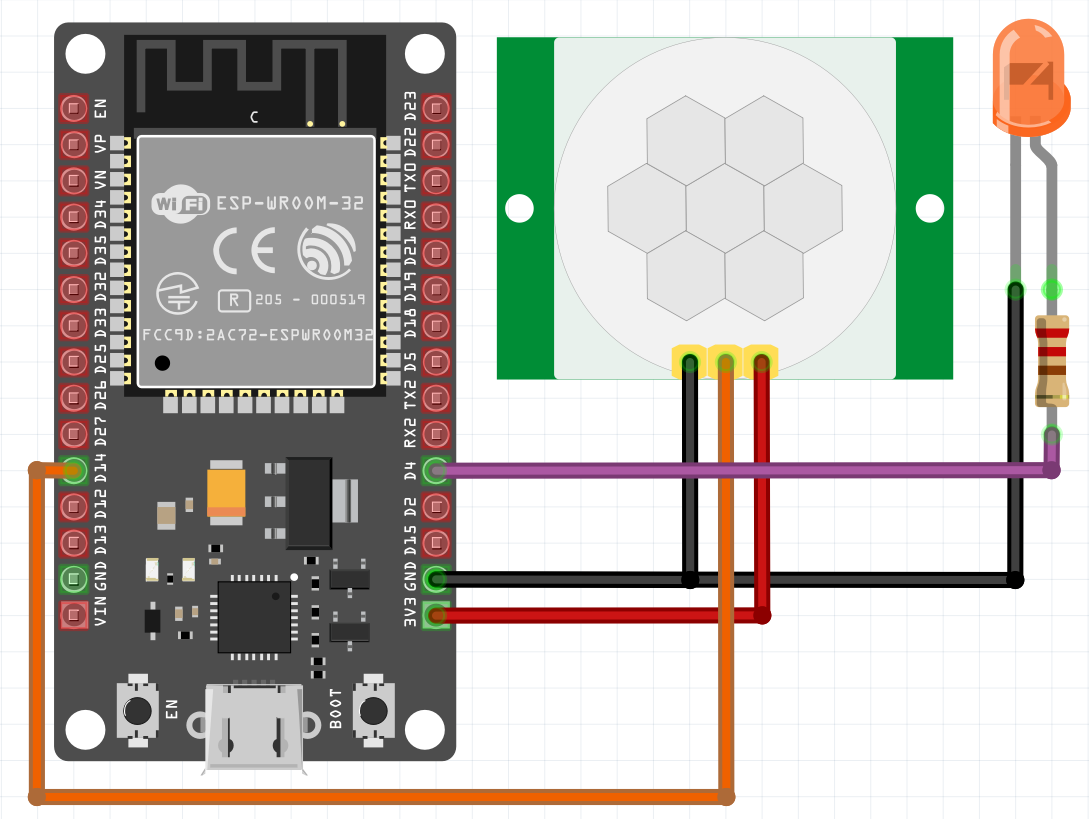
- The PIR sensor detects motion and sends a HIGH signal to GPIO pin D14 on the ESP32.
- The ESP32 processes this input and activates the LED connected to GPIO pin D4.
- The motion status and LED state are updated in real time on the Blynk app.
- A web interface offers additional control and status monitoring using the Blynk API.
- Connect the VCC pin of the PIR sensor to the 3.3V pin on the ESP32.
- Connect the GND pin of the PIR sensor to the GND pin on the ESP32.
- Connect the OUT pin of the PIR sensor to GPIO pin D14.
- Connect the positive terminal of the LED to GPIO pin D4 through a 220-ohm resistor.
- Connect the negative terminal of the LED to the GND pin.
- Assemble the circuit on a breadboard.
- Power the ESP32 using a USB cable or an external power supply.
- Sign up for a Blynk account at Blynk.io and log in.
- Create a new project and select ESP32 as the device type.
- Copy the Blynk authentication token sent to your email.
Open the Blynk app and configure the dashboard:
- Add a label to display motion status and assign it to virtual pin V1.
- Add a button to control the LED and assign it to virtual pin V2.
- Save your project and ensure the ESP32 is connected to the Blynk server.
- Install the Arduino IDE from the official website.
Install the ESP32 Board Manager:
- Go to File > Preferences and paste
https://dl.espressif.com/dl/package_esp32_index.jsonin the Additional Board Manager URLs field. - Go to Tools > Board > Boards Manager, search for ESP32, and install the package.
- Install the Blynk library via the Library Manager in Arduino IDE.
#define BLYNK_TEMPLATE_ID "YourTemplateID"
#define BLYNK_DEVICE_NAME "MotionLightingSystem"
#define BLYNK_AUTH_TOKEN "YourAuthToken"

#include <WiFi.h>
#include <BlynkSimpleEsp32.h>

char auth[] = BLYNK_AUTH_TOKEN;
char ssid[] = "YourWiFiSSID";
char pass[] = "YourWiFiPassword";

const int PIR_PIN = 14; // GPIO D14 for PIR sensor
const int LED_PIN = 4;  // GPIO D4 for LED

void setup() {
    pinMode(PIR_PIN, INPUT);
    pinMode(LED_PIN, OUTPUT);
    Blynk.begin(auth, ssid, pass);
}

void loop() {
    int motion = digitalRead(PIR_PIN);
    if (motion == HIGH) {
        digitalWrite(LED_PIN, HIGH);
        Blynk.virtualWrite(V1, "Motion Detected");
    } else {
        digitalWrite(LED_PIN, LOW);
        Blynk.virtualWrite(V1, "No Motion");
    }
    Blynk.run();
}
Upload this code to the ESP32 after replacing placeholders with your Wi-Fi credentials and Blynk token.
Enhancing the UIA web interface provides users with a more interactive way to monitor and control the system. This section explains how to create a fully functional interface using HTML, CSS, and JavaScript.
Step 1: Design the Web InterfaceCreate an HTML file named index.html with the following content:
<!DOCTYPE html>
<html>
<head>
    <title>Smart Lighting System</title>
    <style>
        body {
            font-family: Arial, sans-serif;
            background-color: #f4f4f9;
            text-align: center;
            padding: 20px;
        }
        h1 {
            color: #007BFF;
        }
        p {
            font-size: 1.2rem;
        }
        button {
            padding: 10px 20px;
            font-size: 1rem;
            background-color: #007BFF;
            color: white;
            border: none;
            border-radius: 4px;
            cursor: pointer;
            transition: background-color 0.3s ease;
        }
        button:hover {
            background-color: #0056b3;
        }
    </style>
</head>
<body>
    <h1>Motion-Activated Lighting</h1>
    <p id="motion-status">No Motion</p>
    <button id="toggle-led">Toggle LED</button>
    <script>
        const motionStatus = document.getElementById('motion-status');
        const toggleButton = document.getElementById('toggle-led');

        // Function to fetch motion status from Blynk
        const fetchMotionStatus = () => {
            fetch('http://blynk.cloud/external/api/get?token=YourBlynkAuthToken&V1')
                .then(response => response.text())
                .then(data => {
                    motionStatus.textContent = data === "1" ? "Motion Detected" : "No Motion";
                })
                .catch(error => console.error('Error fetching motion status:', error));
        };

        // Function to toggle the LED state
        const toggleLED = () => {
            fetch('http://blynk.cloud/external/api/update?token=YourBlynkAuthToken&V2=1')
                .then(() => setTimeout(() => {
                    fetch('http://blynk.cloud/external/api/update?token=YourBlynkAuthToken&V2=0');
                }, 500))
                .catch(error => console.error('Error toggling LED:', error));
        };

        toggleButton.addEventListener('click', toggleLED);
        setInterval(fetchMotionStatus, 1000); // Update motion status every second
    </script>
</body>
</html>
Replace YourBlynkAuthToken with the Blynk token from your project.
- Use a simple HTTP server to host the
index.htmlfile on your local network. - Open the HTML file in your browser, and it will display the motion status and a button to toggle the LED.
- Power the ESP32 and connect it to Wi-Fi.
- Trigger the PIR sensor by moving in front of it and verify that the LED lights up.
- Check the motion status in the Blynk app.
- Open the web interface in a browser and ensure it displays real-time motion updates and allows manual LED control.
- When motion is detected, the LED turns on, and the status updates to "Motion Detected."
- When no motion is detected, the LED turns off, and the status updates to "No Motion."
- The web interface and Blynk app both reflect the correct motion status and allow LED control.
- Ensure the PIR sensor connections are correct if motion is not detected.
- Verify the LED wiring if the LED does not light up.
- Check your Wi-Fi credentials and the Blynk token if the ESP32 fails to connect to the server.
- Use the Serial Monitor in Arduino IDE to debug issues.
Enable deep sleep mode on the ESP32 to save power when the system is idle. Use low-power LEDs or bulbs to further reduce energy consumption.
Applications- Automating lighting in hallways, garages, or gardens.
- Enhancing home security with motion-activated lights.
- Reducing energy usage in homes or offices.
- Add voice control via Alexa or Google Assistant.
- Integrate additional sensors such as temperature or humidity sensors.
- Use AI to predict lighting needs based on user behavior.
This project contains affiliate links. Purchasing through these links helps support the creation of similar content at no additional cost to you.
ConclusionThis motion-activated lighting system is a powerful and scalable IoT solution. By combining the ESP32, Blynk app, and a web interface, it provides a modern, user-friendly, and efficient approach to smart home automation.


Comments
Please log in or sign up to comment.