This tutorial guides you through building and operating an alarm system designed to detect water leaks around a heater or other areas in your home. Water heaters are essential for producing hot water but can pose risks if they leak unnoticed from their tanks, potentially leading to significant damage.
How It WorksThe system utilizes a water sensor to measure the moisture level in its surroundings. The sensor operates on the principle that a low water detection value indicates high humidity, while a high detection value indicates dry conditions. The sensor measures voltage across its fork-like structure. When the voltage is high, resistance between the prongs is also high, indicating no water presence. Conversely, when the voltage is low, the resistance decreases, indicating the presence of a conductive substance like water between the prongs.
Importance of DetectionEarly detection of water leaks is crucial as it allows prompt action to prevent extensive damage. Water heaters, typically large tanks, can fail over time, resulting in leaks that, if undetected, can escalate into costly repairs or replacements.
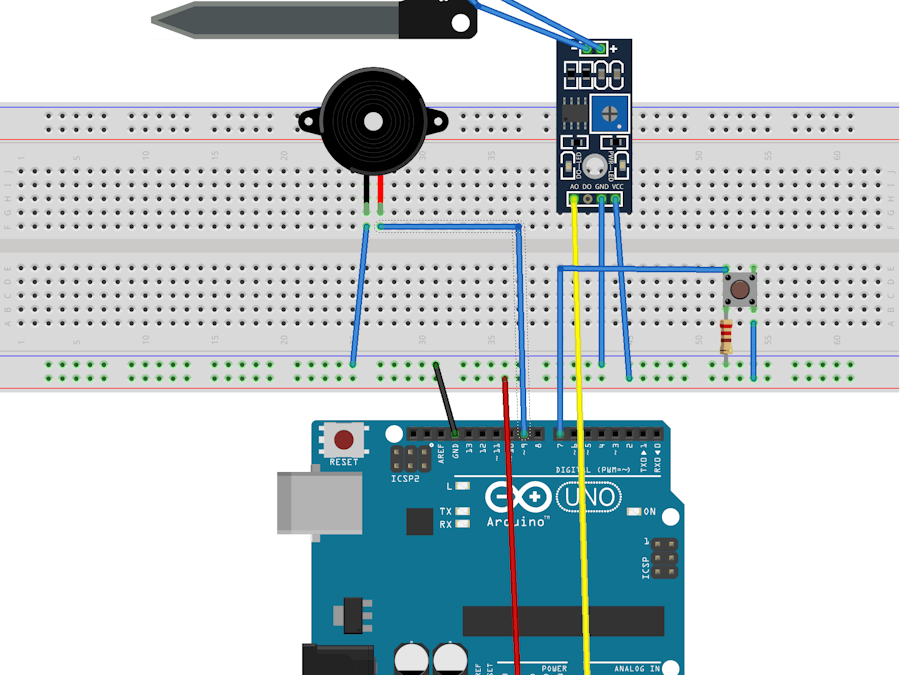
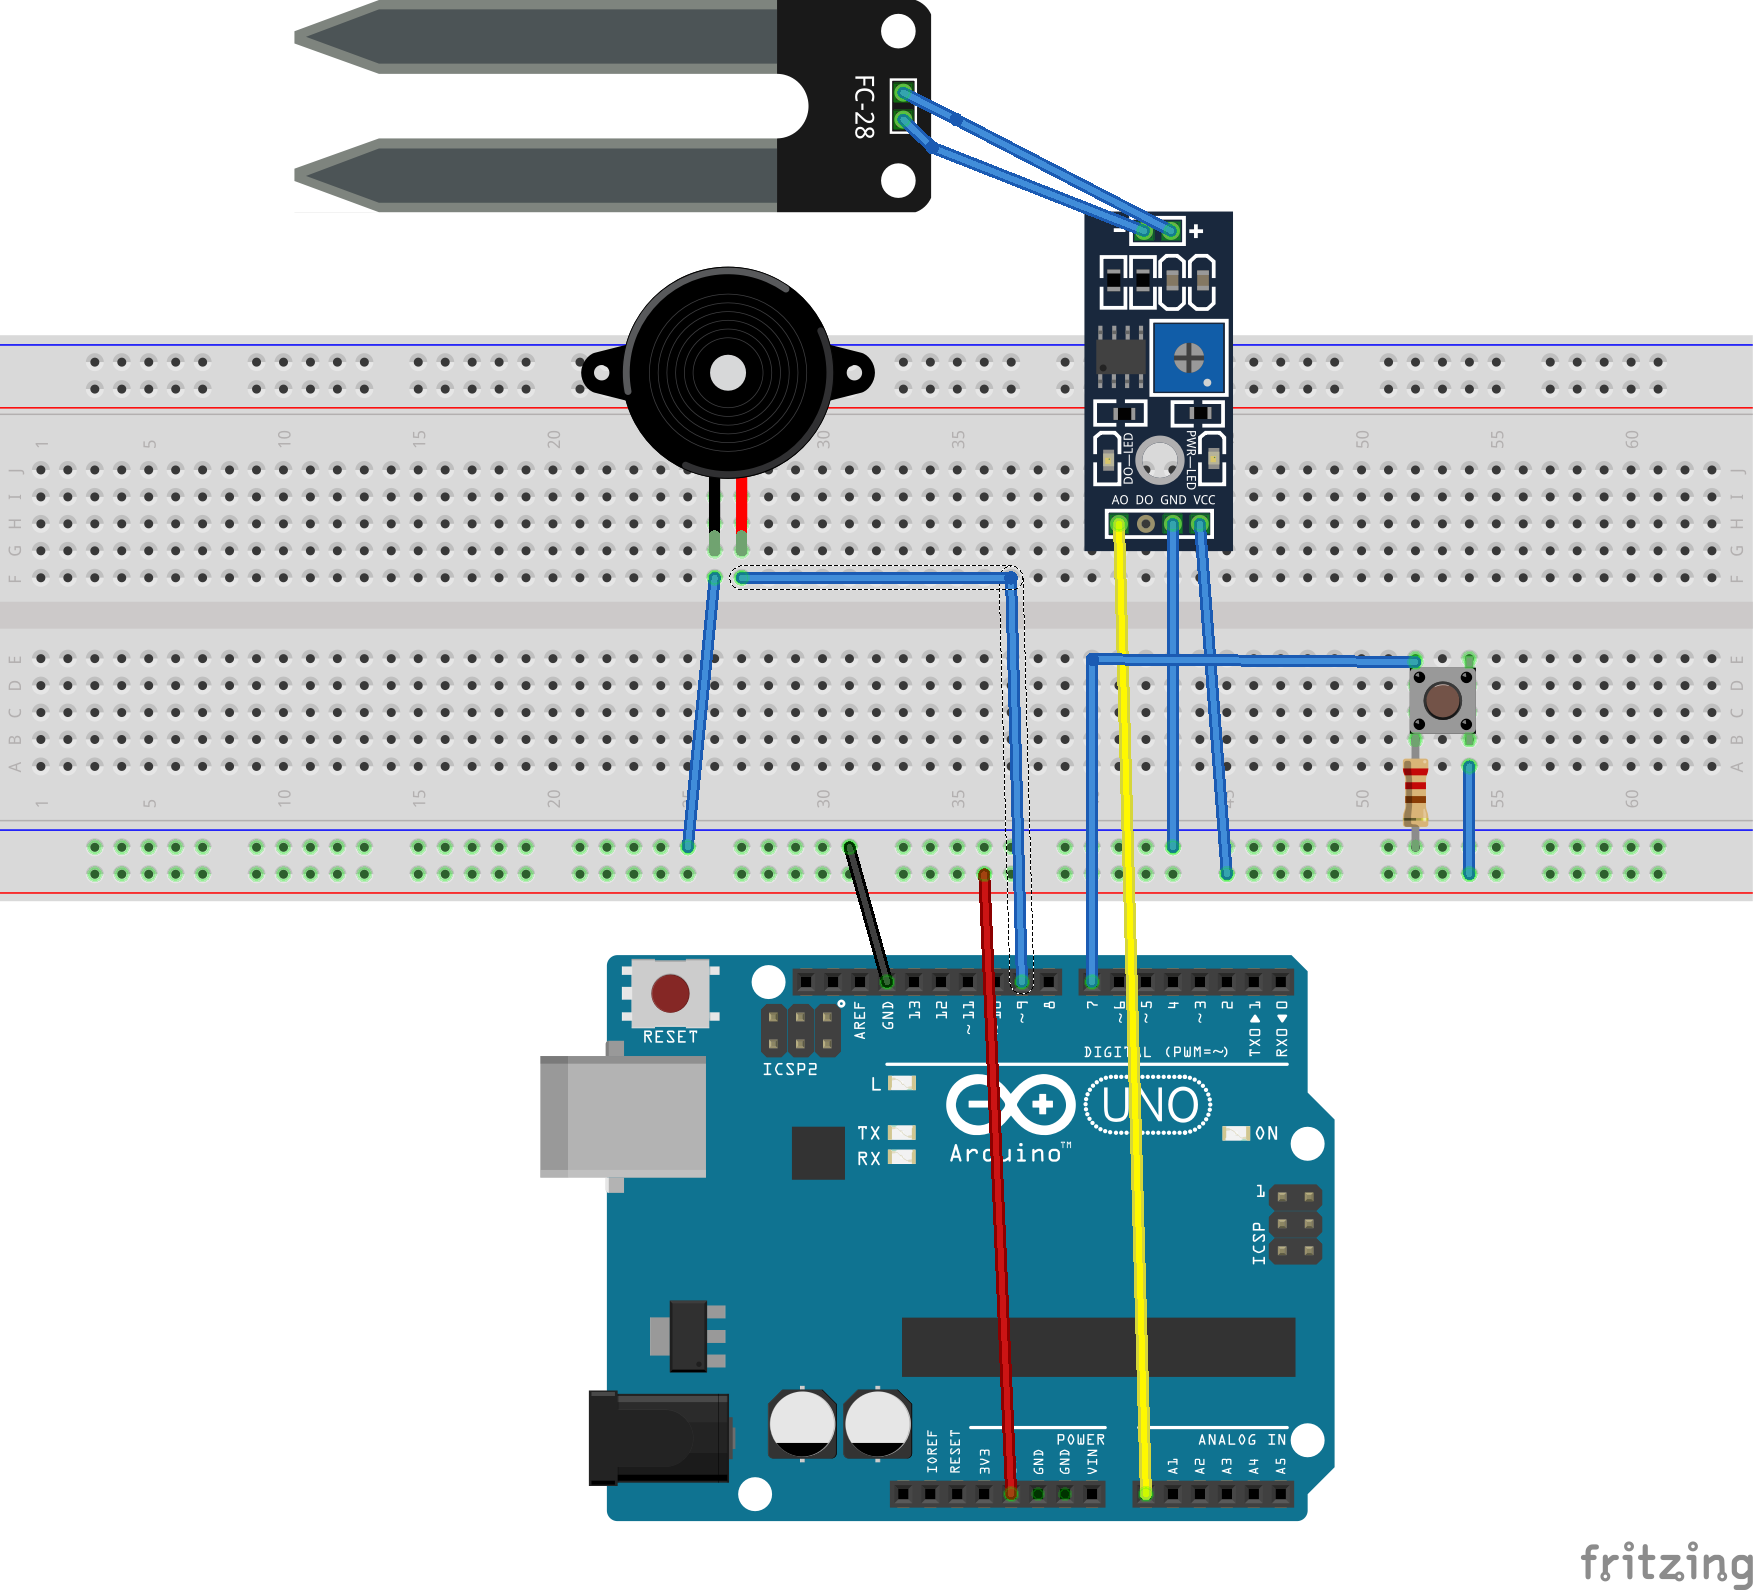
Schematic DiagramHere are the simplified and clear connection instructions for the Arduino setup with a soil moisture sensor and a piezo buzzer:
### Soil Moisture Sensor Connections:
- Connect the VCC pin of the soil moisture sensor to the Arduino 5V pin.
- Connect the GND pin of the soil moisture sensor to the Arduino GND pin.
- Connect the A0 pin of the soil moisture sensor to Arduino analog pin A0.
### Piezo Buzzer Connections:
- Connect the positive terminal of the piezo buzzer to Arduino digital pin 9.
- Connect the negative terminal of the piezo buzzer to the Arduino GND pin.
### Push Button Connections:
- Connect one terminal of the push button to Arduino 3.3V pin.
- Connect the other terminal of the push button to a node with a 10k resistor and a wire leading to Arduino digital pin 7.
- Connect the other end of the 10k resistor to the Arduino GND pin.
This setup will allow you to monitor soil moisture levels using the sensor and trigger the piezo buzzer based on your Arduino code logic. Adjustments to the connections or code can be made based on specific project requirements or sensor behavior.
programconst int VERY_WET = 400;
const int WET = 500;
const int DAMP = 700;
const int DRY = 850;
const int VERY_DRY = 950;
int BuzzerPin = 9;
int BuzzerFreq = 300;
int ButtonPin = 7;
boolean AlarmTripped = false;
int DetectorPin = A0;
int RawValue = 0;
 void setup()
{
pinMode(DetectorPin, INPUT);
pinMode(ButtonPin, INPUT);
Serial.begin(9600);
Serial.println("Water Detector ...");
}
void PrintMoistureStatus(int value)
{
Serial.print("MoistureStatus: ");
if (value <= VERY_WET)
{
Serial.print("VERY_WET");
}
else
if (value <= WET)
{
Serial.print("WET");
}
else
if (value <= DAMP)
{
Serial.print("DAMP");
}
else
if (value <= DRY)
{
Serial.print("DRY");
}
else
{
Serial.print("VERY_DRY");
}
}
void loop()
{
// Read Reset Button
RawValue = digitalRead(ButtonPin);
if (RawValue == 1)
{
AlarmTripped = false;
}
RawValue = analogRead(DetectorPin);
PrintMoistureStatus(RawValue);
Serial.print(" , RawValue: ");
Serial.println(RawValue);
// Check to see if Alarm should be
// tripped.
if (RawValue <= DAMP)
{
AlarmTripped = true;
}
// Sound Alarm if alarm has been
// tripped.
if (AlarmTripped)
{
tone(BuzzerPin, BuzzerFreq);
}
else
{
noTone(BuzzerPin);
}
}Download the Arduino program and start the Serial Monitor. The output of the Serial Monitor should be similar to:
As air is the substance in the sensor between the two sides, a high resistance measurement translates into a "very dry" reading. Soak a towel with water and wrap it around the water sensor fork.
You should see the reading going from damp to very wet depending on how difficult you push the wet towel down on the fork. The buzzer alarm should also be activated when the reading becomes damp. Now the alarm is tricked, and the buzzer continually generates a sound until the button is pressed to reset the alarm system.
program analysisconst int VERY_WET = 400;If the environment is wet, then the value from the water detector will be in the range of 401 to 500:
const int WET = 500;If the environment is just damp, the value from the water detector will be in the range of 501 to 700:
const int DAMP = 700;If the environment is dry, the value from the water detector will be in the range of 701 to 850:
const int DRY = 850;If the environment is very dry, then the value from the water detector will be in the range of 851 to 950:
const int VERY_DRY = 950;The piezo buzzer is assigned to digital pin 9 of the Arduino:
int BuzzerPin = 9;The frequency of the sound the buzzer produces is set to 300:
int BuzzerFreq = 300;The push-button is assigned to digital pin 7 of the Arduino:
int ButtonPin = 7;The AlarmTripped variable is true if the water detector has sensed a damp environment and false otherwise. This variable is initialised to false:
boolean AlarmTripped = false;The water detector is assigned to analogue pin 0 of the Arduino:
int DetectorPin = A0;The RawValue variable holds the raw data that is read from the water detector and is initialised to 0:
int RawValue = 0;
void setup()
{
pinMode(DetectorPin, INPUT);
pinMode(ButtonPin, INPUT);
Serial.begin(9600);
Serial.println("Water Detector ...");
}When the Arduino is activated or reset, the setup() function is named and does the following:
The pin on the Arduino connected to the analogue output pin of the water detector is set as an input pin so that the sensor reads the data.
The pin on the Arduino connected to the push button will be set as an input pin so you can read the voltages to see if the button is pushed.
It initialises the serial monitor, and thespeed of communication is set at 9, 600 baud. The Serial Monitor displays a text message indicating the start of the program.
void setup()
{
pinMode(DetectorPin, INPUT);
pinMode(ButtonPin, INPUT);
Serial.begin(9600);
Serial.println("Water Detector ...");
}The PrintMoistureStatus() function prints out the moisture status of the water detector to the Serial Monitor, and the status is
1. VERY_WET,
2. WET,
3. DAMP,
4. DRY, or
5. VERY_DRY.
void PrintMoistureStatus(int value)
{
Serial.print("MoistureStatus: ");
if (value <= VERY_WET)
{
Serial.print("VERY_WET");
}
else
if (value <= WET)
{
Serial.print("WET");
}
else
if (value <= DAMP)
{
Serial.print("DAMP");
}
else
if (value <= DRY)
{
Serial.print("DRY");
}
else
{
Serial.print("VERY_DRY");
}
}
Reads the push-button status and resets the alarm when the button is pressed.
Reads the water detector value. And Prints the soil moisture level in the Serial Monitor by calling the PrintMoistureStatus() function based on step 2.
Print the raw value read from the Serial Monitor water detector. The value read from the Stepp 2 water detector indicates a damp moisture level (700 or less). The function triggers an alarm.
The function produces a sound with the buzzer if the alarm has been tricked.If the alarm is not triggered, the function stops the buzzer sound.
void loop()
{
// Read Reset Button
RawValue = digitalRead(ButtonPin);
if (RawValue == 1)
{
AlarmTripped = false;
}
RawValue = analogRead(DetectorPin);
PrintMoistureStatus(RawValue);
Serial.print(" , RawValue: ");
Serial.println(RawValue);
// Check to see if Alarm should be
// tripped.
if (RawValue <= DAMP)
{
AlarmTripped = true;
}
// Sound Alarm if alarm has been
// tripped.
if (AlarmTripped)
{
tone(BuzzerPin, BuzzerFreq);
}
else
{
noTone(BuzzerPin);
}
}
The loop() function is repeated until the Arduino is disconnected or reset, and it:
Reads the push-button status and resets the alarm when the button is pressed.
Reads the water detector value.
Prints the soil moisture level in the Serial Monitor by calling the PrintMoistureStatus() function based on step 2.
Print the raw value read from the Serial Monitor water detector.
If the value read from the water detector from step 2 indicates that the humidity level (700 or less) is waterproof, the function triggers the alarm.
The function produces a sound with the buzzer if the alarm has been tricked.
If the alarm is not tricked, the function stops any buzzer sound.


Comments
Please log in or sign up to comment.