


In this project, we will use the LM35 analog temperature sensor to measure temperature and display the readings on a serial monitor. The LM35 is part of the LM135 range from National Semiconductors, capable of measuring temperatures from -40°C to +100°C. We will also use a 5K ohm trim potentiometer to calibrate the sensor.
Required Components1. Arduino
2. Resistors
6. Breadboard
7. 6×2 LCD Display Module (optional)
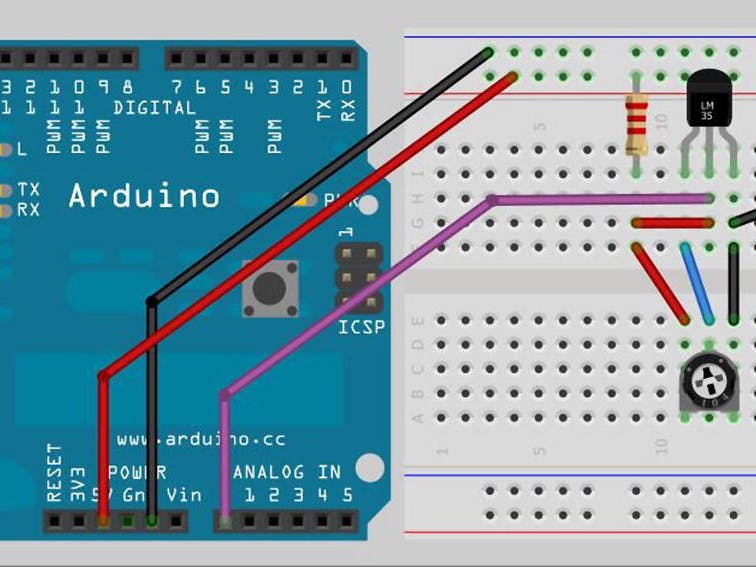
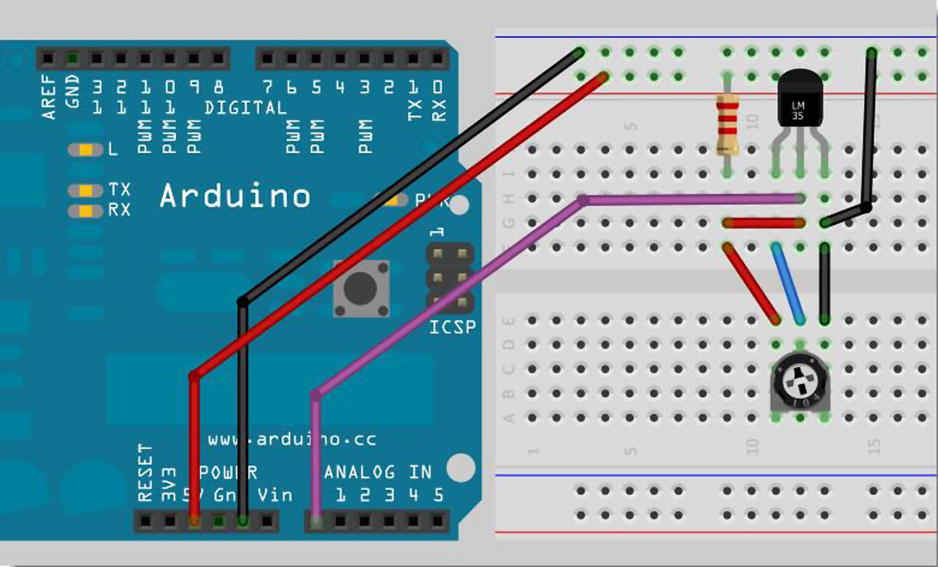
Circuit Diagram- If the flat side of the LM35 temperature sensor is facing you:
- **Left leg**: Adjustment pin to the center pin of the potentiometer.
- **Middle leg**: Positive supply pin.
- **Right leg**: Ground pin.
- Connect the center pin of the potentiometer to analog pin 0 on the Arduino.
Code#define sensorPin A0
float Celsius, Fahrenheit, Kelvin;
int sensorValue;
void setup() {
Serial.begin(9600);
Serial.println("Initializing...");
}
void loop() {
GetTemp();
Serial.print("Celsius: ");
Serial.println(Celsius);
Serial.print("Fahrenheit: ");
Serial.println(Fahrenheit);
Serial.println();
delay(2000);
}
void GetTemp() {
sensorValue = analogRead(sensorPin); // Read the sensor value
Kelvin = (((float(sensorValue) / 1023) * 5) * 100); // Convert to Kelvin
Celsius = Kelvin - 273.15; // Convert to Celsius
Fahrenheit = (Celsius * 1.8) + 32; // Convert to Fahrenheit
}1. Connect your LM35 sensor to the Arduino according to the circuit diagram.
2. Upload the code to the Arduino.
3. Open the Serial Monitor and set the baud rate to 9600.
4. You will see the temperature displayed in both Fahrenheit and Celsius.
CalibrationTo calibrate your sensor, follow these steps:
1. Prepare an ice-water mixture in a Styrofoam cup to ensure a stable 0°C environment.
2. Place the sensor in the ice-water mixture (protected by a thin plastic bag with minimal air).
3. Wait until the reading stabilizes.
4. Adjust the trimmer potentiometer until the reading shows 0°C.
Additional Notes- You can remove the trimmer part of the circuit after calibration. The sensor will provide approximate temperature readings within ±1°C.
- If using heat shrink tubing for waterproofing, use a dual wall or filled-core heat shrink type.
For more detailed information and advanced topics, consider referring to the book **"Beginning Arduino."**
This project demonstrates how to use the LM35 sensor with an Arduino to measure temperature, and how to calibrate the sensor for accurate readings.

Comments
Please log in or sign up to comment.