


Building a Smart Home Temperature and Humidity Monitor is an ideal project for those interested in smart home technology. By using an ESP32 microcontroller, DHT11 sensor, and the Blynk platform, you can monitor temperature and humidity directly from your smartphone. This project is perfect for beginners in IoT and home automation.
How It WorksThe DHT11 sensor collects temperature and humidity data, which the ESP32 microcontroller reads. Using Wi-Fi, the ESP32 then sends this data to the Blynk app, where you can view it in real-time on your phone. This project provides a low-cost, reliable way to keep tabs on indoor environmental conditions.
Materials NeededAffiliate Disclaimer: The following section contains affiliate links, meaning I may earn a commission if you purchase items through these links, at no additional cost to you.
- ESP32 Microcontroller Buy on Amazon
- DHT11 Temperature and Humidity Sensor Buy on Amazon
- Jumper Wires Buy on Amazon
- Breadboard Buy on Amazon
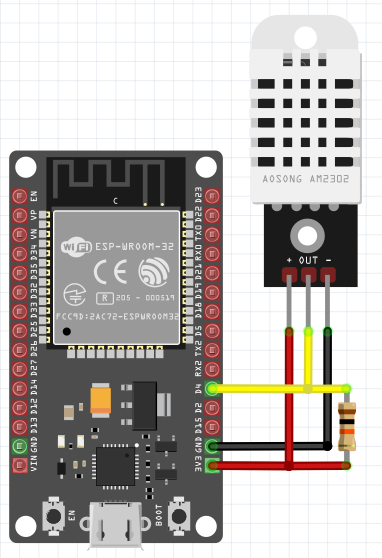
Connect the DHT Sensor to ESP32
- Attach the VCC pin of the DHT11 sensor to the 3.3V or 5V power pin on the ESP32.
- Connect the GND (ground) pin on the DHT11 to any GND pin on the ESP32.
- Link the DATA pin of the DHT sensor to GPIO4 on the ESP32 (Pin D4). This pin reads temperature and humidity data.
- Connect the DHT Sensor to ESP32Attach the VCC pin of the DHT11 sensor to the 3.3V or 5V power pin on the ESP32.Connect the GND (ground) pin on the DHT11 to any GND pin on the ESP32.Link the DATA pin of the DHT sensor to GPIO4 on the ESP32 (Pin D4). This pin reads temperature and humidity data.
Power the ESP32
- Use a USB cable connected to your computer or a USB power adapter to power the ESP32, which also allows you to upload code.
- Power the ESP32Use a USB cable connected to your computer or a USB power adapter to power the ESP32, which also allows you to upload code.
Download and Install the Blynk App
- Go to the App Store (iOS) or Google Play Store (Android) and download the Blynk app. Open it once installed and sign up or log in if you already have an account.
- Download and Install the Blynk AppGo to the App Store (iOS) or Google Play Store (Android) and download the Blynk app. Open it once installed and sign up or log in if you already have an account.
Create a New Project
- In the app, tap the "+" button to create a new project.
- Name the Project: Choose a name that represents your project, like "Smart Home Monitor."
- Select Hardware: From the device list, select ESP32 as your device since we’re using an ESP32 microcontroller.
- Connection Type: Set it to Wi-Fi.
- After creating the project, an Auth Token (authentication token) will be generated and emailed to you. This token will be required in your code to link your ESP32 with Blynk.
- Create a New ProjectIn the app, tap the "+" button to create a new project.Name the Project: Choose a name that represents your project, like "Smart Home Monitor."Select Hardware: From the device list, select ESP32 as your device since we’re using an ESP32 microcontroller.Connection Type: Set it to Wi-Fi.After creating the project, an Auth Token (authentication token) will be generated and emailed to you. This token will be required in your code to link your ESP32 with Blynk.
Add Widgets for Monitoring
- Inside your new project, tap the screen to open the widget box.
Add Gauge Widget for Temperature:
- Select the Gauge widget from the widget box and place it in your project interface.
Tap the gauge widget to configure it:
- Title: Set a title, e.g., “Temperature.”
- Pin: Set to Virtual Pin V5 (this is where we’ll send temperature data in our code).
- Range: Set an appropriate range, e.g., 0-50°C.
- Tap the gauge widget to configure it:Title: Set a title, e.g., “Temperature.”Pin: Set to Virtual Pin V5 (this is where we’ll send temperature data in our code).Range: Set an appropriate range, e.g., 0-50°C.
- Add Gauge Widget for Temperature:Select the Gauge widget from the widget box and place it in your project interface.Tap the gauge widget to configure it:Title: Set a title, e.g., “Temperature.”Pin: Set to Virtual Pin V5 (this is where we’ll send temperature data in our code).Range: Set an appropriate range, e.g., 0-50°C.
Add Gauge Widget for Humidity:
- Add another Gauge widget.
Configure this widget as follows:
- Title: Set it to “Humidity.”
- Pin: Set to Virtual Pin V6 (we’ll send humidity data here in the code).
- Range: Set the range, for example, 0-100%.
- Configure this widget as follows:Title: Set it to “Humidity.”Pin: Set to Virtual Pin V6 (we’ll send humidity data here in the code).Range: Set the range, for example, 0-100%.
- Add Gauge Widget for Humidity:Add another Gauge widget.Configure this widget as follows:Title: Set it to “Humidity.”Pin: Set to Virtual Pin V6 (we’ll send humidity data here in the code).Range: Set the range, for example, 0-100%.
- Add Widgets for MonitoringInside your new project, tap the screen to open the widget box.Add Gauge Widget for Temperature:Select the Gauge widget from the widget box and place it in your project interface.Tap the gauge widget to configure it:Title: Set a title, e.g., “Temperature.”Pin: Set to Virtual Pin V5 (this is where we’ll send temperature data in our code).Range: Set an appropriate range, e.g., 0-50°C.Add Gauge Widget for Humidity:Add another Gauge widget.Configure this widget as follows:Title: Set it to “Humidity.”Pin: Set to Virtual Pin V6 (we’ll send humidity data here in the code).Range: Set the range, for example, 0-100%.
Install the Blynk and DHT libraries in the Arduino IDE, then upload the code below. This code reads temperature and humidity from the DHT11 sensor and sends the data to the Blynk app.
#define BLYNK_PRINT Serial
#include <WiFi.h>
#include <WiFiClient.h>
#include <BlynkSimpleEsp32.h>
#include <DHT.h>

// Blynk Auth Token (from Blynk App)
char auth[] = "YourAuthToken";

// Wi-Fi credentials
char ssid[] = "YourNetworkName";
char pass[] = "YourPassword";

// DHT Sensor Setup
#define DHTPIN 4 // Data pin connected to GPIO4 (D4)
#define DHTTYPE DHT11 // DHT11 sensor type

DHT dht(DHTPIN, DHTTYPE);

void setup() {
  Serial.begin(115200);
  Blynk.begin(auth, ssid, pass);
  dht.begin();
}

void loop() {
  Blynk.run();

  // Read temperature and humidity values
  float temperature = dht.readTemperature();
  float humidity = dht.readHumidity();

  // Check if readings are valid
  if (isnan(temperature) || isnan(humidity)) {
    Serial.println("Failed to read from DHT sensor!");
    return;
  }

  // Send data to Blynk
  Blynk.virtualWrite(V5, temperature); // Virtual pin V5 for temperature
  Blynk.virtualWrite(V6, humidity);    // Virtual pin V6 for humidity

  delay(2000); // Delay between readings
}
Replace "YourAuthToken", "YourNetworkName", and "YourPassword" with your Blynk Auth Token and Wi-Fi credentials. The code reads temperature and humidity from the DHT11 sensor and sends this data to the Blynk app.
Step 4: Save, Run, and Check Output- Upload the Code: Connect your ESP32 to your computer, open the Arduino IDE, select the correct board and port, and upload the code.
- Open the Blynk App: Launch the Blynk app, start the project, and check that the temperature and humidity readings display correctly on the gauge widgets.
- Monitor Readings: Observe the live temperature and humidity data on your smartphone as it updates every two seconds.
This project can be expanded in several ways:
- Add Notifications: Set up Blynk notifications for specific temperature or humidity ranges.
- Add More Sensors: Connect additional sensors to monitor other environmental factors such as air quality or light levels.
- Connect Other Devices: Integrate this monitor with other smart devices, such as a smart fan, to automate temperature control.
You’ve now successfully built a Smart Home Temperature & Humidity Monitor using an ESP32 microcontroller, DHT11 sensor, and the Blynk app. With real-time data at your fingertips, you can take better control of your indoor environment, whether it’s for comfort, plant care, or climate management. Enjoy monitoring your smart home!


Comments
Please log in or sign up to comment.