


Overview: This section explores the fundamental concept of functions in programming with the ESP32 using Arduino and MicroPython. Functions are essential for organising code into reusable and manageable blocks, enhancing code readability, and promoting modular programming practices.
What We Will Learn in This Section:
- How to define functions in Arduino and MicroPython.
- Passing parameters to functions and returning values.
- Function overloading (Arduino).
- Best practices for naming and organising functions.
Why Is This Lesson Important to You?: Understanding functions is crucial for anyone developing projects with ESP32. By mastering functions, you'll streamline your code, make it easier to debug and maintain, and facilitate collaboration in larger projects. This foundational knowledge will empower you to write cleaner, more efficient code for a wide range of applications.
Components List:
LED (for practical demonstrations)
Arduino and MicroPython for ESP32" is your go-to guide for mastering ESP32 projects with clear examples and practical code. For free reading, visit Mechatronics Lab and grab your copy here
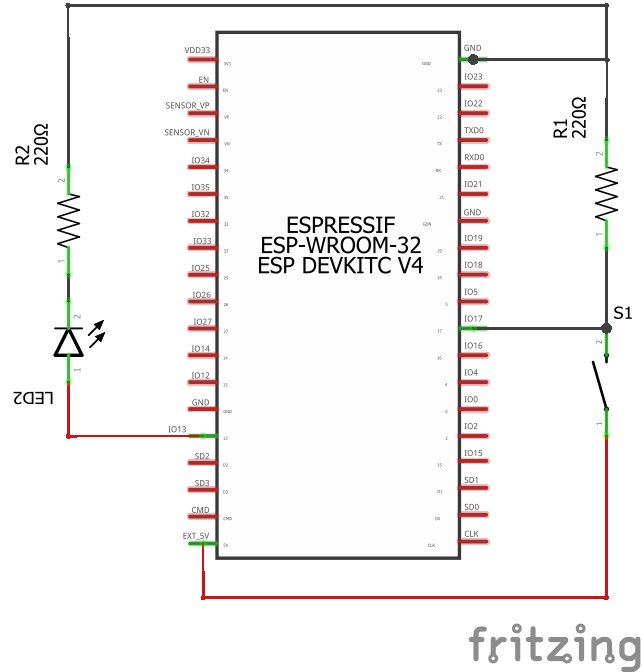
Circuit Diagram (With Connection):
- LED Anode (long leg): Connect to GPIO 2 (or GPIO 13 depending on your board) through a current-limiting resistor.
- LED Cathode (short leg): Connect to GND.
- Push-button switch (optional) Terminal 1: Connect to GPIO 17.
- Push-button switch (optional) Terminal 2: Connect to GND.
const int LED_BUILTIN = 13;  // Built-in LED pin on ESP32 (adjust if needed)
const int inputPin = 17;     // Define the input pin connected to a button or sensor
// Blink an LED once
void blink1() {
digitalWrite(LED_BUILTIN, HIGH); // turn the LED on
delay(500);                      // wait 500 milliseconds
digitalWrite(LED_BUILTIN, LOW);  // turn the LED off
delay(500);                      // wait 500 milliseconds
}
// Blink an LED the number of times given in the count parameter
void blink2(int count) {
while(count > 0) {
digitalWrite(LED_BUILTIN, HIGH); // turn the LED on
delay(500);                      // wait 500 milliseconds
digitalWrite(LED_BUILTIN, LOW);  // turn the LED off
delay(500);                      // wait 500 milliseconds
count--;                         // decrement count
}
}
// Blink an LED using the given delay period
// Return the number of times the LED flashed
int blink3(int period) {
int blinkCount = 0;
Serial.print("Input pin state: ");
Serial.println(digitalRead(inputPin));  // Debugging line to check pin state
while(digitalRead(inputPin) == LOW) {   // Change to LOW for pull-up
digitalWrite(LED_BUILTIN, HIGH);
delay(period);
digitalWrite(LED_BUILTIN, LOW);
delay(period);
blinkCount++;  // increment the count
}
return blinkCount;  // return the count value
}
void setup() {
pinMode(LED_BUILTIN, OUTPUT);
pinMode(inputPin, INPUT_PULLUP);  // Use internal pull-up resistor
Serial.begin(9600);
// Additional setup code as needed
}
void loop() {
// Example usage of blink functions
blink1();
delay(1000);  // wait 1 second between blinks
int count = blink3(250); // blink the LED 250 ms on and 250 ms off
Serial.print("Blink count: ");
Serial.println(count);
delay(2000);  // wait 2 seconds before repeating
}1. Variable Declarations
const int LED_BUILTIN = 13; // Built-in LED pin on ESP32 (adjust if needed)const int inputPin = 17; // Define the input pin connected to a button or sensor
- const int LED_BUILTIN = 13;: Sets the pin number for the built-in LED. This is usually pin 13 on many ESP32 boards, but it might need adjustment based on your specific board.
- const int inputPin = 17;: Sets the pin number for an input device like a button or sensor.
2. Blink Functions
void blink1() {
digitalWrite(LED_BUILTIN, HIGH); // turn the LED on
delay(500); // wait 500 milliseconds
digitalWrite(LED_BUILTIN, LOW); // turn the LED off
delay(500); // wait 500 milliseconds
}
- digitalWrite(LED_BUILTIN, HIGH);: Turns the LED on.
- delay(500);: Waits for 500 milliseconds.
- digitalWrite(LED_BUILTIN, LOW);: Turns the LED off.
- delay(500);: Waits for another 500 milliseconds.
void blink2(int count) {
while(count > 0) {
digitalWrite(LED_BUILTIN, HIGH); // turn the LED on
delay(500); // wait 500 milliseconds
digitalWrite(LED_BUILTIN, LOW); // turn the LED off
delay(500); // wait 500 milliseconds
count--; // decrement count
}
}
- while(count > 0): Loops while count is greater than 0.
- digitalWrite(LED_BUILTIN, HIGH);: Turns the LED on.
- delay(500);: Waits for 500 milliseconds.
- digitalWrite(LED_BUILTIN, LOW);: Turns the LED off.
- delay(500);: Waits for another 500 milliseconds.
- count--;: Decrements count by 1.
int blink3(int period) {
int blinkCount = 0;
Serial.print("Input pin state: ");
Serial.println(digitalRead(inputPin)); // Debugging line to check pin state
while(digitalRead(inputPin) == LOW) { // Change to LOW for pull-up
digitalWrite(LED_BUILTIN, HIGH);
delay(period);
digitalWrite(LED_BUILTIN, LOW);
delay(period);
blinkCount++; // increment the count
}
return blinkCount; // return the count value
}
- int blinkCount = 0;: Initializes a counter to track the number of blinks.
- Serial.print("Input pin state: ");: Prints a message to the Serial Monitor.
- Serial.println(digitalRead(inputPin));: Prints the current state of the input pin.
- while(digitalRead(inputPin) == LOW): Loops while the input pin is LOW (this is for active-low buttons or sensors).
- digitalWrite(LED_BUILTIN, HIGH);: Turns the LED on.
- delay(period);: Waits for the specified period.
- digitalWrite(LED_BUILTIN, LOW);: Turns the LED off.
- delay(period);: Waits for the specified period again.
- blinkCount++;: Increments the blink counter.
- return blinkCount;: Returns the number of blinks.
3. Setup Function
void setup() {
pinMode(LED_BUILTIN, OUTPUT);
pinMode(inputPin, INPUT_PULLUP); // Use internal pull-up resistor
Serial.begin(9600);
// Additional setup code as needed
}
- pinMode(LED_BUILTIN, OUTPUT);: Configures the LED pin as an output.
- pinMode(inputPin, INPUT_PULLUP);: Configures the input pin with an internal pull-up resistor.
- Serial.begin(9600);: Initializes serial communication at 9600 baud rate.
4. Loop Function
void loop() {
// Example usage of blink functions
blink1();
delay(1000); // wait 1 second between blinks
int count = blink3(250); // blink the LED 250 ms on and 250 ms off
Serial.print("Blink count: ");
Serial.println(count);
delay(2000); // wait 2 seconds before repeating
}
- blink1();: Calls blink1() to blink the LED once.
- delay(1000);: Waits for 1 second.
- int count = blink3(250);: Calls blink3() to blink the LED with a period of 250 milliseconds and stores the blink count.
- Serial.print("Blink count: ");: Prints a message to the Serial Monitor.
- Serial.println(count);: Prints the blink count to the Serial Monitor.
- delay(2000);: Waits for 2 seconds before repeating the loop.
from machine import Pin  # Import the Pin class from the machine module to control the pins
import time              # Import the time module for delays
LED_BUILTIN = Pin(2, Pin.OUT)  # Define the built-in LED pin (GPIO 2 on ESP32) and set it as an output
inputPin = Pin(17, Pin.IN, Pin.PULL_UP)  # Define the input pin connected to a button or sensor and enable the internal pull-up resistor
# Function to blink the LED once
def blink1():
LED_BUILTIN.value(1)  # Turn the LED on
time.sleep(0.5)       # Wait for 500 milliseconds
LED_BUILTIN.value(0)  # Turn the LED off
time.sleep(0.5)       # Wait for another 500 milliseconds
# Function to blink the LED a specified number of times
def blink2(count):
while count > 0:             # Loop until the count reaches 0
LED_BUILTIN.value(1)     # Turn the LED on
time.sleep(0.5)          # Wait for 500 milliseconds
LED_BUILTIN.value(0)     # Turn the LED off
time.sleep(0.5)          # Wait for another 500 milliseconds
count -= 1               # Decrement the count
# Function to blink the LED with a specified delay period and return the number of blinks
def blink3(period):
blink_count = 0  # Initialize the blink counter
print("Input pin state: ", inputPin.value())  # Print the current state of the input pin for debugging
while inputPin.value() == 0:  # Loop while the input pin is LOW (button pressed)
LED_BUILTIN.value(1)               # Turn the LED on
time.sleep(period / 1000.0)        # Wait for the specified period (converted to seconds)
LED_BUILTIN.value(0)               # Turn the LED off
time.sleep(period / 1000.0)        # Wait for the specified period (converted to seconds)
blink_count += 1                   # Increment the blink counter
return blink_count  # Return the total number of blinks
# Main loop to use the blink functions
while True:
blink1()                  # Call the blink1 function to blink the LED once
time.sleep(1)             # Wait for 1 second between blinks
count = blink3(250)       # Call the blink3 function to blink the LED with 250 ms on and 250 ms off
print("Blink count: ", count)  # Print the number of blinks
time.sleep(2) # Wait for 2 seconds before repeating the loop1. Variable Declarations
LED_BUILTIN = Pin(2, Pin.OUT) # Define the built-in LED pin (GPIO 2 on ESP32) and set it as an output
inputPin = Pin(17, Pin.IN, Pin.PULL_UP) # Define the input pin connected to a button or sensor and enable the internal pull-up resistor
- LED_BUILTIN: Sets GPIO 2 (often used for the built-in LED on ESP32) as an output pin.
- inputPin: Sets GPIO 17 as an input pin with an internal pull-up resistor, which is useful for reading button or sensor states.
2. Blink Functions
def blink1():
LED_BUILTIN.value(1) # Turn the LED on
time.sleep(0.5) # Wait for 500 milliseconds
LED_BUILTIN.value(0) # Turn the LED off
time.sleep(0.5) # Wait for another 500 milliseconds
- LED_BUILTIN.value(1): Turns the LED on by setting the pin to high (1).
- time.sleep(0.5): Pauses for 500 milliseconds.
- LED_BUILTIN.value(0): Turns the LED off by setting the pin to low (0).
- time.sleep(0.5): Pauses for another 500 milliseconds.
def blink2(count):
while count > 0: # Loop until the count reaches 0
LED_BUILTIN.value(1) # Turn the LED on
time.sleep(0.5) # Wait for 500 milliseconds
LED_BUILTIN.value(0) # Turn the LED off
time.sleep(0.5) # Wait for another 500 milliseconds
count -= 1 # Decrement the count
- while count > 0: Loops while count is greater than 0.
- LED_BUILTIN.value(1): Turns the LED on.
- time.sleep(0.5): Pauses for 500 milliseconds.
- LED_BUILTIN.value(0): Turns the LED off.
- time.sleep(0.5): Pauses for another 500 milliseconds.
- count -= 1: Decrements the count by 1.
def blink3(period):
blink_count = 0 # Initialize the blink counter
print("Input pin state: ", inputPin.value()) # Print the current state of the input pin for debugging
while inputPin.value() == 0: # Loop while the input pin is LOW (button pressed)
LED_BUILTIN.value(1) # Turn the LED on
time.sleep(period / 1000.0) # Wait for the specified period (converted to seconds)
LED_BUILTIN.value(0) # Turn the LED off
time.sleep(period / 1000.0) # Wait for the specified period (converted to seconds)
blink_count += 1 # Increment the blink counter
return blink_count # Return the total number of blinks
- blink_count = 0: Initializes a counter to track the number of blinks.
- print("Input pin state: ", inputPin.value()): Prints the current state of the input pin for debugging purposes.
- while inputPin.value() == 0: Loops while the input pin is LOW (indicating a button press or sensor trigger).
- LED_BUILTIN.value(1): Turns the LED on.
- time.sleep(period / 1000.0): Waits for the specified period (converted from milliseconds to seconds).
- LED_BUILTIN.value(0): Turns the LED off.
- time.sleep(period / 1000.0): Waits for the specified period again.
- blink_count += 1: Increments the blink counter.
- return blink_count: Returns the total number of blinks.
3. Main Loop
while True:
blink1() # Call the blink1 function to blink the LED once
time.sleep(1) # Wait for 1 second between blinks
count = blink3(250) # Call the blink3 function to blink the LED with 250 ms on and 250 ms off
print("Blink count: ", count) # Print the number of blinks
time.sleep(2) # Wait for 2 seconds before repeating the loop
- while True: Continuously loops indefinitely.
- blink1(): Calls the blink1 function to blink the LED once.
- time.sleep(1): Waits for 1 second before proceeding.
- count = blink3(250): Calls blink3 with a period of 250 milliseconds and stores the number of blinks in count.
- print("Blink count: ", count): Prints the number of blinks.
- time.sleep(2): Waits for 2 seconds before repeating the loop.

Comments
Please log in or sign up to comment.