


Creating a Smart Home Temperature & Humidity Monitor using the ESP32, a DHT11 sensor, and the Adafruit IO platform allows you to monitor temperature and humidity levels in real-time from anywhere with internet access. In this guide, we’ll set up the hardware and software to send live temperature and humidity data to Adafruit IO, where you can view it on a customizable dashboard.
How It WorksThe DHT11 sensor reads temperature and humidity data and sends it to the ESP32 microcontroller. The ESP32 then connects to Wi-Fi and transmits this data to Adafruit IO. You can monitor the temperature and humidity levels in real-time from the Adafruit IO dashboard, accessible through any web browser.
Materials NeededAffiliate Disclaimer: The following section contains affiliate links, meaning I may earn a commission if you purchase items through these links, at no additional cost to you.
- ESP32 MicrocontrollerBuy on Amazon
- DHT11 Temperature and Humidity SensorBuy on Amazon
- Jumper WiresBuy on Amazon
- BreadboardBuy on Amazon
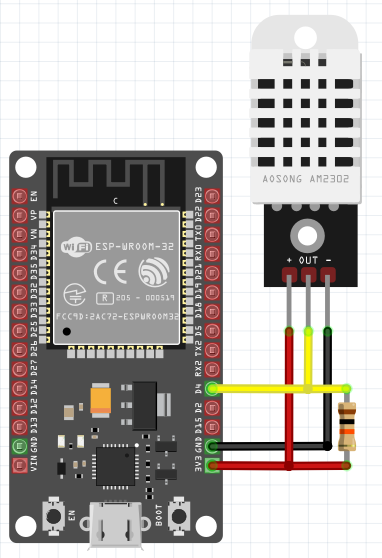
Connect the DHT Sensor to ESP32Connect the VCC pin of the DHT11 sensor to the 3.3V or 5V power pin on the ESP32.Connect the GND pin on the DHT11 to a GND pin on the ESP32.Connect the DATA pin of the DHT sensor to GPIO4 on the ESP32 (Pin D4).
Power the ESP32Use a USB cable connected to your computer or a USB power adapter to power the ESP32, allowing you to upload code as well.
Step 2: Setting Up Adafruit IOCreate an Adafruit IO AccountGo to Adafruit IO and create a free account if you don’t have one.
Create Feeds for Temperature and HumidityAfter logging in, go to the Feeds tab and create two separate feeds:
- Name one feed "temperature" for temperature data.
- Name the other feed "humidity" for humidity data.
Create a DashboardGo to the Dashboards tab and create a new dashboard named "Smart Home Monitor." Inside the dashboard, add two Gauge blocks:
- For the temperature gauge, select the "temperature" feed and set an appropriate range, such as 0-50°C.
- For the humidity gauge, select the "humidity" feed and set a range from 0-100%.
Obtain Your Adafruit IO Username and KeyGo to your Adafruit IO Profile Settings to find your username and active key. You’ll need these to connect your ESP32 to Adafruit IO.
Step 3: Writing the Code for ESP32Make sure you have the Adafruit IO and DHT libraries installed in your Arduino IDE. Then, use the code below, which will read temperature and humidity data from the DHT11 sensor and send it to Adafruit IO.
Install Required LibrariesIn the Arduino IDE, go to Sketch > Include Library > Manage Libraries...Search for Adafruit IO Arduino and install it.Search for DHT sensor library and install it.
#include <AdafruitIO_WiFi.h>
#include <Adafruit_Sensor.h>
#include <DHT.h>
#include <DHT_U.h>

// Replace with your Adafruit IO credentials
#define IO_USERNAME "YourAdafruitIOUsername"
#define IO_KEY "YourAdafruitIOKey"

// Wi-Fi credentials
#define WIFI_SSID "YourNetworkName"
#define WIFI_PASS "YourPassword"

// DHT Sensor settings
#define DHTPIN 4      // Data pin connected to GPIO4 (D4)
#define DHTTYPE DHT11 // DHT11 sensor type
DHT dht(DHTPIN, DHTTYPE);

// Adafruit IO instance
AdafruitIO_WiFi io(IO_USERNAME, IO_KEY, WIFI_SSID, WIFI_PASS);

// Set up feeds for temperature and humidity
AdafruitIO_Feed *temperature = io.feed("temperature");
AdafruitIO_Feed *humidity = io.feed("humidity");

void setup() {
  // Start Serial Monitor
  Serial.begin(115200);

  // Connect to Adafruit IO
  Serial.print("Connecting to Adafruit IO...");
  io.connect();

  // Wait for connection
  while(io.status() < AIO_CONNECTED) {
    Serial.print(".");
    delay(500);
  }
  Serial.println("Connected!");

  // Initialize DHT sensor
  dht.begin();
}

void loop() {
  // Ensure connection to Adafruit IO
  io.run();

  // Read temperature and humidity
  float temp = dht.readTemperature();
  float hum = dht.readHumidity();

  // Check for valid readings
  if (isnan(temp) || isnan(hum)) {
    Serial.println("Failed to read from DHT sensor!");
    return;
  }

  // Send temperature and humidity to Adafruit IO
  Serial.print("Sending temperature: ");
  Serial.print(temp);
  Serial.print(" °C | humidity: ");
  Serial.print(hum);
  Serial.println(" %");

  temperature->save(temp);
  humidity->save(hum);

  // Delay between readings
  delay(2000);
}
Replace "YourAdafruitIOUsername", "YourAdafruitIOKey", "YourNetworkName", and "YourPassword" with your Adafruit IO username, key, and Wi-Fi credentials. This code reads data from the DHT11 sensor and sends temperature and humidity readings to Adafruit IO.
Step 4: Save, Run, and Check OutputUpload the CodeConnect your ESP32 to your computer. In the Arduino IDE, select the ESP32 board and the correct port, then upload the code.
Check Serial MonitorOpen the Serial Monitor to check for any errors. Once connected, you should see temperature and humidity values being printed and sent to Adafruit IO every two seconds.
View Data on Adafruit IO DashboardGo to your Adafruit IO dashboard in a browser. You should see real-time updates in the gauges you configured, reflecting the current temperature and humidity.
Optional: Expand the ProjectAdd Notifications: Set up Adafruit IO triggers to receive email alerts if temperature or humidity goes above or below specific levels.Connect Additional Sensors: Add other environmental sensors, like light or air quality, to enhance your smart home monitor.Integrate with Other IoT Platforms: Use Adafruit IO’s API to send data to other platforms like IFTTT for additional smart home automation possibilities.
ConclusionYou’ve successfully built a Smart Home Temperature & Humidity Monitor using an ESP32, DHT11 sensor, and Adafruit IO. This setup allows you to track environmental conditions in real-time from anywhere with an internet connection. Enjoy using this data to make your home smarter and more comfortable!


Comments
Please log in or sign up to comment.