


The DHT11 sensor will measure temperature and humidity, which the ESP32 will read and publish to Home Assistant using MQTT. Home Assistant will then display the data in real-time, and you can also set up automations or alerts based on the sensor readings.
Materials Needed- ESP32 MicrocontrollerBuy on Amazon
- DHT11 Temperature and Humidity SensorBuy on Amazon
- Jumper WiresBuy on Amazon
- BreadboardBuy on Amazon
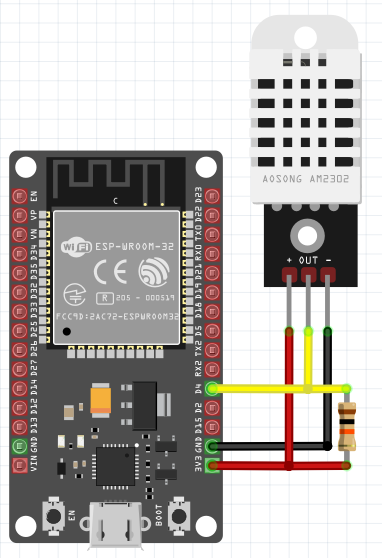
Connect the DHT11 Sensor to the ESP32:
- Connect the VCC pin of the DHT11 sensor to the 3.3V or 5V power pin on the ESP32.
- Connect the GND pin of the DHT11 sensor to a GND pin on the ESP32.
- Connect the DATA pin of the DHT11 sensor to GPIO4 on the ESP32 (Pin D4).
Power the ESP32:
- Use a USB cable to connect the ESP32 to your computer or a USB power adapter.
Install Mosquitto Broker:
- Open Home Assistant.
- Go to Supervisor (or Add-Ons in newer versions).
- Search for Mosquitto broker and install it.
Start the MQTT Broker:
- After installation, start the Mosquitto broker service.
Configure MQTT in Home Assistant:
- In Home Assistant, go to Settings > Devices & Services > Integrations.
- Click Add Integration and search for MQTT to add the MQTT integration if it hasn’t been added already.
Note the MQTT Broker IP Address and Credentials:
- You’ll need these details (IP, username, and password) for the ESP32 code.
Install the necessary libraries in the Arduino IDE:
- PubSubClient library for MQTT communication.
- DHT sensor library for reading the DHT11 sensor.
To install these libraries:
- Open the Arduino IDE.
- Go to Sketch > Include Library > Manage Libraries....
- Search for PubSubClient and install it.
- Search for DHT sensor library and install it.
Below is the code for the ESP32 to read data from the DHT11 sensor and publish it to Home Assistant via MQTT.
#include <WiFi.h>
#include <PubSubClient.h>
#include <DHT.h>

// WiFi and MQTT configuration
#define WIFI_SSID "YourWiFiSSID"
#define WIFI_PASSWORD "YourWiFiPassword"
#define MQTT_SERVER "YourMQTTBrokerIP"
#define MQTT_USER "YourMQTTUsername"
#define MQTT_PASSWORD "YourMQTTPassword"

// DHT Sensor configuration
#define DHTPIN 4        // DHT sensor data pin connected to GPIO4
#define DHTTYPE DHT11   // Using DHT11 sensor
DHT dht(DHTPIN, DHTTYPE);

// MQTT topics for temperature and humidity
const char* temperature_topic = "home/livingroom/temperature";
const char* humidity_topic = "home/livingroom/humidity";

// Initialize WiFi and MQTT clients
WiFiClient espClient;
PubSubClient client(espClient);

void setup() {
  Serial.begin(115200);
  dht.begin();

  // Connect to WiFi
  setup_wifi();

  // Configure MQTT server
  client.setServer(MQTT_SERVER, 1883);
}

void setup_wifi() {
  delay(10);
  Serial.println("Connecting to WiFi...");
  WiFi.begin(WIFI_SSID, WIFI_PASSWORD);

  while (WiFi.status() != WL_CONNECTED) {
    delay(500);
    Serial.print(".");
  }
  Serial.println("\nWiFi connected.");
}

void reconnect_mqtt() {
  // Loop until reconnected
  while (!client.connected()) {
    Serial.print("Attempting MQTT connection...");
    if (client.connect("ESP32Client", MQTT_USER, MQTT_PASSWORD)) {
      Serial.println("connected");
    } else {
      Serial.print("Failed, rc=");
      Serial.print(client.state());
      Serial.println(" trying again in 5 seconds...");
      delay(5000);
    }
  }
}

void loop() {
  // Reconnect to MQTT if disconnected
  if (!client.connected()) {
    reconnect_mqtt();
  }
  client.loop();

  // Read temperature and humidity
  float temperature = dht.readTemperature();
  float humidity = dht.readHumidity();

  // Check if readings are valid
  if (isnan(temperature) || isnan(humidity)) {
    Serial.println("Failed to read from DHT sensor!");
    return;
  }

  // Publish temperature and humidity to MQTT
  Serial.print("Temperature: ");
  Serial.print(temperature);
  Serial.print(" °C | Humidity: ");
  Serial.print(humidity);
  Serial.println(" %");

  client.publish(temperature_topic, String(temperature).c_str(), true);
  client.publish(humidity_topic, String(humidity).c_str(), true);

  // Delay between readings
  delay(2000);
}
Replace:
"YourWiFiSSID"and"YourWiFiPassword"with your Wi-Fi credentials."YourMQTTBrokerIP"with the IP address of your MQTT broker (Home Assistant)."YourMQTTUsername"and"YourMQTTPassword"with your MQTT credentials.
To display the sensor data in Home Assistant, add the MQTT sensors to the configuration.yaml file.
sensor:
  - platform: mqtt
    name: "Living Room Temperature"
    state_topic: "home/livingroom/temperature"
    unit_of_measurement: "°C"
    value_template: "{{ value | float }}"

  - platform: mqtt
    name: "Living Room Humidity"
    state_topic: "home/livingroom/humidity"
    unit_of_measurement: "%"
    value_template: "{{ value | float }}"
After editing the configuration file, restart Home Assistant to apply the changes.
Step 5: Viewing Data on Home Assistant Dashboard- Go to the Overview tab in Home Assistant.
- Click Edit Dashboard and Add Card.
- Select a Sensor Card and add the "Living Room Temperature" and "Living Room Humidity" sensors to the dashboard.
You can also use Gauge Cards or History Graphs to display the data visually.
Optional: Automations and AlertsIn Home Assistant, you can create automations based on temperature or humidity readings. For example, set an alert if the temperature exceeds 30°C or if the humidity drops below a certain level.
ConclusionYou’ve successfully built a Smart Home Temperature & Humidity Monitor using an ESP32, DHT11 sensor, and Home Assistant via MQTT. This project provides real-time data on temperature and humidity, which you can monitor, analyze, and use to trigger automations in your smart home setup.


Comments
Please log in or sign up to comment.