Want to control almost anything using the power of your hand? Just adding a band on your hand and you control your lights and fans?
It's just an idea inspired from star wars! Force to do anything :D :D
So basically in this we use a basic IR receiver and a transmitter. They both communicate together. When hand is shaked, an IR beam is blasted out which turns on any device :D !
Let's build it!
What do you Need?Spark photon
Tilt sensor
IR LEDs
Tiny button cell
A band
Assembling your PhotonHere we will do basic setup stuff for the photon. I assume that you know basics about photon, about how to setup and load the IDE.
Here we'll setup the hardware for a basic LED control.
First of all, we'll connect and LED and an IR LED to the photon. Connect it just like this.
Connecting the LED
Connecting the IR Receiver
Pin Connections:
Photon A0 - IR LED VCC
Photon GND - IR LED GND and LED
Photon D0 - LED VCC
Now burn this code into your board
void setup(){
  pinMode(D0, OUTPUT);
pinMode(A0, INPUT);
}
void loop(){
if(analogRead(A0) > 0)  // if IR receiver LED detects a ray
{  digitalWrite(D0, HIGH);    delay(10000);              }
}
This is the final looks of the receiver!
After this we will make the smart band with IR LED!
Building the band
Now take your band and 2 button cell coin battery. Attach a tilt sensor and tape up the whole circuit as shown in the images.
Now we'll hold and stick the small circuit on the band.
Do this step carefully as the circuit it delegate and it can easily break!
Tape the battery up with the band and stick the IR LED to your finger!
This is how you hand will look like:
Now you're done!
Testing it
Now shake your hand while focusing the LED attached on the photon. See it glow bright!
Build the hardware for fan controlNow comes most interesting part!
Controlling your fan with it!!
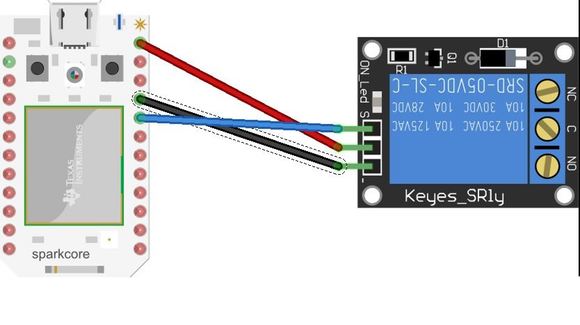
Everything would be same in the step except connecting a relay with fan.
First of all have a look to your fan. Find a place where we can attach a relay and the photon for the control.
This is my fan.
Look inside it...
This is the place to attach the relay circuit.
Attaching a relay to the circuit
So if you don't know what is a relay, relay is a basic device for switching high power appliances.
You can see its diagram here:
So when current flows from the DC 12 V coil, (from your photon) the circuit gets completed and then appliance turns on.
We'll need to attach a relay as we are operating high power appliances. Attach that as shown in the images.
Tape up your relay with some double sided tape.
I attached the relay with the fan circuit.
Do make sure that IR led faces the front!
I attached my photon on top as you can see.
Code for the fan
int relay = D0;

void setup(){
  pinMode(relay, OUTPUT);
pinMode(A0, INPUT);
}
void loop(){
if(analogRead(A0) > 0)  // if IR receiver LED detects a ray
{  digitalWrite(relay, HIGH);    delay(10000);              }
}
Testing the circuit
Now test the circuit! Shake your hand and see the magic!
In similar way you can control other devices such as your chandelier, radio garage etc as well. You just need to attach a relay and then you are completely done!


Comments