In October of this year I applied for the electronics competition organized by Hackster.io and Hologram called The Hologram Nova Challenge. The idea I submitted was called Hola Connect! Me and my dad came up with the idea, and what it does is converts any unconnected device in a house to an Internet-of-Things device by using the Hologram Nova and Raspberry Pi. Essentially, it would make it where anything with a USB port is IoT capable : an old TV or an outdated car record player, or any other device with a USB port - a receiver, a projector, an MP3 player, etc.
The device needs to have a USB input so it can be connected to any storage cloud, like a Dropbox folder or Google Drive folder.
One idea that me and my dad came up for this, and one that we absolutely loved was taking a digital picture frame and making it IoT capable. These digital photo frames were popular for awhile, but now that can be better utilized through the cloud and IoT. We decided to synchronize one of these photo frames that my grandparents had back in our home country with a folder on my iPhone here in Novato. They’ll be able to see photos I share with them 9,000 miles away seamlessly.
HardwareRaspberry Pi Zero Wireless has only one HW accelerated UART and one USB OTG controller which can only run in “host” or “device” mode. That’s why initial setup of Raspberry Pi Zero Wireless performed using its default onboard UART, then using WiFi, and only then Hologram Nova modem can be connected to UART, because USB works in “device mode” (or it also called “gadget mode”) for USB flash drive emulation.
Initial setup performed using Raspberry Pi UART and WiFi.
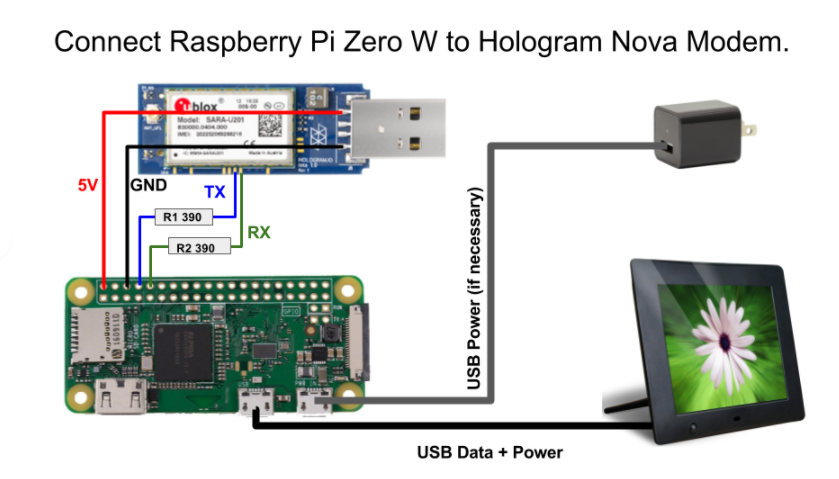
After initial setup performed, hardware finally should be connected this way:
First, you’ll need to download Raspbian Linux image, put it to your microSD card and then setup WiFi connection and enable SSH access - all described here: https://medium.com/@danidudas/install-raspbian-jessie-lite-and-setup-wi-fi-without-access-to-command-line-or-using-the-network-97f065af722e
Disable default Raspbian Linux console on UART.After you’ll be able to connect to console via SSH over WiFi, then you should disable default Raspbian Linux console on UART, see “Disabling Linux's use of console UART” section here: https://www.raspberrypi.org/documentation/configuration/uart.md
It’s necessary to disable Linux console on Raspberry Pi UART, because you’ll connect Hologram Nova later there and use /dev/ttyS0 file to manage modem using AT commands.
Enable USB OTG “gadget” mode.Next we need to enable USB OTG “gadget” mode using dwc2 USB driver:
echo "dtoverlay=dwc2" | sudo tee -a /boot/config.txt
echo "dwc2" | sudo tee -a /etc/modules
And create a file which will hold USB flash drive contents (4GB FAT32 in this example):
sudo dd if=/dev/zero of=/root/FlashDrive.bin bs=1M count=4096
After previous steps you’ll be able to connect Raspberry Pi Zero Wireless to your PC using micro USB cable plugged into USB port and plug in your (empty!) USB flash drive emulation using command:
sudo modprobe g_mass_storage file=/root/FlashDrive.bin stall=0
When your PC’s OS will see empty USB flash drive it will probably offer you to format it. For this project I recommend you to format your USB flash drive emulation to FAT32 filesystem.
Then to plug out USB flash drive emulation use this command:
sudo rmmod g_mass_storage
In this project you need to put files to USB flash drive emulation from inside Raspbian Linux and at the same time expose (in r/o mode to avoid filesystem damage) the same flash drive to your PC (or digital photo frame, or TV), so you need to mount flash drive, but your PC’s OS (see above) formatted flash drive and created a partition on it, so you’ll need to know filesystem offset in bytes in partition table for mount it.
You may know filesystem offset using fdisk -l /root/FlashDrive.bin command and then multiply offset (in sectors) to 512 (sector size in bytes) to get filesystem offset in bytes.
For example, if fdisk shows offset 2 (in sectors) then offset in bytes for mount command will be 1024 and you’ll be able to mount it locally this way:
sudo mkdir -p /root/FlashDrive
sudo mount -o offset=1024 /root/FlashDrive.bin /root/FlashDrive
And at the same time expose it to your PC as USB flash drive with command:
sudo modprobe g_mass_storage file=~/FlashDrive.bin ro=y removable=y
After steps above, you’ll see read only USB flash drive at your PC and at the same time all files you’ll put into /root/FlashDrive on Raspberry Pi will appear on PC at USB flash drive! :-)
Setting up background sync with your Google Drive.For sync your Google Drive with local folder /root/FlashDrive , where USB flash drive emulation mounted, rclone ( https://rclone.org/ ) utility was selected. Rclone also can be used for sync with a various cloud storages: Google Drive, Dropbox, Microsoft OneDrive, etc. Google Drive selected as an example.
Rclone utility has easy to use interactive command line configuration - you need only run rclone config command and follow instructions from this page for Google Drive: https://rclone.org/drive/ (name of remote should be gdrive, or if you type another name, then you’ll need to change it in the script below).
Also I recommend to not to leave Google Application Client Id and Google Application Client Secret blank, but type yours, then rclone will provide you with URL which you should copy and paste to your internet browser’s address line and then grant the app access to your Google Drive.
Finally /root/sync.sh script looks this way:
#!/bin/bash
# name me /root/sync.sh and run me under root (sudo su) user with: screen -d -m /root/sync.sh
# insert simulated flash drive
modprobe g_mass_storage file=~/FlashDrive.bin ro=y removable=y
# mount simulated flash drive 1st partition contents locally for rclone
# to find partition offset: fdisk -l ~/FlashDrive.bin and multiply start sector by 512
mount -o offset=1024 ~/FlashDrive.bin ~/FlashDrive
# run forever
while true
do
  NOCHANGES=`rclone -v sync gdrive: ~/FlashDrive/ 2>&1 | grep -c "Transferred:   0 Bytes"`
  sync # !!! syncs rclone changes to simulated flash drive avoiding memory cache of new files
  if [ $NOCHANGES -gt 0 ]
  then
 # unchanged
 echo "$(date) unchanged"
 sleep 2 # TODO: adjust seconds to not to poll Google Drive API too often.
  else
 # changed - reinsert simulated flash drive
 echo "$(date) new files added!"
 rmmod g_mass_storage
 modprobe g_mass_storage file=~/FlashDrive.bin ro=y removable=y
  fi
done
Sync script above may be run right after Raspberry Pi start and it also performs initial setup: “inserts” simulated USB flash drive, mounts it to /root/FlashDrive path and after that runs rsync in infinite while loop. To run sync script in background I recommend to run it using Linux screen utility:
screen -d -m /root/sync.sh
After this step ready, Raspberry Pi will provide you an USB flash drive simulation which also synced with your Google Drive account over WiFi. To finally setup this project you only need to set up Hologram Nova modem and connect to Internet over Hologram Nova, not over WiFi. But it’s useful to have WiFi also for managing and debug purposes via SSH command line - WiFi can work at the same time when Hologram Nova connected to the Internet.
Final setup.Prepare Hologram Nova with AT commands.Hologram Nova modem, after it connected to Raspberry Pi, can be managed as any other modem with AT commands.
Here’s some useful links on how to set up and use u-blox SARA-U201 module which used in Hologram Nova modem as a 3G module:
https://www.u-blox.com/sites/default/files/SARA-U2_DataSheet_%28UBX-13005287%29.pdf
https://www.u-blox.com/sites/default/files/u-blox-CEL_ATCommands_%28UBX-13002752%29.pdf
https://www.u-blox.com/sites/default/files/SARA-G3-U2_SysIntegrManual_%28UBX-13000995%29.pdf
Initial setup of u-blox SARA-U201 module should be performed via USB on PC, because onboard UART (which is necessary for connect to Raspberry Pi, because USB OTG is busy with flash drive emulation and unfortunately can’t be used for connect Hologram Nova) is set up with HW flow control (RTS/CTS lines in addition to Tx/Rx lines) while Raspberry Pi UART has Tx/Rx lines only.
To properly set up u-blox SARA-U201 onboard UART, you may connect Hologram Nova to your PC via USB, then run terminal program at speed 115200 (I recommend to use TeraTerm under Windows or minicom under Linux) and issue the following commands:
AT+IFC=0,0
AT&K0
AT\Q0
AT&W0
Also for best UART performance it’s a good idea to change speed from 115200 to 921600 with the following AT command:
AT+IPR=921600
Right after that your terminal on next symbol types may respond with “hieroglyphs” instead of normal symbols - this happens because your terminal still works at speed 115200 while u-blox SARA-U201 module speed already changed to 921600, so you’ll need to exit your terminal program and run it again with a speed 921600.
To save UART speed into default profile, so modem will use it after restart, issue the following AT command again:
AT&W0
After this step Hologram Nova modem is ready for use directly via onboard UART with Raspberry Pi. Raspberry Pi sees Hologram Nova modem via UART file /dev/ttyS0
Hologram Nova connect to Internet.The dongle comes with a sim card and cell network built for M2M data with easy activation.
Alternative cellular providers. Setup pppd to connect to Internet.For connect Raspberry Pi to the Internet with Hologram Nova standard Linux’s pppd daemon used.
You should leave /etc/chatscripts/gprs as is and create a settings file for your provider at path /etc/ppp/peers/
I was testing the set up using an alternative cell provider, my cellular network provider was TELE2, so I created /etc/ppp/peers/tele2 script with the following contents:
# example configuration for a dialup connection authenticated with PAP or CHAP
#
# This is the default configuration used by pon(1) and poff(1).
# See the manual page pppd(8) for information on all the options.
# MUST CHANGE: replace myusername@realm with the PPP login name given to
# your by your provider.
# There should be a matching entry with the password in /etc/ppp/pap-secrets
# and/or /etc/ppp/chap-secrets.
user "myusername@realm"
# MUST CHANGE: replace ******** with the phone number of your provider.
# The /etc/chatscripts/pap chat script may be modified to change the
# modem initialization string.
connect "/usr/sbin/chat -v -f /etc/chatscripts/gprs -T internet.tele2.ru"
# Serial device to which the modem is connected.
/dev/ttyS0
# Speed of the serial line.
115200
# Assumes that your IP address is allocated dynamically by the ISP.
noipdefault
# Try to get the name server addresses from the ISP.
usepeerdns
# Use this connection as the default route.
defaultroute
# IMPORTANT: REPLACE DEFAULT ROUTE!!!
replacedefaultroute
# Makes pppd "dial again" when the connection is lost.
persist
# Do not ask the remote to authenticate.
noauth
After that you may connect/disconnect Internet using Hologram Nova modem with pon tele2 and poff -a respectively.
Note that it’s still possible to connect to Raspberry Pi via SSH over WiFi and replacedefautroute option in config is very useful - it automatically changes default gateway on connect/disconnect modem, i.e. sync with Google Drive will be performed via Hologram Nova when it’s connected to Internet, otherwise sync will be performed via WiFi connection.
So, after Raspberry Pi start, two commands should be run at start (with settings from above):
pon tele2
screen -d -m /root/sync.sh
After that, all files that you put to your Google Drive will appear at emulated USB flash drive.
See GitHub repository attached to the project!


Comments
Please log in or sign up to comment.