Welcome to Hackster!
Hackster is a community dedicated to learning hardware, from beginner to pro. Join us, it's free!
Cole RabsonAndre WasemAlex Elkin
Published

Color Cycle

The Color Cycle is designed for anyone who needs a little more color in their lives.

BeginnerShowcase (no instructions)606
Color Cycle

Things used in this project

Hardware components

Breadboard (generic)
×1
EK-TM4C123GXL TM4C Tiva LaunchPad
Texas Instruments EK-TM4C123GXL TM4C Tiva LaunchPad
×1
Energia
×1
Jumper wires (generic)
×1
LED, RGB
LED, RGB
×1
Breadboard Booster Pack
×1

Story

Read more

Schematics

Diagram

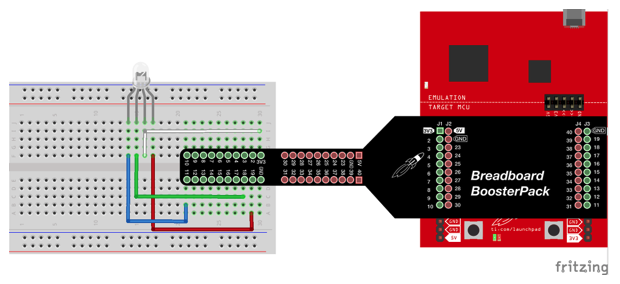
This diagram represents the build of the curcuit that we used using the launchpad, breadboard, and the booster pack.

Code

Cycle Code

C/C++
// Connect Anode pin to VCC
// Connect Red to pin 19 which should be PWM capable
// Connect Green to pin with PWM
// Connect Blue to pin with PWM
// You can put a resistor in between to protect your circuit
// but for low power LEDs it's usually okay to drive directly
// from the LaunchPad.

// Let's use #define to rename our pins from numbers to readable variables
// This is good practice when writing code so it is less confusing to read
#define RED 19 // pin 19 is always PWM capable according to LaunchPad standard
#define GREEN 18 // may need to change this for your LaunchPad
#define BLUE 11 // may need to change this for your LaunchPad
#define delayTime 5 // delay between color changes, 10ms by default

// Here we can introduce some global variables. These variables have a type
// (int) and a name. We can use the variables in any function that comes after
// Global variables are useful because we can save the state of a variable to
// use in later operations and functions.
int redVal;
int greenVal;
int blueVal;

/* This is our setup function. We want to set our LED pins as OUTPUT.
 * We can also set them to HIGH at the beginning.
 */

// This code runs whenever you hit the top button on the launchpad
void setup() {

 int PWM_RESOLUTION = 255; // this variable will hold our resolution.

 /* Start with full red */
 int redVal = 0; // zero voltage will give us full color
 int greenVal = PWM_RESOLUTION; // max voltage will give us no color
 int blueVal = PWM_RESOLUTION; // max voltage will give us no color
 analogWrite( RED, redVal );
 analogWrite( GREEN, greenVal );
 analogWrite( BLUE, blueVal );

 /* Fade from red to green */
 for( int i = 0 ; i < PWM_RESOLUTION ; i += 1 ){
 greenVal -= 1;
 redVal += 1;
 analogWrite( RED, redVal ); // set the new red value
 analogWrite( GREEN, greenVal ); // set the new green value

 delay(2); // wait for how long delay time is
 }

 /* Now full green */
 redVal = PWM_RESOLUTION; // max voltage will give us no color
 greenVal = 0; // zero voltage will give us full color
 blueVal = PWM_RESOLUTION; // max voltage will give us no color
 analogWrite( RED, redVal );
 analogWrite( GREEN, greenVal );
 analogWrite( BLUE, blueVal );

 // again we will use the for loop to change the color gradually
 /* Fade from green to blue */
 for( int i = 0 ; i < PWM_RESOLUTION ; i += 1 ){
 blueVal -= 1;
 greenVal += 1;
 analogWrite( BLUE, blueVal ); // set the new blue value
 analogWrite( GREEN, greenVal ); // set the new green value

 delay(2); // wait for how long delay time is
 }

 /* Now full blue */
 redVal = PWM_RESOLUTION; // max voltage will give us no color
 greenVal = PWM_RESOLUTION; // max voltage will give us no color
 blueVal = 0; // zero voltage will give us full color
 analogWrite( RED, redVal );
 analogWrite( GREEN, greenVal );
 analogWrite( BLUE, blueVal );

 // again we will use the for loop to change the color gradually
 /* Fade from blue to red */
 for( int i = 0 ; i < PWM_RESOLUTION ; i += 1 ){
 redVal -= 1;
 blueVal += 1;
 analogWrite( RED, redVal ); // set the new red value
 analogWrite( BLUE, blueVal ); // set the new blue value

 delay(2); // wait for how long delay time is
 }
}

//This code runs as default
void loop() {

 // We will use a for loop to change the color gradually
 // This will make it fade instead of instantly change
 // We need to go from 0 to 255. You may need to modify
 // your range depending on your LaunchPad to see a smooth
 // result.
 int PWM_RESOLUTION = 255; // this variable will hold our resolution.


 /* Start with full red */
 int redVal = 0; // zero voltage will give us full color
 int greenVal = PWM_RESOLUTION; // max voltage will give us no color
 int blueVal = PWM_RESOLUTION; // max voltage will give us no color
 analogWrite( RED, redVal );
 analogWrite( GREEN, greenVal );
 analogWrite( BLUE, blueVal );

 /* Fade from red to green */
 for( int i = 0 ; i < PWM_RESOLUTION ; i += 1 ){
 greenVal -= 1;
 redVal += 1;
 analogWrite( RED, redVal ); // set the new red value
 analogWrite( GREEN, greenVal ); // set the new green value

 delay( delayTime ); // wait for how long delay time is
 }

 /* Now full green */
 redVal = PWM_RESOLUTION; // max voltage will give us no color
 greenVal = 0; // zero voltage will give us full color
 blueVal = PWM_RESOLUTION; // max voltage will give us no color
 analogWrite( RED, redVal );
 analogWrite( GREEN, greenVal );
 analogWrite( BLUE, blueVal );

 // again we will use the for loop to change the color gradually
 /* Fade from green to blue */
 for( int i = 0 ; i < PWM_RESOLUTION ; i += 1 ){
 blueVal -= 1;
 greenVal += 1;
 analogWrite( BLUE, blueVal ); // set the new blue value
 analogWrite( GREEN, greenVal ); // set the new green value

 delay( delayTime ); // wait for how long delay time is
 }

 /* Now full blue */
 redVal = PWM_RESOLUTION; // max voltage will give us no color
 greenVal = PWM_RESOLUTION; // max voltage will give us no color
 blueVal = 0; // zero voltage will give us full color
 analogWrite( RED, redVal );
 analogWrite( GREEN, greenVal );
 analogWrite( BLUE, blueVal );

 // again we will use the for loop to change the color gradually
 /* Fade from blue to red */
 for( int i = 0 ; i < PWM_RESOLUTION ; i += 1 ){
 redVal -= 1;
 blueVal += 1;
 analogWrite( RED, redVal ); // set the new red value
 analogWrite( BLUE, blueVal ); // set the new blue value

 delay( delayTime ); // wait for how long delay time is
 }
}

Credits

Cole Rabson
1 project • 0 followers
Contact
Andre Wasem
1 project • 0 followers
Contact
Alex Elkin
1 project • 0 followers
Contact

Comments

Please log in or sign up to comment.