If you're new to LinkIt ONE..........................
Before you start, Please take note of the following:
1. It's compulsory to connect battery to your LinkIt ONE board. It's required almost all time using power from Battery.
2. Sometime, in order for LinkIt ONE to give response while updating firmware or uploading sketch from Arduino, you will need to press reset button on the board (if it's working the no need to press)
For the basic setup of your LinkIt One, please check this out : http://www.instructables.com/id/Dummys-Linkit-One-Getting-Started-Guide/ (Please don't follow mediatek's website official guide, it's outdated cum didn't take note on the above points)
I realized follow MediaTek Lab quick start guide or tutorial didn't help. In fact wasted my time to figure out the correct way of basic setup. In order to help other Hacksters to get thing done fast, I will show you the proper way to setup your LinkIt ONE board in the next few paragraphs
Quick Start Guide To Setup Your LinkIt ONE:
1. Download and install Arduino IDE if you haven't https://www.arduino.cc/en/Main/Software
2. Download and install USB COM port drivers for LinkIt ONE. If you already installed LinkIt ONE USB COM port drivers before, you can skip this step.
* [Download driver for Windows]http://download.labs.mediatek.com/mediatek_linkit_windows-com-port-driver.zip
* [Download driver for OS X]http://download.labs.mediatek.com/mediatek_linkit_os-x-com-port-driver.zip
3. Set 3rd party Boards Manager URL
Point your Arduino IDE 1.6.5 to our Boards Manager repository.
To do this, choose `File > Preferences` from IDE menu. Copy and
paste following URL to the "Additional Boards Manager URLs" preferences.
Repository URL:
http://download.labs.mediatek.com/package_mtk_linkit_index.json
4. Go to Tools>Board>Boards manager and search for LinkIt One.
5. Select "LinkIt ONE" and click install.
6. Once installation is done, close the Board manager Window and go back to Tools>Board to select LinkIt ONE
Please check the following video for a better understanding:
Update Firmware
for updating firmware you may follow this link or take a look on the video below for better understanding:
Finally upload your sketch from Arduino IDE to LinkIt ONE and make it work
After setting up your LinkIt ONE, let's start making!
For LinkIt ONE GPS and real time map traking,I'm referring to MediaTek bike tracking tutorial: https://labs.mediatek.com/site/global/developer_tools/mediatek_linkit/documentation/bicycle-tracking/tutorial/
The tutorial here using PubNub and MapBox, if feel free to try other cloud services if you're more comfortable (eg: AWS IoT + Google Map)
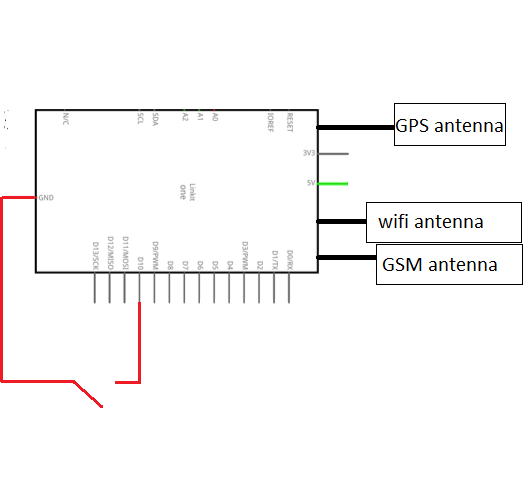
After everything is setup nicely, I added in a button for LinkIt ONE to send a status message over to PubNub. This button will allow driver to report bus break down by pressing. Once button is pressed, PubNub will receive the message with status "Break down" and the data will then display on real time map.
This feature can be further enhanced by utilizing LinkIt ONE SMS feature to inform service team.
User will be able to read the bus speed and bus status from Map. User will be able to see real time movement of the bus too.
Future Plan
Frankly, i found that's GPS data is not yet accurate enough for user to track the exact location of bus. That also lead to inaccuracy of arrival time estimation. I would like to try using Bluetooth for LinkIt ONE on bus to detect which bus-stop it's reaching. Let's say each busstop having a bluetooth device(beacon: http://kontakt.io/) with the busstop name, and the LinkIt ONE installed on bus is keep on scanning the bluetooth devices around, once it found the bus stop name, it can send the data to cloud and mobile phone user will know which bus stop the bus just passed by.


Comments