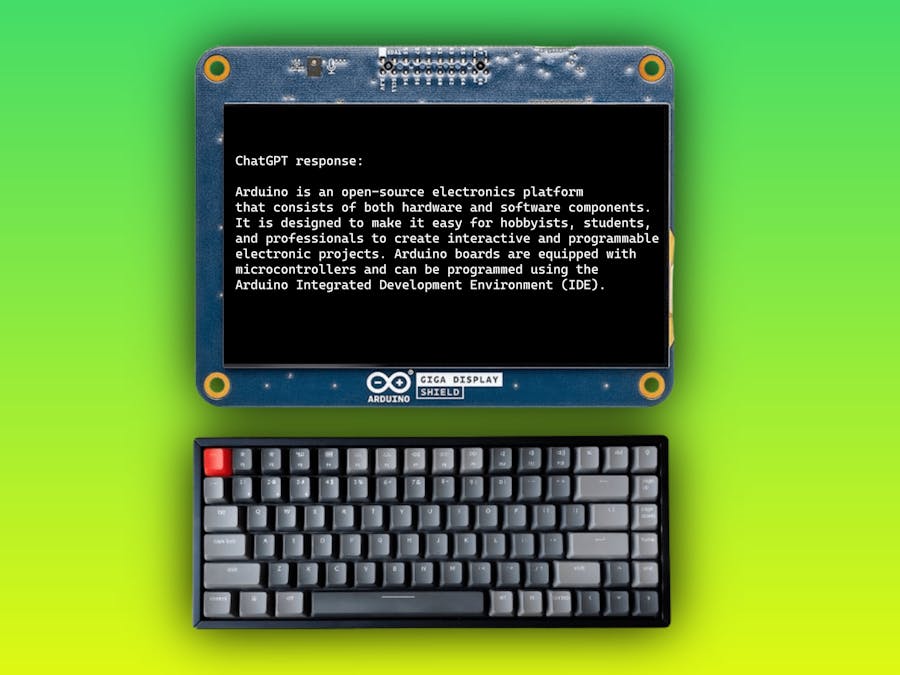
The ArduinoGPT project enables the use of the Arduino GIGA R1 WiFi and keyboard for user prompt input, followed by transmission to ChatGPT, and finally, display of the corresponding response on the GIGA Display Shield.
When using the ChatGPT API, sometimes we want to print the output as we receive it, as a stream, rather than waiting a few seconds for the full response. This can be useful when we want to process the output in real-time or when we want to see the output as it is being generated.
To achieve this, we can use the "stream" parameter in our API request. When this parameter is set to true, the response from ChatGPT will be a list of results rather than a single result.
Here is an example of how to use the "stream" parameter in a curl request:
curl -X POST -H "Content-Type: application/json" -H "Authorization: Bearer OPENAI_APIKEY" --data-raw '{
"model": "gpt-3.5-turbo",
"messages": [
{"role": "system", "content": "You are a helpful assistant."},
{"role": "user", "content": "What is Arduino"}
],
"max_tokens": 50,
"temperature": 0.7,
"stream": true
}' https://api.openai.com/v1/chat/completions
Here is an example of how the response might look:
data: {"id":"chatcmpl-8S1KjF9N9yYQyXrNkFBb83WMhM9y7","object":"chat.completion.chunk","created":1701689001,"model":"gpt-3.5-turbo-0613","system_fingerprint":null,"choices":[{"index":0,"delta":{"role":"assistant","content":""},"finish_reason":null}]}
data: {"id":"chatcmpl-8S1KjF9N9yYQyXrNkFBb83WMhM9y7","object":"chat.completion.chunk","created":1701689001,"model":"gpt-3.5-turbo-0613","system_fingerprint":null,"choices":[{"index":0,"delta":{"content":"Arduino"},"finish_reason":null}]}
data: {"id":"chatcmpl-8S1KjF9N9yYQyXrNkFBb83WMhM9y7","object":"chat.completion.chunk","created":1701689001,"model":"gpt-3.5-turbo-0613","system_fingerprint":null,"choices":[{"index":0,"delta":{"content":" is"},"finish_reason":null}]}
When we run this request, the API will return a list of completion chunks, with each chunk containing a single completion in content:.
The GIGA R1's USB-A connector can be used to connect generic USB keyboards, allowing users to input prompts to Chatgpt. Arduino released a library called USBHostGiga, which can be downloaded from Github. This library will enable the integration of functionality that allows users to input prompts via keyboard to Arduino GIGA R1 WiFi.
My setup is as shown below.
You can follow these steps:
- Download the USBHostGiga library from GitHub. This library allows you to use the GIGA R1's USB-A connector to connect a generic USB keyboard.
- Install the USBHostGiga library on your Arduino IDE.
- Connect a generic USB keyboard to the GIGA R1's USB-A connector.
- Open the Arduino IDE and create a new sketch.
- Copy below code snippet
- Replace
SSID_NETWORK_NAME,WIFI_PASSWORDandOPENAI_APIKEYwith your data.
#include <Wire.h>
#include <SPI.h>
#include "Arduino_GigaDisplay_GFX.h"
#include <WiFi.h>
#include <ArduinoJson.h>
#include <WiFiSSLClient.h>
#include <string>
#include "USBHostGiga.h"


GigaDisplay_GFX display; // create the object
#define BLACK 0x0000
#define ARDUINOJSON_DECODE_UNICODE 1

Keyboard keyb;
HostSerial ser;

char server[] = "api.openai.com";
const int serverPort = 443;

char ssid[] = "SSID_NETWORK_NAME";
char pass[] = "WIFI_PASSWORD";
std::string apikey = "OPENAI_APIKEY";
int status = WL_IDLE_STATUS;

String getUserInput() {
  display.fillScreen(BLACK);
  display.setCursor(10, 10);
  display.println("User Prompt");
  display.setCursor(40, 40);

  String userInput = "";
  while (true) {
    if (keyb.available()) {
      auto _key = keyb.read();
      char inputChar = keyb.getAscii(_key);
      display.print(inputChar);
      if (inputChar == '1') {
        break;
      } else {
        userInput += inputChar;
      }
    }
  }

  return userInput;
}


void setup() {

  Serial.begin(115200);
  while (!Serial);
  pinMode(PA_15, OUTPUT);
  keyb.begin();
  ser.begin();
  display.begin();
  display.fillScreen(BLACK);
  display.setCursor(0, 0);
  display.setTextSize(3);
  display.setRotation(3);
  delay(1000);
  if (WiFi.status() == WL_NO_SHIELD) {
    Serial.println("Communication with WiFi module failed!");
    while (true);
  }

  while (status != WL_CONNECTED) {
    delay(1000);
    display.fillScreen(BLACK);
    display.setCursor(10, 10);
    display.println("Accessing Wi-Fi...");
    Serial.println("Accessing Wi-Fi...");
    status = WiFi.begin(ssid, pass);
    delay(3000);
  }
  delay(1000);
  display.fillScreen(BLACK);
  display.setCursor(10, 10);
  display.println("Connected to Wi-Fi");
  display.setCursor(40, 40);
  display.println(ssid);
  Serial.println("Connected to Wi-Fi");
  Serial.println(ssid);
  delay(1000);

}

void loop() {
  String userPrompt = getUserInput();
  Serial.println(userPrompt);
   // Create the JSON payload using ArduinoJson library
  DynamicJsonDocument doc(1024);
  doc["model"] = "gpt-3.5-turbo";
  doc["temperature"] = 0.7;
  doc["stream"] = true;

  JsonArray messages = doc.createNestedArray("messages");

  JsonObject systemMessage = messages.createNestedObject();
  systemMessage["role"] = "system";
  systemMessage["content"] = "You are an assistant. You have a character limit of about 100 words ";

  JsonObject userMessage = messages.createNestedObject();
  userMessage["role"] = "user";
  userMessage["content"] = userPrompt;

  String requestBody;
  serializeJson(doc, requestBody);

  delay(3000);
  Serial.println("\nStarting connection to server...");

  WiFiSSLClient client;

  if (client.connect(server, serverPort)) {
    Serial.println(client.status());
    Serial.println("Connected to the Server: api.openai.com");
    delay(100);

    // Send HTTP POST request and change the prompt to your own
    String request = "POST /v1/chat/completions HTTP/1.1\r\n";
    request += "Host: api.openai.com\r\n";
    request += "Authorization: Bearer " + String(apikey.c_str()) + "\r\n";
    request += "Content-Type: application/json\r\n";
    request += "Content-Length: " + String(requestBody.length()) + "\r\n";
    request += "Connection: close\r\n\r\n";
    request += requestBody;


    Serial.println(request);
    client.print(request);
    String response;
    String accumulatedContent; // Variable to accumulate content words

    while (client.connected()) {
      String line = client.readStringUntil('\n');

      if (line.startsWith("data: ")) {
            // Remove the "data: " prefix
            line.remove(0, 6);
            Serial.println(line);
            DynamicJsonDocument doc(1024);
            DeserializationError error = deserializeJson(doc, line);

            if (error) {
            Serial.print("Failed to parse JSON: ");
            Serial.println(error.c_str());
            display.fillScreen(BLACK);
            display.setCursor(10, 10);
            display.print("Failed to parse JSON: ");
            display.println(error.c_str());
        }
        else if   (line.equals("[DONE]")) {
            break;
      }
        else {
            JsonArray choices = doc["choices"];
            for (JsonObject choice : choices) {
              String content = choice["delta"]["content"];
              Serial.println("ChatGPT Response: " + content);
              accumulatedContent += content + " ";

              display.fillScreen(BLACK);
              display.setCursor(10, 10);
              display.println("ChatGPT Response:");
              display.setCursor(40, 40);
              display.println(accumulatedContent);
            }
        }
    }
    }

  } else {
    Serial.println("api.openai.com connection failed");
    display.fillScreen(BLACK);
    display.setCursor(10, 10);
    display.println("api.openai.com connection failed");
  }

    // Delay between iterations
  delay(10000);
}
To initiate acceptance of the prompt, the user should locate and press the key "1" on their keyboard.
The following video illustrates real-time usage of ArduinoGPT.
I hope you found this project useful and thanks for reading. If you have any questions or feedback? Leave a comment below.
All the code referenced in this story is available in my github repo.
Reference- DeserializationError
- If an LED on GIGA R1 WiFi is flashing red
- How to Print ChatGPT API Response as a Stream
- arduChat - First project with Arduino Giga R1 Wifi and Api of OpenAi


Comments
Please log in or sign up to comment.