Hello there!
Battery life has become a key competing feature between mobiles, laptops, wearable devices, etc. Over charging a battery leads to an effect called the "battery-effect", where due to charging a devices battery past it's power limit leads to decrease in battery life. I have lost phones due to this problem. There are various situations of over-charging - forgetting to switching off the charger, leaving the device on charging and going out, etc. So I decided to make a device that would help me solve the problem of over-charging my devices. Hence, I came upon the idea of the "Particle Switch."
The Particle Switch is basically an AC circuit switching hardware. At its heart is a WiFi-enabled microcontroller which is controlled through a custom Android app.
(Warning : We are going to deal with very high voltages. Please take the necessary precautions.)
Hardware Construction:The hardware consists of 4 main parts:
- Circuit to convert 240V AC to 5V DC
- Circuit to convert 5V DC to 3V DC
- Particle Photon
- Switching Circuit
The basic working of the hardware is that it takes the 230V AC from the wall and converts it to 5V DC. This is further step down to 3V to supply power to the microcontroller. Here we are using the Particle Photon as our microcontroller because of it's wifi capability and the amazing community where you can get all the info and support related to the device and it's related software. This device is used to switch on or off the AC circuit of the wall socket by switching it's GPIO pin D0 to control the switching circuit.
First CircuitFor the first circuit we are using the MORNSUN LS03-15B05SR2S(-F) to convert the 230V AC from the wall to 5V DC so that it can be used as power supply to the Photon after stepping it down. This circuit helps the Photon to work continuously without the need for a battery supply, saving the hassle of charging/changing the Photon's battery. Use the datasheet to understand the specs of the module and make the application circuit in the datasheet to use the module. You can either use Eagle CAD to design the PCB and give it to PCB manufacturing house to get a ready made PCB or make the circuit manually on a perf-board/copper clad PCB.
For the second circuit we are using MORNSUN B0503S-1WR2 module to step down the 5V DC to 3V DC as the Photon works on 3V(3.3V to be precise). Use the application circuit in datasheet to design the circuit and make it's PCB.
After I read the data sheet for LS03-15B05SR2S(-F), I found there is a module LS03-15B03SR2S(-F) that directly converts 230V AC to 3.3V DC. You can use this module to save yourself some time in hardware and a few bucks. Then you have to make the first circuit and buy components according to it's datasheet.
The Photon is the brains of the project. The 3V from the second circuit is given to the Photon through the pins Vin and GND. If you are a beginner to using Particle Photon, you should check their great documentation . Connect the D0 pin to the switching circuit.
The switching circuit receives digital signal from the Photon, which is given to the base of the TIP 122 through a 10K Ohm resistor. For the circuit you can check my Github repo which has the schematic design for the switching circuit. Use female headers to your PCBs to connect the circuits and the Photon.
Software Designing :The software part consists
- Photon Firmware
- Android App
The Photon firmware code uses cloud callable functions to receive command to switch on or off the board from the Particle Switch Android App that is run in your mobile.
For the Photon Firmware, you first you need to make an account at particle.io. Then you have to register your photon to your particle account. Now go to the link to the Particle App https://go.particle.io/shared_apps/597b24204aa2fef... . The code calls the Power function that uses the command value to switch ON or OFF the D0 pin of the Photon. Upload the code to your photon and then your photon is ready.
For the Android app, you first need to have Android Studio installed on your PC. After that go to my Particle Switch App repo to download the app for controlling the hardware using the mobile app. In the app, when the toggle button is pressed to turn the socket on, the app sends a command to the function in the device firmware to switch the circuit on. The same is done when trying to switch off. In the MainActivity.java file add your particle account details and the access token. Install the app to your mobile using Android Studio.
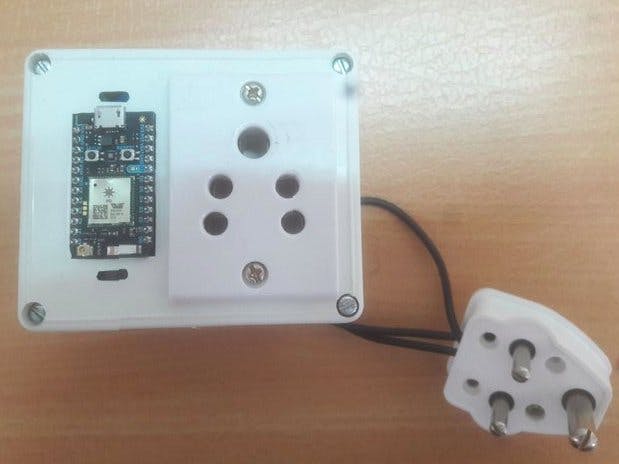
For testing, connect all the hardware as shown in the photo above. Make sure the connections are tight and all the necessary precautions are taken. We are using the 3 pin plug to test the device by inserting it in a wall socket. Double check everything and then push the plug into a wall socket and then switch on. If there are no short in the PCBs or open wires shorting, the particle Photon will switch on and use the pre-configured settings to connect to the wifi. Now wait for the LED on the Photon to breathe Cyan (indicating connection to Particle Cloud was successful). Then either using the AVD(Android Virtual Device) in Android Studio or your mobile, run the app. When the "Connecting..." message pops, use the tap button to switch on or off the 5 pin socket to which the hardware is connected. You can verify by connecting your charger to the socket.


_t9PF3orMPd.png?auto=compress%2Cformat&w=40&h=40&fit=fillmax&bg=fff&dpr=2)


Comments
Please log in or sign up to comment.