

Hardware components | ||||||
 |
| × | 1 | |||
| × | 1 | ||||
 |
| × | 1 | |||
Software apps and online services | ||||||
 |
| |||||
It’s every entrepreneur’s dream to set up a firm of her own. But there are lot of hurdles to it. We require an office space, authentication system for the office and so on. It would have been great if you could cut down something from this huge list of necessities to reduce the overall expense. One thing that you could do is to build an authentication system by yourself which is very economical and that too employing the technology you love the most. Yes, you are right, with nothing other than Salesforce. Let’s see how we can build an employee check-in system with Tessel and Salesforce.
I want to build this! What do I need?
For building an authentication system of your own, all that you would require are -
- Tessel You can purchase it online from https://www.seeedstudio.com/Tessel-2-p-2622.html. Or you can purchase from their official website https://tessel.io/ too.
- A 4 x 4 Membrane Keypad You can buy it from http://www.amazon.in/Universial-Switch-Keyboard-Arduino-REES52/dp/B00F167UY2
- Jumper wires (Male to Male) You can buy it from http://www.amazon.in/Dupont-Jumper-Wires-female-Pieces/dp/B00ZYFX6A2
- A free developer account in Salesforce
What’s this Tessel?
Tessel is a microcontroller and I call it a next-gen prototyping board. Now say the RaspberryPi, it is like your motherboard but in the size of a credit card but that’s not what a Tessel is. It’s a microcontroller and not a microprocessor. Every prototyping board understands a language that you would use to tell what it needs to do, how it needs to interact and so on. In case of Tessel it understands Node.js. That’s one good aspect about Tessel. Think of Node.js like your JavaScript on steroids. You are not really learning anything new here. Another very good aspect about the Tessel 2 is that it has an on-board Wi-Fi and this is very helpful. It’s very reliable too. In case of RaspberryPi you would have to run to find a good Wi-Fi Adapter to connect to the Internet or you would have to resort to a LAN. And wait that’s not it. With Tessel 2, you have lot of plug and play modules.
How it works ?
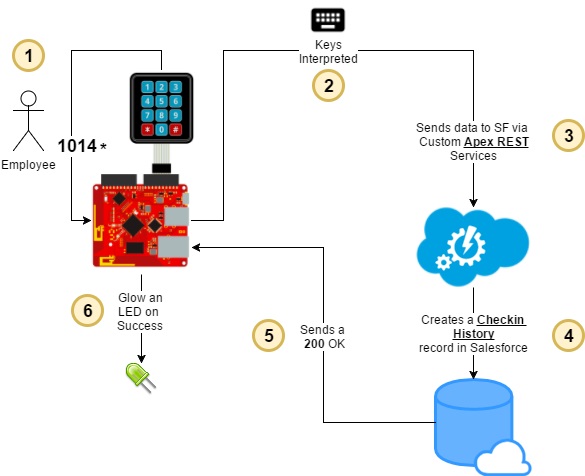
We have a 4 x 4 Membrane type Keypad connected to the Tessel. Say you pressed the keys 1014*. This will be interpreted by the Tessel. Tessel waits and scans all the keys that you pressed until it encounters a * or a #. Now if it ends with a * it’s basically a check-in and if it’s a # then it’s a check-out. Once when we have the key sequences scanned completely, it makes a GET request to a set of custom Apex REST Services. Now if it’s ending with a * then that means we are doing a check-in and the Apex REST Service upon receiving the request creates a record with the current date/time stamped on the check-in time field. If it happens to be a # then that means, we are doing a check-out. The Apex REST Service would spot the recently logged check-in record and update the checkout time with the current date/time.
How do I setup my SF Account ?
Back in Salesforce it’s all very simple. We just have 2 Custom Objects and an Apex REST Service that will be invoked from the Tessel. These Apex REST Services are then made public via Force.com Sites.
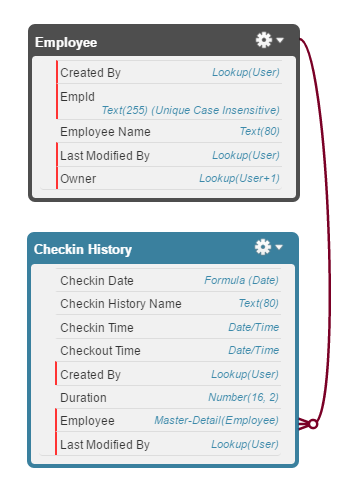
I have named the Custom Objects as Employee and Checkin History. The Employee object will hold all the Employees Names and their Ids. The Checkin History object will hold the check-in/checkout date/time. The Checkin History object contains a Master-Detail relationship to the Employee object. This means that it’s the child of the Employee object. It also contains two Date/Time fields Checkin Time and Checkout Time to hold the check-in and checkout time respectively.
Back in my Apex code, I have an inner class called Response which has member variables status, message and statusCode to hold the status and message of the Http requests.
I then have a HttpGet method called ‘authenticate’ which would receive the keys entered by the employee as URL Parameters from the Tessel and interprets them. And if a * is encountered, it calls the check-in method and if a # is encountered, it calls the checkout method.
The checkin method which is private, receives the Employee Id and the check-in time as parameters. It queries for the Employee record with respect to the Employee Id received as the parameter. Once when we get the record, it then creates a new Checkin History record with the check-in time received as the parameter related to the queried Employee record. And once this is done, it returns a response with TRUE status. If it receives an invalid Employee Id in the parameter, then it returns a FALSE with a message saying ‘Invalid Employee Id’.
Now in the checkout method which is also defined as a private method, receives the Employee Id and the checkout time as the parameters. Just like before, it then queries for Employee record with respect to the Employee Id received as the parameter. Once when we get the record, we query for the Checkin History record in which the checkout time is NULL, the Employee field is related to the queried Employee record and the one in which the check-in date is of today. Once when we get the Checkin History record, we update the Checkout time with the checkout time that we received in the parameter. And if that was done successfully, we return a TRUE status. And if we received an invalid Employee Id in the parameter, then it returns a FALSE with a message saying ‘Invalid Employee Id’.
Have a peek at the Apex Code right below:
@RestResource( urlMapping='/employee/*' )
global class JDFServices {
   global class Response {
       public Boolean status;
       public String message;
       public Integer statusCode;
       public Response( Boolean status, String message, Integer statusCode ){
           this.status     = status;
           this.message    = message;
           this.statusCode = statusCode;
       }
   }
   @HttpGet
   global static Response authenticate() {
       String keysPressed = RestContext.request.params.get( 'keys' );
       if( keysPressed.endsWith( '*' ) ) {
           keysPressed = keysPressed.replace( '*', '' );
           Response resp = checkin( keysPressed, DateTime.now() );
           return resp;
       }
       else {
           keysPressed = keysPressed.replace( '#', '' );
           Response resp = checkout( keysPressed, DateTime.now() );
           return resp;
       }
   }
   private static Response checkin( String empId, DateTime checkinTime ) {
       try {
           List<Employee__c> employee = new List<Employee__c>();
           employee = [
               SELECT  Name
               FROM    Employee__c
               WHERE   EmpId__c = :empId
           ];
           if( !employee.isEmpty() ) {
               Checkin_History__c newcheckinHist   = new Checkin_History__c();
               newcheckinHist.Checkin_Time__c      = checkinTime;
               newcheckinHist.Employee__c          = employee[0].Id;
               INSERT newcheckinHist;
               return new Response( TRUE, employee[0].Name + ' checked in successfully.', 777 );
           }
           else {
               return new Response( FALSE, 'Invalid Employee Id', 111 );
           }
       }
       catch( Exception ex ) {
           return new Response( FALSE, ex.getMessage(), 555 );
       }
   }
   private static Response checkout( String empId, DateTime checkoutTime ) {
       try {
           List<Employee__c> employee = new List<Employee__c>();
           employee = [
               SELECT  Name
               FROM    Employee__c
               WHERE   EmpId__c = :empId
           ];
           if( !employee.isEmpty() ) {
               Checkin_History__c checkinHist = new Checkin_History__c();
               DateTime todaysDateTime = System.today();
               Date todaysDate         = todaysDateTime.date();
               checkinHist = [
                   SELECT  Checkout_Time__c
                           ,Checkin_Time__c
                           ,Duration__c
                           ,Employee__c
                   FROM    Checkin_History__c
                   WHERE   Employee__c = :employee[0].Id   AND
                           Checkout_Time__c = NULL         AND
                           Checkin_Date__c = :todaysDate
               ];
               if( checkinHist != NULL ) {
                   checkinHist.Checkout_Time__c = checkoutTime;
                   UPDATE checkinHist;
               }
               return new Response( TRUE, employee[0].Name + ' checked out successfully.', 777 );
           }
           else {
               return new Response( FALSE, 'Invalid Employee Id', 111 );
           }
       }
       catch( Exception ex ) {
           return new Response( FALSE, ex.getMessage(), 555 );
       }
   }
}
I then exposed my HttpGet method as an Apex REST Service which will generate a REST Endpoint and then I made it public via Force.com Sites in order to make a request to it from outside of Salesforce without any authentication.
How do I configure my Tessel 2?
Before you head further below, I would recommend you to configure the Tessel by reading through this getting started link - https://tessel.github.io/t2-start/.
The Tessel uses basic HTTP Requests to communicate with Salesforce. At first, I have referenced 3 libraries – ‘Tessel’ to interact with the Tessel device, ‘Request’ to make the GET Requests to Apex REST Services and the ‘Tessel Async Matrix Keypad’ to interface the keypad with the Tessel.
You can download the NPM libraries in the following link:
- Tessel : https://www.npmjs.com/package/t2-cli
- Request : https://www.npmjs.com/package/request
- Tessel Async Matrix Keypad : https://www.npmjs.com/package/tessel-async-matrix-keypad
I then specified the keys available on my Membrane Keypad and I also specified the pins that I have used to connect the same to my Tessel. Now for the working, I have bound a function to the keyup event. In that, I am logging a message on to the console whenever a key has been pressed. Then I collect all the keys pressed by the user and whenever I encounter a * or #, I make a GET request to the Apex REST Service which I have made public via the Force.com Sites. On a success, I will blink the LED for like 3 seconds. That’s it.
Here is the Node JS code:
var tessel = require( "tessel" )
   , request = require( "request" )
   , Keypad = require( "tessel-async-matrix-keypad" )
   , keypadPins = tessel.port.A.pin;
   var keypad = new Keypad({
       keys: [
           ["1", "2", "3", "A"],
           ["4", "5", "6", "B"],
           ["7", "8", "9", "C"],
           ["*", "0", "#", "D"]
       ]
       , rows: [keypadPins[0], keypadPins[1], keypadPins[2], keypadPins[3]]
       , cols: [keypadPins[4], keypadPins[5], keypadPins[6], keypadPins[7]]
       , scan: "row"
       , poll: 200
   });
var empId = "";
keypad.on( "keyup", function( key ){
   console.log( "Key Pressed..." );
   empId = empId + key;
   if( key === "*" || key === "#" ){
       request(
           "https://shruti-jdf17-developer-edition.ap5.force.com/services/apexrest/employee/authenticate?keys=" + empId,
           function( error, response, body ) {
               var response = JSON.parse( body );
               if( response.status ) {
                   tessel.led[2].on();
                   setTimeout(
                       function() {
                           tessel.led[2].off();
                       },
                       3000
                   );
                   console.log( response.message );
               }
           }
       );
       empId = "";
   }
});
Can you show me how it works ?
What's next that you can expect?
What I demoed here was a simple implementation. But you can really get creative. The very good thing about Tessel is the different plug and play modules that it offers. One such module is a RFID Card Reader. With that you can setup a fully fool proof authentication system for your office or maybe use CloudBit to do something more creative on a successful login.
This project was presented at JDF’17 and here is the link to the slides that was used for the session - https://www.slideshare.net/ShrutiSridharan2/iot-build-an-employee-checkin-system-with-tessel-and-salesforce


Comments