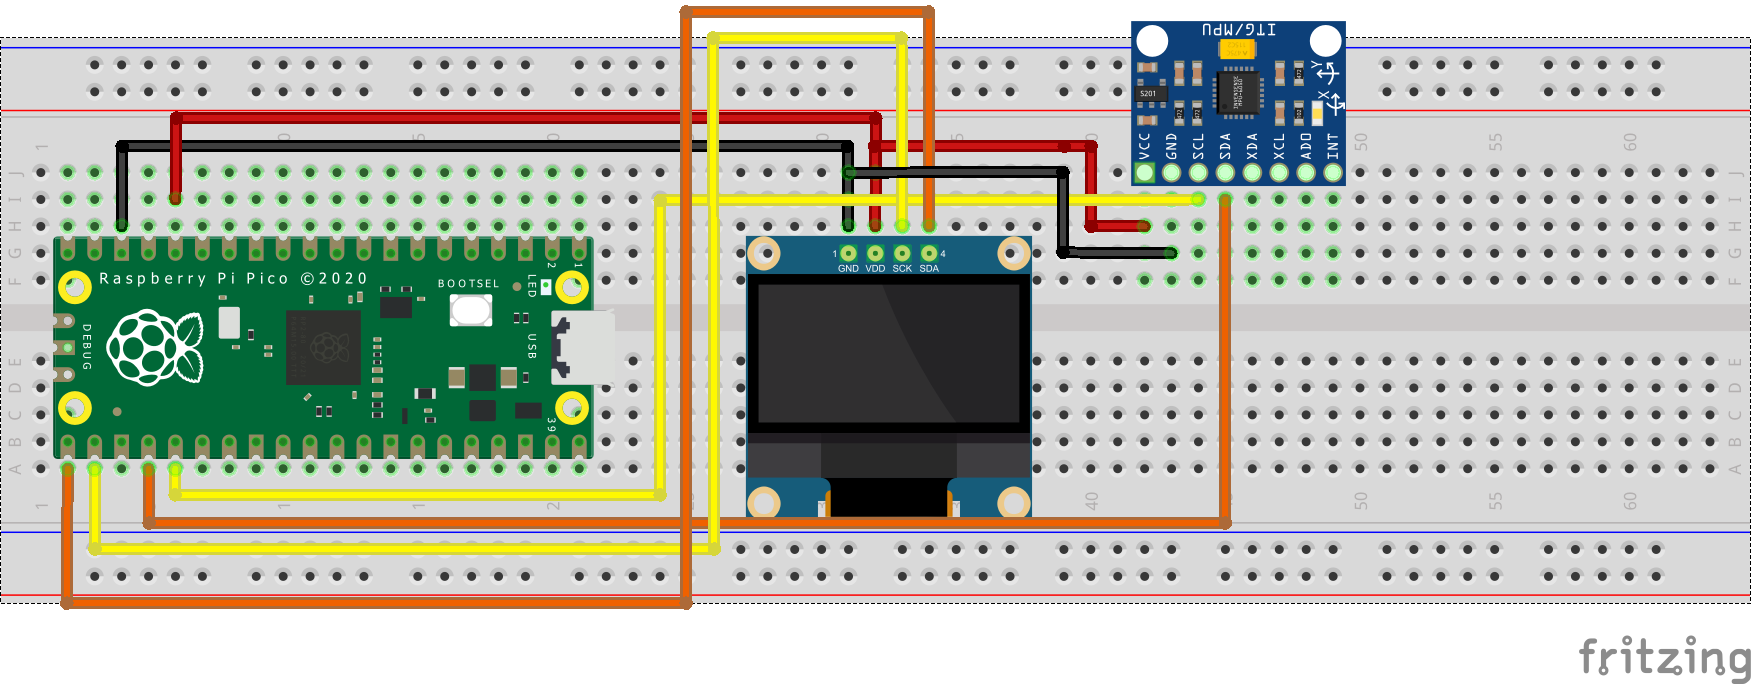
Embedded machine learning has now become easy with the help of online platforms like Edge Impulse and allows creators to devise their own application with just a little or no knowledge on Machine learning.
In this project I have created a basic gesture recognition device using an MPU6050 accelerometer sensor and a pi pico. The model is trained to recognize left-right, up-down and idle motion and can be enhanced further by adding more gestures to it. The gesture recognized is displayed on an 128*64 SSD1306 OLED display and even from the serial monitor(optional).
The whole application is developed on the pico's C/C++ sdk on VScode and the edge impulse platform for training the model.
I have made this project only for learning purpose to implement even more embedded ML related projects in near future.
Click here to view the public edge impulse project.
Edge Impulse PlatformEdge Impulse is a ML development platform for training ML models and also allows you to deploy these models on almost all embedded dev boards like the Raspberry pi pico used in this project.
With minimal knowledge on ML, I was able to create a basic gesture recognition model by following the steps mentioned in the platform.
Click here to know more about the edge impulse.
Training The Model1: Configuring the Pi-coUsing the data forwarder, you can connect your pico from the CMD using just a few commands and the data forwarder automatically calculates the baud rate of the device and the sensor frequency and the data is sent automatically to the service.
Follow the steps here to know about the data forwarder.
Make sure to upload the data forwarder code on the pico before connecting the device to the Edge Impulse server.
There are several means to send data to the Edge Impulse Service depending upon the file type. For this application, the data forwarder also handles the data acquisition once the pico is connected.
Here is a raw sample data from the accelerometer.
12628,-6600,1376
12624,-6584,1268
12684,-6620,1284
12532,-6648,1100
12636,-6752,1296
12644,-6672,1404
The data is sent as x-axis,y-axis,z-axis in-line captured at that moment.
The data is acquired for 3 labels, namely up-down, left-right and idle. 20 samples were collected for each label for training.
Each sample was collected for 10 seconds. For example, accelerometer was moved left-right for 10 seconds to make one sample of left-right.
A total of 11 mins of data were collected which was split to 8 mins for training set and 3 mins for test set.
I have used the default options for training the model. The model accuracy upon training was 97.8%. However, this is only evaluated with the validation set so we can't rely much on this accuracy.
In order to determine the accuracy, I used live inferencing in-order to determine the model's prediction at that instant which seems to be promising.
4. DeploymentOnce the trained model provides a good accuracy with live inferencing, It is time to deploy it on the pico. I have downloaded the C/C++ library(unoptimized float32) from the deployment tab and used the Arduino script as a reference to develop the C++ script to be used for the pico. I found poor prediction when I used the quantized int8 library which was the reason I chose the unoptimized float32 library.
Adding an OLED displayAfter testing the model on the pico, I have used an SSD1306 OLED display to display the graphic image of the gesture recognized. Thanks to Harbys git repo for the OLED driver files for the pico.
Bitmap images were used each to display the left-right and up-down image icons. The icons were taken from google images and converted to bitmap array using the image2cpp tool.
Note: As the images are viewed facing the breadboard from the Pico's USB in side, the left-right image appear as up-down and vice versa.
Making use of multiple coresThe overall process is handled by both the cores of the Pico where core-1 handles performs data acquisition and inferencing and core-0 takes care of the OLED functionality. I made use of both the cores as I wanted to learn about parallel processing and this method will further enable me to add more functionality to it(for eg: In applications where one core performs inferencing and other core sends the data to a cloud server or to any other peripheral device) which I may implement later.
About Embedded machine learning and project idea- Click here for the coursera course
MPU6050 driver development - Vidura Embedded
SSD1306 OLED Driver - Harbys git repo
How to Deploy Edge Impulse model on the pico - Hardware.ai


Comments
Please log in or sign up to comment.