<html>
<head>
<!-- CDN script for accessing the cloud server-->
<script src="https://unpkg.com/bolt-iot-wrapper/umd/boltIotWrapper.min.js"></script>
<script type="text/javascript" src="https://cloud.boltiot.com/static/js/boltCommands.js"></script>
<script>
setKey('xxxxxxxxxxxxxxxxxxxxxxxxxxxxxxxxxxxx','BOLTxxxxxxx');
</script>
</head>
<style type="text/css">
.alert {
border-color: red;
border-radius: 10px;
}
.buttondesign1 {
height: 70px;
width: 70px;
border-radius: 50px;
color: #E1DFDF;
background-image: url('light.png');
background-repeat: no-repeat;
outline: none;
font-size: 0px;
}
.buttondesign1:active {
background-color: #3e8e41;
box-shadow: 0 5px #666;
transform: translateY(2px);
}
.buttondesign1:hover {background-color: yellow}
.buttondesign2 {
height: 70px;
width: 70px;
border-radius: 50px;
color: #34b7eb;
background-image: url('fan.png');
background-repeat: no-repeat;
outline: none;
font-size: 0px;
}
.buttondesign2:active {
background-color: #3e8e41;
box-shadow: 0 5px #666;
transform: translateY(2px);
}
.buttondesign2:hover {background-color: blue}
.buttondesign3 {
height: 70px;
width: 70px;
border-radius: 50px;
color: #E1DFDF;
background-image: url('tv.png');
background-repeat: no-repeat;
outline: none;
font-size: 0px;
}
.buttondesign3:active {
background-color: #3e8e41;
box-shadow: 0 5px #666;
transform: translateY(2px);
}
.buttondesign3:hover {background-color: green}
.buttondesign4 {
height: 70px;
width: 70px;
border-radius: 50px;
color: #E1DFDF;
background-image: url('ac.png');
background-repeat: no-repeat;
outline: none;
font-size: 0px;
}
.buttondesign4:active {
background-color: #3e8e41;
box-shadow: 0 5px #666;
transform: translateY(2px);
}
.buttondesign4:hover {background-color: blue}
.buttondesign5 {
height: 70px;
width: 70px;
border-radius: 50px;
color: #fc5a03;
background-image: url('fridge.png');
background-repeat: no-repeat;
outline: none;
font-size: 0px;
}
.buttondesign5:active {
background-color: #3e8e41;
box-shadow: 0 5px #666;
transform: translateY(2px);
}
.buttondesign5:hover {background-color: red}
.buttondesign7 {
height: 70px;
width: 150px;
border-radius: 20px;
color: red;
background-repeat: no-repeat;
outline: none;
color: white;
font-weight: bold;
-webkit-transform: rotateX(30deg);
}
.buttondesign7:active {
background-color: #3e8e41;
box-shadow: 0 5px #666;
transform: translateY(10px);
}
.button1 {
background-color: green;
border: 50px;
border-radius: 50
color: white;
padding: 15px 32px;
text-align: center;
text-decoration: none;
display: inline-block;
font-size: 16px;
border-radius: 20px;
color: white;
outline: none;
}
.button2 {
background-color: red;
border: none;
border-radius: 15px
color: white;
padding: 15px 32px;
text-align: center;
text-decoration: none;
display: inline-block;
font-size: 16px;
border-radius: 20px;
color: white;
outline: none;
}
.h1 {
color: white
}
.body {
color: white;
-webkit-perspective:400;
}
.tbox1{border-radius: 12px}
.tbox2{border-radius: 12px}
.tbox3{border-radius: 10px; text-align: center;}
</style>
<body class="body" background="https://images.wallpaperscraft.com/image/board_black_line_texture_background_wood_55220_2560x1600.jpg" align="center" bgcolor="grey">
<div id="gassistant" >
<input class="tbox1" type="hidden" id="bolt_id" value="BOLTxxxxxxx">
<input class="tbox2" type="hidden" id="api_key" value="xxxxxxxxxxxxxxxxxxxxxxxxxxxxxxxxxxx">
<br>
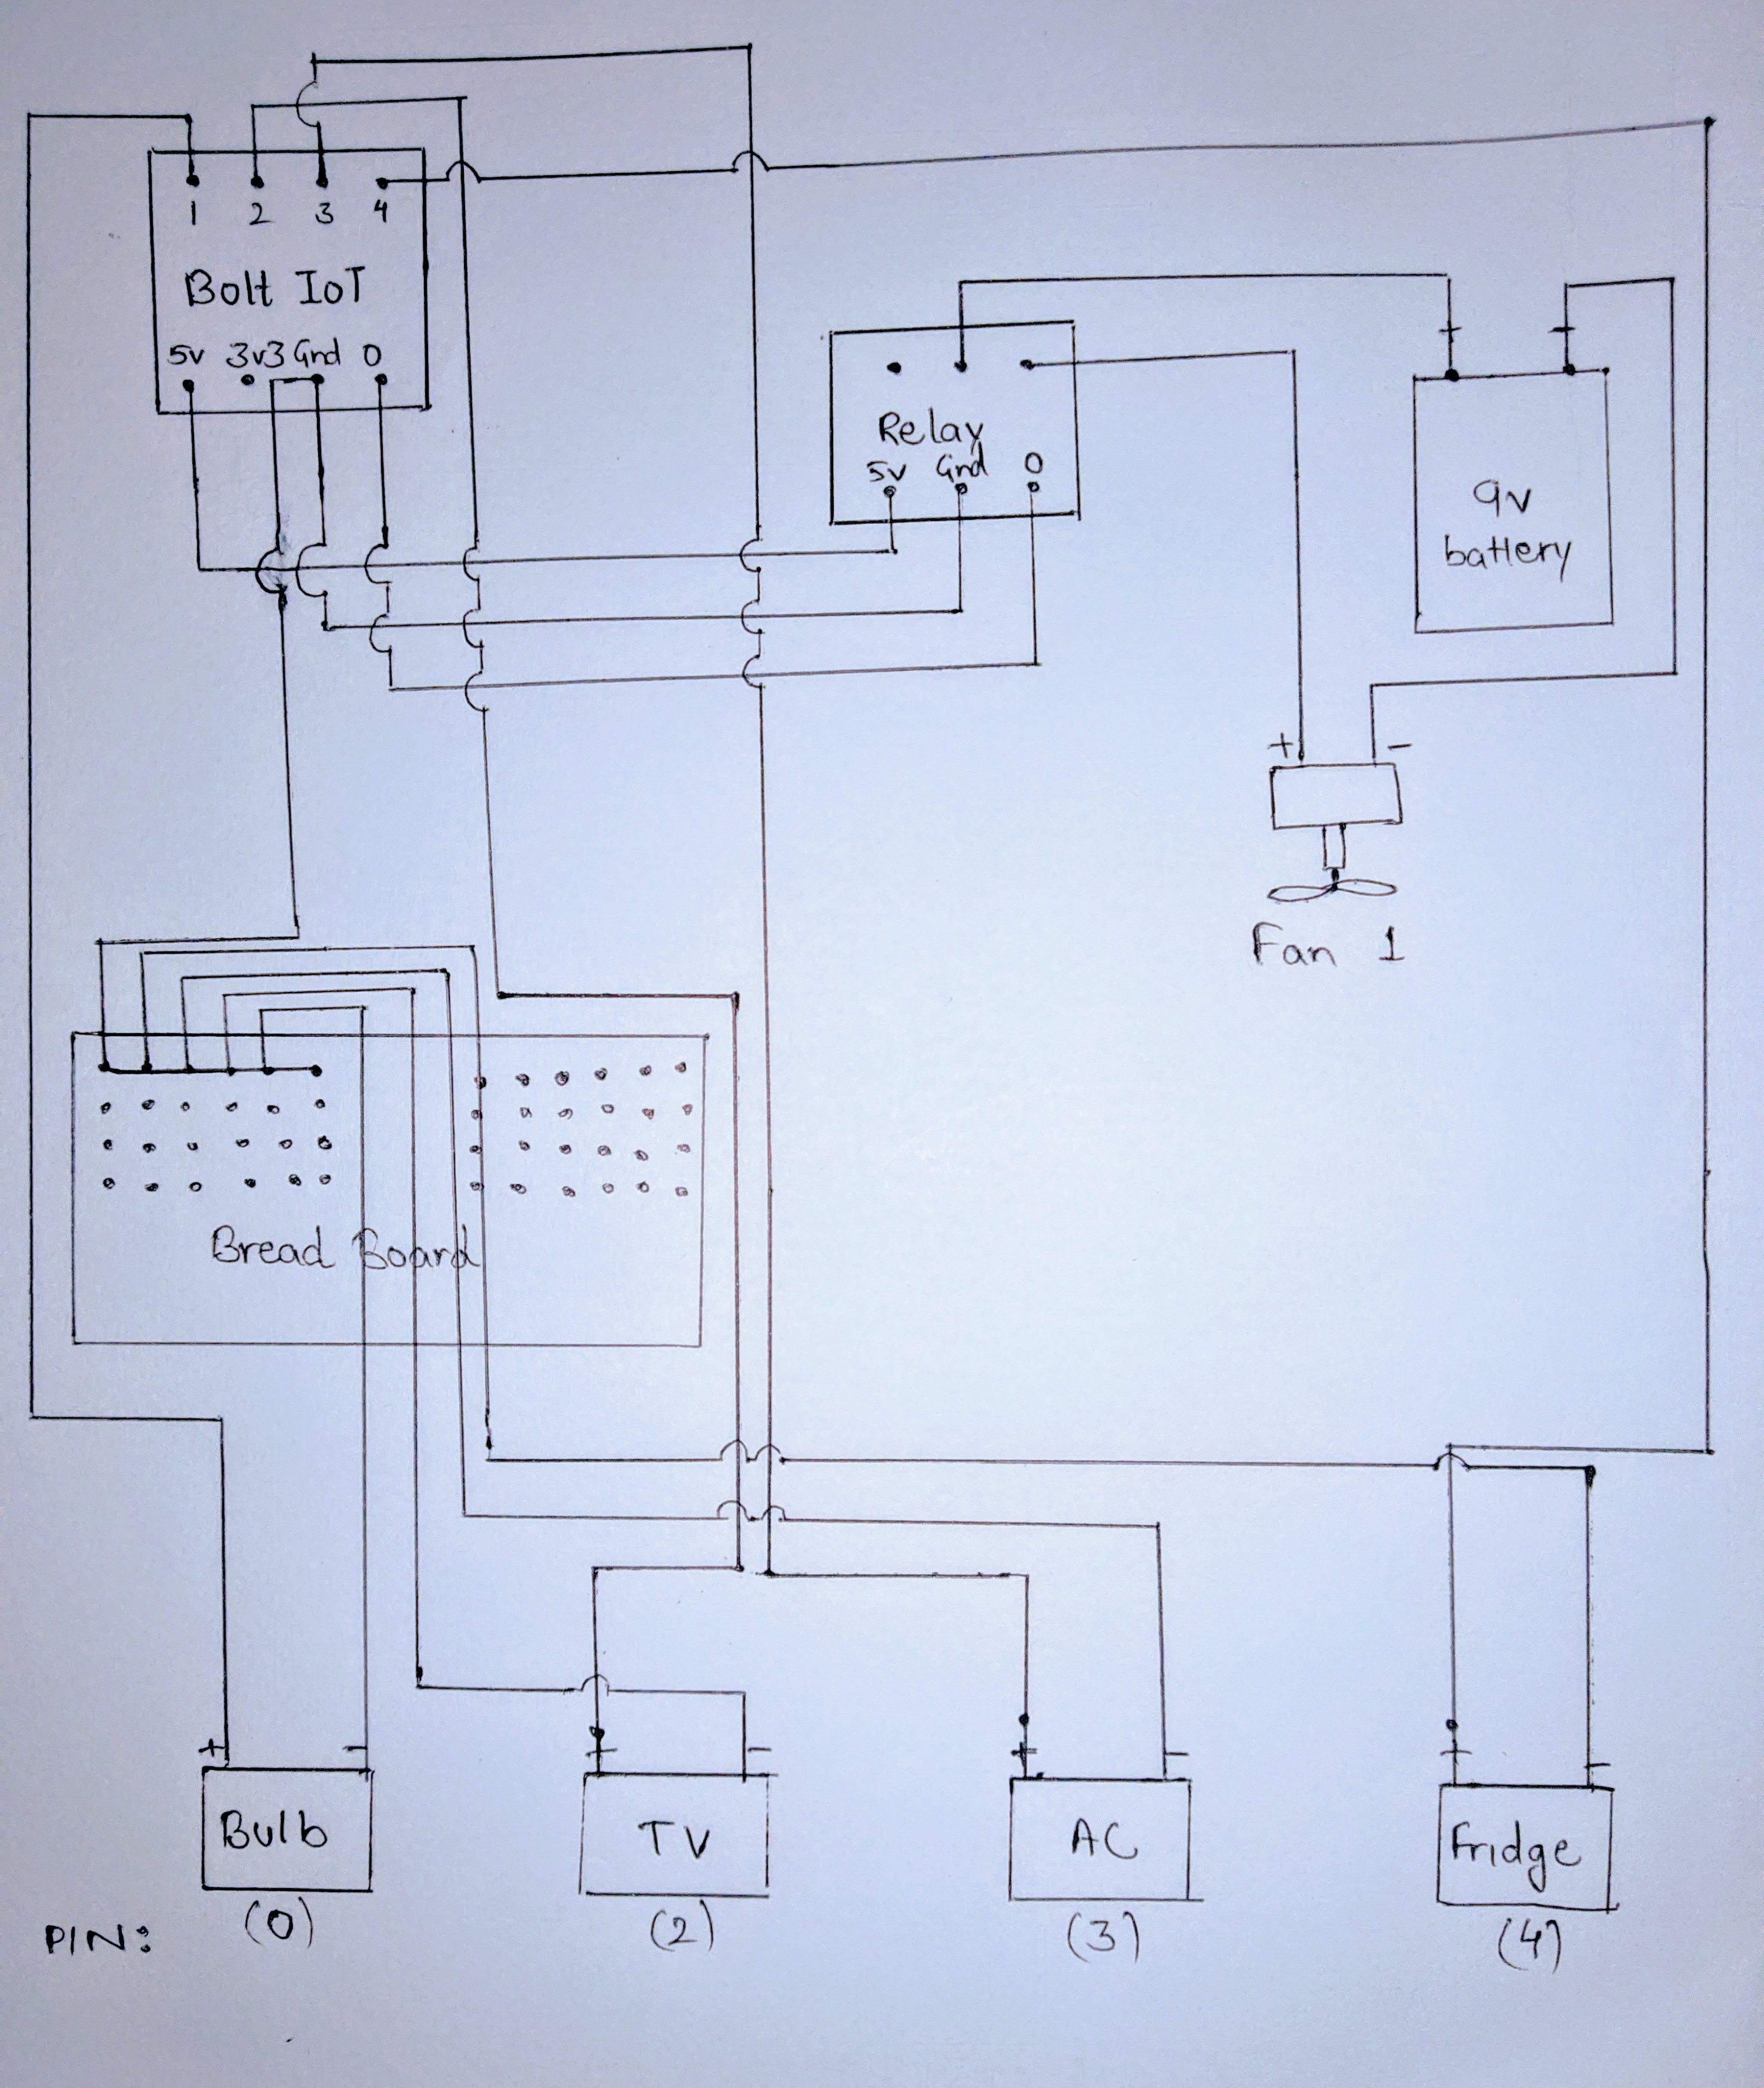
<h1>Smart Home</h1>
<hr/><p><b>Touch the appliance's icon<br>to toggle it's state</b><br><hr/>
<form>
<br><br><br>
<input class="buttondesign1" type="button" value="0" onclick="moveNumbers(this.value)">    
<input class="buttondesign2" type="button" value="1" onclick="moveNumbers(this.value)">    
<input class="buttondesign3" type="button" value="2" onclick="moveNumbers(this.value)"><br><b>
Bulb    Fan     TV</b>
<br><br>
<input class="buttondesign4" type="button" value="3" onclick="moveNumbers(this.value)">    
<input class="buttondesign5" type="button" value="4" onclick="moveNumbers(this.value)">
<br><b> AC   Refrigerator </b></br>
<br><br><br><br>
<b><input type="button" onclick="digitalWrite(0, 'LOW');digitalWrite(1, 'LOW');digitalWrite(2, 'LOW');digitalWrite(3, 'LOW');digitalWrite(4, 'LOW')" class="buttondesign7" value="TURN OFF ALL"/><b>
<br><br><br><b>
</form>
<hr/><p>Say: Hey Google<br>to control with your voice commands</p><hr/>
<div id="alert" class="alert">
 
</div>
 
<script>
//toggle
let config = {
0: 'LOW',
1: 'LOW',
2: 'LOW',
3: 'LOW',
4: 'LOW',
};
let alert = document.getElementById('alert');
function moveNumbers(number){
let pin = number;
config[pin] = config[pin] == "HIGH" ? "LOW" : "HIGH";
let state = config[pin];
console.log({pin, state});
if(window.bolt == null){
window.bolt = setUpBolt();
let deviceName = document.getElementById("bolt_id").value;
let deviceKey = document.getElementById("api_key").value;
}
mypin(pin,state);
alert.innerHTML = ` The appliance has been turned ${state}`;
setTimeout(function(){
alert.innerHTML = " ";
},3000);
}
var bolt = null;
function setUpBolt() {
console.log("Setting up Bolt");
let deviceName = document.getElementById("bolt_id").value;
let deviceKey = document.getElementById("api_key").value;
return boltApi.Devices.add(deviceName, deviceKey);
}
function mypin(pin, state) {
bolt.Digital.write({ pin: pin, state: state });
}
</script>
<br><br><br><br>
<p align="center"></p>
</body>
</html>


Comments
Please log in or sign up to comment.