


Hardware components | ||||||
| × | 1 | ||||
_ztBMuBhMHo.jpg?auto=compress%2Cformat&w=48&h=48&fit=fill&bg=ffffff) |
| × | 1 | |||
 |
| × | 1 | |||
| × | 1 | ||||
 |
| × | 3 | |||
| × | 4 | ||||
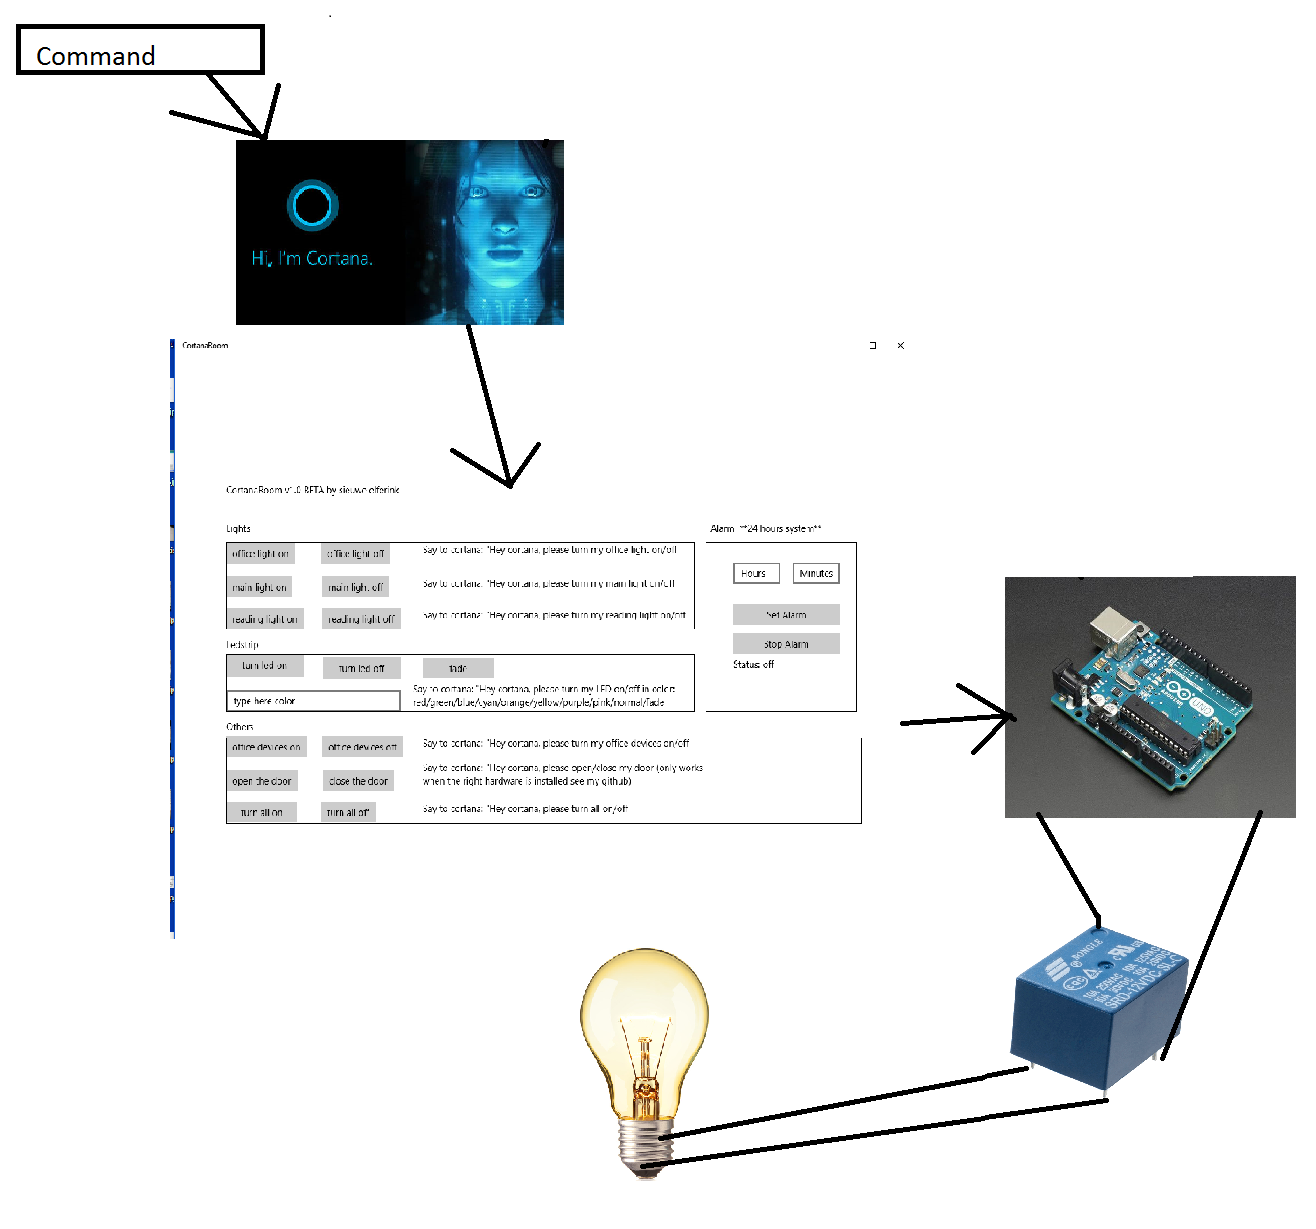
CortanaRoom is an open source project to use Cortana to control your electronics by voice. This is done by an application which can be downloaded from my GitHub and an Arduino with StandardFirmata code on it. CortanaRoom is still under development by me right now. This means that there will be more features in the future. This also means that the application may have some bugs in it. Please report them as an issue on my GitHub page so that I can fix them!
Check the video above for a demonstration!
Features- Turn on and off 3 different lights with your voice
- Turn on or off an outlet box with your voice
- Use your voice to lock or unlock your room (complete support will come later)
- Turn an RGB LED strip into different colors with your voice
- Turn an RGB LED strip into a fading effect with your voice
- Use the built-in alarm clock to turn your RGB LED strip into a wake up light
- Support for multiple command sorts. For example you can say "turn LED blue" or you can say "can you turn my LED on in color blue".
- 1x Windows 10 PC with Cortana
- 1x Arduino
- 1x USB cable for your Arduino
- 1x RGB LED strip (this is optional)
- 3x N-channel MOSFETs; I use the IRFZ44N (only if you want the RGB LED strip)
- 4x 5V relay (12V is possible with extra some circuitry); I use the SRD-05VDC-SL-C but every 5V relay will work.
- Lots of long wires to route through your home.
The CortanaRoom application can be found on my GitHub with this link. There are two files on the GitHub page called compiled and project.
If you do not want to make changes to the code
If you don't want to make any changes to the code and just run the application you can download the compiled version in the map compiled. In that folder there are 2 versions of the CortanaRoom application. One version is for official or very good fake Arduinos. The other version is for fake Arduino clones with the ch340 driver. If you are not sure if you have one of these Arduinos, follow the steps below.
Connect the Arduino, then:
1. Windows key + X and select Device Manager
2. Go to Ports
3. Right click your device and select Properties
4. Go to the Details tab
5. In the property selection area, click Hardware LDS; now you will see your VID and PID
A clone with the ch340 driver should give "VID_1A86", "PID_7523". An official Arduino should give "VID_2341", "PID_0043".
If one of these above cases is correct, you can just download the appropriate version for you Arduino. And then install the application with these steps.
1. Open the downloaded file and go to your Arduino version (fake or original)
2. Go to compiled>fake Arduino/Original Arduino
3. Right click Add-AppDevPackage and click open with Powershell
4. Follow the instructions, and you are done.
If you do not have any of these cases you must follow the steps below.
If you want to make changes to the code
You first need to install Visual Studio 2015 or higher (lower may work, not tested). Visual studio can be downloaded from here.
You also have to install the UWP SDK to run the project. When you open the project, Visual Studio will automatically download these for you (but this may take some time). You also have to install the Microsoft Remote Arduino library. To do this, follow the steps on this website.
After everything is finished and you are in Visual Studio, go to step 2.
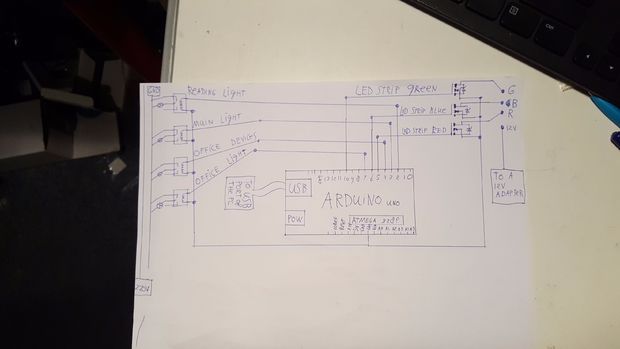
Step 2: Configure CortanaRoom with your ArduinoIn order to let Cortana make a USB serial connection to your Arduino, you first need the VID and PID numbers of the Arduino. For an original or fake Arduino with the same USB to serial converter IC, the VID and PID are probably as follows: "VID_2341", "PID_0043". Put these values in the blue circled part in the picture above.
If you are not using an original but a clone like me or you are not sure, you must find the VID and PID yourself. This can be done by:
1. Windows key + X and select Device Manager
2. Go to Ports
3. Right click your device and select Properties
4. Go to the Details tab
5. In the property selection area, click Hardware LDS
6. Now you will see your VID and PID
After this everything is ready, you can feel free to make any improvements to the code, which it probably could use because this is my first C# application. If you are done with all the modifications, press the green arrow in the top center of Visual Studio to run the app. (The CortanaRoom app will still do nothing because we first need to make the hardware!)
Step 3: Setting up the ArduinoNow you have CortanaRoom set up. Nothing will happen when you press a button. We first need to program an Arduino with the StandardFirmata library to make it talk with the CortanaRoom application. To do this:
1. Open the Arduino IDE
2. Go to File
3. Go to Examples
4. Go to Firmata
5. Select StandardFirmata
6. Click the upload button, and you are done.
Step 4: Make the hardwareShow All Items
Now we have the software part done; we need to go to the hardware part.
For the hardware, we need 1 Arduino Uno or Nano, a lot of long wires, 3 MOSFETs (I use the IRFZ44N 4 5V - 12V is possible with extra circuitry), and relay (I use the SRD-05VDC-SL-C but every 5V relay will work). Before connecting anything, keep in mind you are probably working with live voltages of 110V or 230V. Do this at your own risk!
Just follow the schematic above. If you do not understand something, I have tried to explain some parts here below.
Relays
Keep in mind that the relays only disconnect or reconnect a wire when the relay gets a voltage. When you have a lamp with two wires going into it, just cut one of the wires in the middle. Then get a relay and put one end of the wire to the switching pin the (COM pin) and the other wire to one of the other two pins so that if the relay gets power, the two wires get connected. Connect the relay as seen above in the pictures. If you have everything connected and the lamp goes on when you click "lamp on" and it goes on when you click "lamp off," you need to change the wire going to the non-switching pin of the relay to the other non-switching op of the relay. Above is a pic of a relay. The other two pins that go to the coil should go one to the ground and the other to a digital pin according to the schematic.
I connected the office devices by getting an outlet box and cutting into one of the two wires. After that, I soldered a relay in between those 2 ends like how the lights are connected. After that you can plug the devices you want to turn on or off into the outlet box.
The LED strip
The LED strip should be connected as below. The colors, red, green and blue, should go to the right pin on the Arduino. If you don't do this, the colors won't be the same as they say in the program. If you can't read the diagram, you should connect it like this: Gate pin > correct Arduino pin for that color source pin > ground Drain pin > Correct color on the LED strip. Above is a picture of the MOSFET.
Step 5: You are done! Here are some tips!Now you are done! If everything was done correctly, you now have a room controlled with an Arduino! Here are some ideas about how to extend CortanaRoom's functionality!
Remote room control
Sometimes forgot to turn off the light when you leave? It is not a problem anymore. Because the CortanaRoom software runs on your PC, you can install an application called TeamViewer which allows you to control your PC from anywhere in the world. When installed, you can open the CortanaRoom application and turn on and off your lights from anywhere!
Wake up light alarm
CortanaRoom has an alarm built in! But this is not your normal alarm - it is a wake up light-style alarm. This means that if you set the alarm for 7 o'clock, it will actually go off a bit earlier. This is so that it will slowly turn on your RGB LED strip in the colors of the sun. This helps getting up easier on those dark mornings. Remember the clock is in 24-hour format!
How does the Wake up light alarm work?
As you can see, the alarm has only 2 text fields. The left for hours and the right for minutes. Because you can't set a date; the application will make an alarm for the next time your alarm time will be reached. For example: if it is 18 o'clock (6 pm) and you want to wake up at 7:30 am, type in 7:10 (because it takes 20 min to light up the LED strip) in the alarm. The alarm will now ring at 7:30 the next day. Example 2: if it is 13 o'clock (1 pm) and you want to have it ring at 19:00 (7 pm). Just type in 18:40 and the alarm will go off on 19:00 the same day. Sadly, it is not possible at the moment to set an alarm for example 9 o'clock over 2 days. because it will always search for the next coming 9 o clock not the one after that.
The door lock
As you can see when opening Cortana, there are 2 buttons called "open the door" and "close the door." This does work when you hook it up the right way. The only problem is that you can only open and close the door with your voice or with the application. So if you are outside and you want to go in, you need to open it by talking to Cortana. I have on the outside a code lock which must be entered to enter my room. So if you want to hook it up, here are the steps.
Get:
- a CD drive with DC motor stripped down to only the motor with the rails part.
- a L9110 DC motor driver
- a piece of wood
- hot glue
How to hook up?
Make the following connections:
L9110 ---- Arduino
- GND ---- GND
- VCC ---- 5V
- A-1A ---- pin 9
- A-1B ---- pin 9
L9110 ---- DC motor
- one of the motor A pins ---- the + wire of the DC motor
- another of the motor A pins ---- the - wire of the DC motor
****If the door closes when you click "open the door" and it opens when you click "close the door," switch the two wires of the DC motor. Put the - wire to the pin where the + was, and the + wire to the pin where the - wire was.*****
The last step
At last, glue a piece of wood on the CD drive part where the reading sensor is. See the picture above as an example.


Comments
Please log in or sign up to comment.