In some applications, a load needs to be triggered, depending on how long a sensor is actuated.
For this example, we use a position sensor to trigger an LED when it is activated for 3 seconds. After this drive time, the load will be triggered.
The ProjectIn this project, when the sensor is actuated for three seconds, the LED will be actuated. All logical programming is made based on the millis function of the Arduino.
Important observation: If you don't have the position sensor, you can use a button with a pull-down for simulating the on/off state of the sensor.
When the sensor is activated for more than 3 seconds, the LED of digital pin 13 will be activated and when the sensor is in the state off/ on detect, the LED of digital pin 13 will be non-activated.
For create a solution for the project, we use the following code:
void setup()
{
   pinMode(10, INPUT);  //Pino de conexao do botao
   pinMode(13, OUTPUT); //Pino de conexao do LED da placa do Arduino UNO
}
   unsigned long int tempo_atual = 0; //Variavel utilizada para armazenar o tempo de execucao atual do codigo
   unsigned long ultimo_tempo = 0; //Variavel utilizada para armazenar o ultimo valor armazenado na variavel tempo_atual
void loop()
{
   int pino = digitalRead(10); //0
   tempo_atual = millis(); //7000
   if(pino == 0)
   {       //7000
     ultimo_tempo = tempo_atual; //7000
     digitalWrite(13, LOW); //LED Desligado
   }
   if((pino == 1) && (tempo_atual - ultimo_tempo >= 3000))
   {
     digitalWrite(13, HIGH); //LED Ligado
     ultimo_tempo = tempo_atual;//5000
   }
}
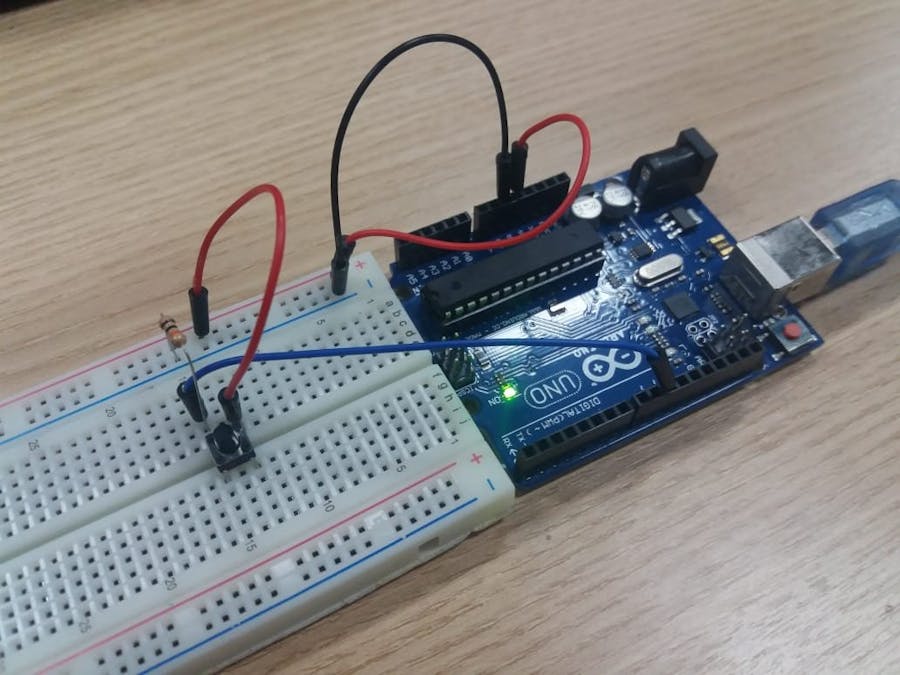
Based on the code, was made the following circuit presented in Figure 2.
In the presented circuit, as is possible to see, don't is used a sensor, but was used the button with pull-down for simulating the two states: on and off of the sensor.
In the code don't use the debounce control because the focus was in solution problem for the logic.
Based on the circuit is possible to see the LED in upstate when the button is pressed more of 3 seconds and LED in downstate when the button is unpressed.
Acknowledgments
The Silícios Lab thank you for reading and invite you to visit our YouTube channel.
The Silícios Lab thanks the PCBWay for the support.
The Silícios Lab thanks the UTSOURCE to offer the electronic components for this project.


Comments
Please log in or sign up to comment.