


Hardware components | ||||||
 |
| × | 1 | |||
| × | 1 | ||||
| × | 1 | ||||
| × | 1 | ||||
| × | 1 | ||||
| × | 1 | ||||
| × | 1 | ||||
| × | 1 | ||||
| × | 1 | ||||
| × | 1 | ||||
Software apps and online services | ||||||
 |
| |||||
In several applications, the need to perform the temperature monitoring of a system arises. In this way, it is necessary to use sensors for monitoring and light and sound signals in order to alert the user.
Thinking about this problem was developed as a system to monitor the temperature. When the temperature exceeds the value programmed by the user, an LED and a buzzer will be activated in order to alert the user.
Now, let's understand how to develop the functions to:
- Adjustment of the temperature entered by the user;
- DS18B20 Sensor Configuration;
- Creation of Screens;
- Storage of permanent data in Arduino EEPROM memory.
But first, we will explain the circuit and then introduce all the programming logic developed.
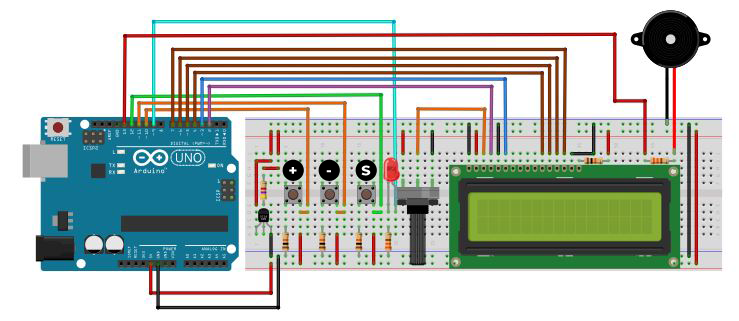
The Project Electronic CircuitHereafter, we will discuss and present the circuit in Figure 1.
For this project, were used three buttons:
Button (+): Responsible to increment the adjust of the temperature value;
Button (-): Responsible to decrease the adjust of the temperature value;
Button (S): Responsible to set the information of the adjusting the temperature in the system.
The Arduino will read the temperature of the DS18B20 sensor and will send this information to the 16x2 LCD screen. In Figure 2, the assembly circuit of the DS18B20 sensor with the Arduino is shown.
Through this circuit, the Arduino will read the temperature with the DS18B20 sensor. If the read temperature will more than adjusting temperature, the LED and buzzer will be activated to sinalize for the user.
Now, you'll learn how to implement all the functions of this system.
The System ProgrammingFrom the circuit shown in Figure 1, we set up all the project programming logic.
When the system is powered up, the PCBWay Factory Message will appear, according to to Figure 3.
#include <LiquidCrystal.h>
#include <EEPROM.h>
#include <OneWire.h>
#include <DallasTemperature.h>

const int rs = 2, en = 3, d4 = 4, d5 = 5, d6 = 6, d7 = 7;
LiquidCrystal lcd(rs, en, d4, d5, d6, d7);
#define ONE_WIRE_BUS 8
/********************************************************************/
OneWire oneWire(ONE_WIRE_BUS);
/********************************************************************/
DallasTemperature sensors(&oneWire);
unsigned int verificador = 0;
bool increment, decrease, set = 0;
bool IncrementState = 0, DecreaseState = 0, EstadoSet = 0;
unsigned int temperature = 0;
byte PreviousValue = 0;
#define EndVerif 120
#define EndTemp  125
void setup()
{
     lcd.begin(16, 2);
     delay(500);
     lcd.setCursor(3,0);
     lcd.print("Factory");
     lcd.setCursor(6,1);
     lcd.print("PCBWay");
     delay(3000);
     sensors.begin();
     lcd.clear();
     pinMode(13, OUTPUT);
     temperature = EEPROM.read(EndTemp);
}
void loop()
{
        set = digitalRead(12);
        if(set == 1)
        {
          lcd.clear();
          lcd.setCursor(2,0);
          lcd.print("Reconfigure ?");
          lcd.setCursor(0,1);
          lcd.print("Yes (+)  No (-)");
          do
          {
          increment = digitalRead(10);
          decrease  = digitalRead(11);
          delay(50);
             if(increment == 1 && decrease == 0)
             {
              EEPROM.write(EndVerif,0);
             }
          }while(increment == 0 && decrease == 0);
              lcd.clear();
        }
         verificador = EEPROM.read(EndVerif);
     if(verificador != 75)
     {
       lcd.setCursor(3,0);
       lcd.print("Configure");
       lcd.setCursor(0,1);
       lcd.print("Temperature:");

       temperature = EEPROM.read(EndTemp);

           do
           {

             increment = digitalRead(10);
             decrease = digitalRead(11);

             set        = digitalRead(12);

               delay(200);

                 if(increment == 1 && IncrementState == 0)
                 {
                   temperature++; //Incrementa o valor da temperatura
                   IncrementState = 1;
                 }
                 if(increment == 0 && IncrementState == 1)
                 {
                   IncrementState = 0;
                 }


                 if(decrease == 1 && DecreaseState == 0)
                 {
                   temperature--; //Decrementa o valor da temperatura
                   DecreaseState = 1;
                 }

                 if(decrease == 0 && DecreaseState == 1)
                 {
                   DecreaseState = 0;
                 }
            lcd.setCursor(13,1);

            lcd.print("  ");
            lcd.setCursor(13,1);

            lcd.print(temperature);
           }while(set != 1);
           lcd.clear();
           EEPROM.write(EndVerif,75);
           EEPROM.write(EndTemp, temperature);
     }
            sensors.requestTemperatures();

            float TempSensor = sensors.getTempCByIndex(0);
               if(TempSensor != PreviousValue)
               {
                lcd.setCursor(2,0);
                lcd.print("Temperature");
                lcd.setCursor(4,1);
                lcd.print(TempSensor);
                lcd.print((char)223);
                lcd.print("C");
                   PreviousValue = TempSensor;
                if(TempSensor >= temperature)
                {
                   digitalWrite(9, HIGH);
                   digitalWrite(13, HIGH);
                   delay(1000);
                   digitalWrite(9, LOW);
                   digitalWrite(13, LOW);
                   delay(1000);
                }
                if(TempSensor < temperature)
                {
                   digitalWrite(9, LOW);
                   digitalWrite(13, LOW);
                }
              }
}
Then, we set the sensor and the LCD in the void setup function, and finally, we read the value of temperature adjustment in the memory.
This reading process is useful when a shutdown of the machine occurs and we need to turn on in order to use the same set temperature value.
temperature = EEPROM.read(EndTemp);At the beginning of the loop function, we implement a condition to check if the set button is pressed. If yes, the system will present the temperature setting menu, according to Figure 4.
At this moment, appear the screen for adjusting the temperature, as is shown in Figure 5. The user can choose yes or no. If theuser press no, don't will adjusting the temperature. But, if yes, the user will adjust the temperature value.
When the user press yes, the system will write the value 0 in the End Verif (120) position of the EEPROM memory. This is to signal that it is necessary to enter a new temperature setting value.
In the next condition, the system will perform a condition to test whether the value read and stored in the check variable is equal to 75.
The value 75 means that the system is set to temperature. If the read value is different from 75, the system will start a new temperature adjustment process.
After here, the system will configure the new value based on the increment or decrement of the value until the user presses the set button.
Finally, the system will save the value 75 in the EndVerif position and save the temperature value in the EndTemp position. This is so that the temperature value remains saved if the system is turned off.
EEPROM.write(EndVerif,75);
EEPROM.write(EndTemp, temperature);
Then, the temperature value will be requested and the value stored in the TempSensor variable as shown below.
sensors.requestTemperatures();
float TempSensor = sensors.getTempCByIndex(0);
Finally, if the temperature is different from the previous value, the system displays a new value on the screen, as is shown in Figure 5.
Then, it compares the temperature read with the set value. If it is larger, the LED and the buzzer will be activated to get the operator's attention. If it is smaller, the LED and the buzzer will be turned off.
AcknowledgmentThanks to the PCBWay for support the our YouTube Channel and produce and assembly PCBs with better quality.
The Silícios Lab thanks UTSOURCE to offer the electronic components.


Comments