


Hardware components | ||||||
 |
| × | 1 | |||
| × | 1 | ||||
 |
| × | 1 | |||
| × | 1 | ||||
Software apps and online services | ||||||
| ||||||
| ||||||
“KitchenMind: The AI-Powered Kitchen That Thinks For You” , is a modular and scalable AI-powered kitchen assistant that revolutionizes how households manage their kitchen operations. It uses SenseCraft AI computer vision, IoT-powered devices, and environmental sensors to simplify food inventory tracking, reduce waste, and optimize organization. The project is my entry for the Machine Builder Competition - Hackster.io and emphasizes the integration of advanced hardware components, such as SenseCap Watcher, nRF7002-DK, DFRobot Unihiker, and optional competition hardware like Particle Boron LTE-M, Particle Photon 2, nRF9151-DK, and Arduino GIGA R1 WiFi. KitchenMind also integrates Autodesk Fusion 360 and PCBWay CNC/3D Printing Services to create custom enclosures and mounts, ensuring high-quality, functional, and aesthetic designs.
1.1 Project IntroductionKitchenMind is a bold evolution of my original concept, "Kitchen Smart Inventory Assistant (KSIA)." The original design document, available at this Hackster.io link (Design Document - Kitchen Smart Inventory Assistant - Hackster.io), provided the foundation for this ambitious system. It is a winning entry in the Hackster.io Junk Drawer Competition 2024.
1.2 How KitchenMind Aligns with the ChallengeThe Machine Builder Competition encourages inventive solutions to everyday problems through creativity and functionality. KitchenMind rises to this challenge by delivering a comprehensive kitchen management system that tackles critical household issues such as:
● Food Waste Reduction: Tracks expiration dates and provides alerts to avoid spoilage.
● Inventory Management: Offers real-time monitoring of food stock using AI-powered visual recognition.
● Meal Planning: Suggests recipes based on available ingredients.
1.3 Summary of the Original Design Document
The original Kitchen Smart Inventory Assistant introduced several foundational features, including:
● AI-Powered Visual Recognition: Used the SenseCap Watcher to identify food items and log them into a digital inventory.
● Voice Interaction: Hands-free commands for adding or removing items.
● Environmental Monitoring: Used BBC micro:bit for temperature and humidity tracking.
● Central Hub: Managed inventory and user interfaces via the DFRobot Unihiker.
1.4 Evolution into KitchenMindBuilding on this foundation, KitchenMind refines and expands the concept into a polished, AI-powered assistant tailored for modern households. Key updates include:
● Real-Time Inventory Tracking: Combines weight sensors and cameras for precise stock monitoring.
● Smart Notifications: Sends reminders for grocery shopping and reordering essentials.
● Predictive Analytics: Anticipates future inventory needs based on usage patterns. To enhance functionality, components like the BBC micro:bit have been replaced with advanced hardware such as the nRF7002-DK, offering superior environmental monitoring.
2. System DesignThis section provides a comprehensive overview of the KitchenMind platform's data collection, processing, and presentation mechanisms. It emphasizes the critical role of MQTT (Message Queuing Telemetry Transport) in facilitating seamless communication and data exchange between the diverse array of devices integrated into the system.
The section delves into the intricacies of how KitchenMind acquires data from various sources, the subsequent data handling and processing methodologies employed, and the ultimate presentation of this information to the user in a meaningful and intuitive manner. The pivotal role of MQTT as the underlying communication protocol enabling real-time data transmission and device interoperability is underscored.
Furthermore, the section incorporates illustrative diagrams and explanatory text to explain clearly the intricate relationships and data flows between the components of the KitchenMind platform. These visual aids and accompanying descriptions serve to enhance the reader's comprehension of the system architecture and operational dynamics.
2.1 System Operation Diagram1 The SenseCap Watcher captures images and voice commands, sending them to the Unihiker via Wi-Fi. using a MQTT publish
2 The nRF7002DK continuously sends environmental data to the Unihiker through the WIFI connection using MQTT publish. The environment sensor is attached to the nRF7002DK.
3 The Unihiker communicates to both theSenseCap Watcher and the nRF7002DK via WiFI using an MQTT subscribe.
4 When the Unihiker receives data, it processes this data, updating the inventory and user interface located on the Unihiker.
5 The Unihiker analyzes all data, updating the display and giving alerts as needed to users.
2.2 System Architecture DiagramsThe system uses the strengths of each component to create a smooth and effective kitchen management solution. The DFRobot Unihiker, SeeedStudio SenseCap Watcher, and nRF7002DK work together as a strong network of devices, each with a specific role.
The DFRobot Unihiker acts as the central processing unit and user interface hub. It connects to other devices SenseCap Watcher via Wi-Fi for fast data transfer for image processing and voice command interpretation. The Unihiker's powerful processor handles the complex AI algorithms for item recognition and inventory management, while its touchscreen provides an intuitive user interface.
The SeeedStudio SenseCap Watcher, with a high-resolution camera and microphone, is the system's main input device. It captures images of food and packaging, sending them to the Unihiker for processing. The Watcher's AI capabilities help with initial image analysis, reducing the Unihiker's workload. Its speaker gives voice feedback and alerts to users.
The nRF7002DK , connected to the Unihiker via WiFI, acts as an environmental sensor hub. It monitors temperature and humidity in the kitchen, sending data to the Unihiker for analysis and alerts.
Data flow and processing:
- The SenseCap Watcher captures images and voice commands, sending them to the Unihiker via Wi-Fi.
- The Unihiker processes this data, updating the inventory and user interface.
- The nRF7002DK continuously sends environmental data to the Unihiker through the WIFI connection.
- The Unihiker analyzes all data, updating the display and giving alerts as needed.
This system allows real-time inventory tracking, environmental monitoring, and user interaction, making a comprehensive and responsive Smart Inventory Assistant. Its modular design allows for future expansions with more sensors or smart home integration.
2.2.1 Data Flow DiagramKey Data Flow
1. Local Sensor Layer
- Environment Sensor (Temp/Humidity) → I2C → nRF7002DK
- Low-power, wired communication for reliable temp/humidity sensing
2. Wireless MQTT Layer
- SenseCap Watcher → MQTT PUBLISH over WiFi → MQTT Broker
- PUBLISH - Image ITEM and Voice text payloads to the MQTT BROKER.
- nRF7002DK → MQTT PUBLISH over WiFi → MQTT Broker
- PUBLISH - TEMP/HUMIDITY payload to the MQTT BROKER.
- Unihiker MQTT Broker ↔ MQTT over WiFi ↔ Unihiker
- Subscribes to sensor topics
3, Central Processing -- Unihiker
- subscribes to sensor topics
- Receives and Processes the MQTT payload data streams
4. User Interaction
- Unihiker → Display → User Interface
- Shows processed data (e.g., environmental alerts, system status)
Key Interactions
1. SenseCap Watcher
- Publishes raw data (images, audio, or environmental readings) to MQTT topics
2. nRF7002DK
- Converts I2C sensor data to MQTT messages
- Manages local sensor polling frequency
3. MQTT Broker
- Routes messages between all devices using publish/subscribe pattern
- Implements QoS levels for reliable message delivery
4. Unihiker
- Subscribes to relevant MQTT topics
- Runs analytics on combined data streams
- Generates visual outputs for User Interface
5. MQTT Broker
- The MQTT Broker simplifies and streamlines communication within the KitchenMind system, making it more efficient and scalable.
- The purpose of the MQTT Broker Is to act as a central hub for messages between the different parts of the KitchenMind system. Here's a breakdown:
- Central Communication Hub: It's like a post office for your smart devices. Instead of the devices talking directly to each other, they send messages to the MQTT Broker, and the broker then delivers those messages to the right recipients.
- Smoother Operation: This central hub makes the whole system run more smoothly. Devices don't have to worry about who they need to send messages to; they just send them to the broker.
- Easier Expansion: Adding more sensors or devices to the KitchenMind system becomes simpler with a broker. New devices can just connect to the broker and start sending/receiving data without needing complex configurations.
- Decoupling: The MQTT Broker decouples the devices, which means that the devices don't need to know about each other, they only need to know about the broker. If one of the devices fails the other devices connected through the broker can continue to function normally.
Technical Advantages
Protocol Optimization: Combines I2C (low-power local) + MQTT (long-range wireless)
Decentralized Architecture: Broker pattern prevents single-point failures
Scalability: New sensors/devices can be added via MQTT without system redesign
Real-Time Monitoring: MQTT's low latency enables instant updates
This architecture serves as an example of modern IoT design patterns, separating sensing, communication, and processing layers for maintainability and scalability.
2.2.1.1 MQTT Data FlowKey Features
- Decoupled Communication: Devices only interact with the broker, not directly with each other
- Topic-Based Routing: Specific MQTT topics ensure data isolation (environmental vs. multimedia)
- WiFi Infrastructure: All communication occurs over WiFi using MQTT's lightweight protocol
- Central Processing: Unihiker consolidates all data streams for unified processing/display
System Behavior
- Sensors/devices push data to the broker without knowing downstream consumers
- The broker routes messages based on topic subscriptions
- Unihiker pulls relevant data on demand while remaining unaware of publishers
- No direct device-to-device communication – all coordination happens via the broker
This architecture enables scalable IoT deployments where new sensors can be added by simply publishing to existing or new topics, without disrupting the core system.
2.2.2 Sequence DiagramThis sequence diagram describes the interaction between three components: SenseCap Watcher, nRF7002DK, and Unihiker. It outlines the system's initialization, data exchange, and continuous monitoring using MQTT (Message Queuing Telemetry Transport).
This ensures an efficient data pipeline where the Unihiker acts as the central hub, receiving and managing data from multiple sources
Step-by-Step Description
1. System Initialization
- A note appears over Unihiker, indicating that the system is initializing.
2. Wi-Fi Connection Setup
- The Unihiker establishes a Wi-Fi connection with both:
- SenseCap Watcher
- nRF7002DK
3. Continuous Monitoring Loop (MQTT Communication
- The system enters a loop, indicating a continuous monitoring process.
4. SenseCap Watcher Publishes Data
- The SenseCap Watcher captures images and voice commands and publishes them to Unihiker via MQTT.
5. nRF7002DK Publishes Environmental Data
- The nRF7002DK collects environmental sensor data (such as temperature, humidity, etc.)
- It publishes this data to Unihiker via MQTT.
6. Unihiker Subscribes to MQTT Topics
- The Unihiker subscribes to receive data from both:
- SenseCap Watcher
- nRF7002DK
7. Unihiker Processes Data
- The Unihiker processes the received data and updates the inventory and user interface (UI).
8. Unihiker Analyzes Data & Provides Alerts
- The Unihiker further analyzes the data to check for any significant changes or required alerts.
- If necessary, it updates the display and notifies users.
9. Loop Repeats Continuously
- The system continuously cycles through this process to ensure real-time data collection, processing, and response.
Key Takeaways
- Unihiker acts as the central hub, managing data from both devices.
- MQTT Publish-Subscribe Model enables real-time communication
- The process runs in an infinite loop, ensuring continuous monitoring.
- Data is analyzed and displayed dynamically, enhancing the user experience.
This setup is useful for IoT-based monitoring systems, where multiple sensors and devices communicate efficiently using Wi-Fi and MQTT protocols.
3. Development Environment including computer language and Tools.This section presents a comprehensive list of all devices, including the 3 implemented and 4 awarded devices, along with a description and their development environments:
Nordic nRF7002-DK
- Core: nRF7002 Wi-Fi 6 IC + nRF5340 dual-core Cortex-M33
- OS: Zephyr RTOS 3.5+
- Language: C (nRF Connect SDK v2.4+)
- Key Tools: nRF Connect for VS Code, Segger Embedded Studio
- Features: Concurrent BLE/Wi-Fi 6, Matter protocol support
DFRobot Unihiker
- Core: Rockchip RK3308 (Cortex-A35)
- OS: Debian Linux 11 (headless)
- Language: Python 3.9
- Key Libraries: integrated PinPong control library enables developers to directly control the board's built-in sensors and hundreds of connected sensors and actuators using Python.
- Tools: VS Code Remote SSH, Jupyter Notebooks
SenseCap Watcher (ESP32-S3 Based)
- Core: Dual-core Xtensa LX7 MCU + Himax HX6538 AI accelerator
- OS: FreeRTOS via ESP-IDF v5.2.1
- Languages: C/C++ (ESP-IDF framework), Python (SenseCraft AI services)
- Key Tools: ESP-IDF Toolchain, SenseCraft SDK, Arduino IDE (limited)
- Communication: MQTT over Wi-Fi/BLE using esp-mqtt library
- Workflow: ESP-IDF for firmware, SenseCraft Model Assistant for AI
Particle Boron LTE-M
- Core: nRF52840 + u-blox SARA R510S
- OS: Particle Device OS (FreeRTOS fork)
- Language: C++
- Tools: Particle Workbench, Particle CLI
- Features: Automatic carrier certification, ECC608 secure element
nRF9151-DK (Nordic LTE-M/NB-IoT)
- Core: nRF9160 SiP (Cortex-M33 + LTE modem)
- OS: Zephyr RTOS with LwM2M client
- Language: C
- Tools: nRF Connect SDK, VS Code Integration
- Key APIs: AT Commands via nrf_modem_lib, GNSS support
Arduino GIGA R1 WiFi
- Core: STM32H7 (Cortex-M7 + M4)
- OS: Bare metal (Arduino Core)
- Language: C++17 with Arduino API
- Tools: Arduino IDE, PlatformIO, STM32CubeIDE
- Feature: Dual-core programming (M7 and M4)
Particle Photon 2
- Core: Realtek RTL8721DM A33 MCU (200 MHz)
- OS: Particle Device OS (based on FreeRTOS)
- Language: C++
- Tools: Particle Workbench, Particle Web IDE, Particle CLI
- Features: OTA updates, Edge Impulse integration for ML, Particle Cloud integration
This section details the development environment for seven different devices, showcasing the diversity of programming environments required for these devices. It includes the core components, operating system, programming language, key tools, and notable features for each device.
For example, the SenseCap Watcher uses a dual-core Xtensa LX7 MCU and a Himax HX6538 AI accelerator, operates on FreeRTOS via ESP-IDF v5.2.1, and is programmed in C/C++ and Python. Key tools for development on this device include the ESP-IDF Toolchain, SenseCraft SDK, and Arduino IDE.
4. Programming Guidelines and Test CodeThis section describes the Programming environment For the 3 devices:
- Nordic nRF7002-DK
- DFRobot Unihiker
- Seed SenseCap Watcher
Each section on each device includes:
- Functionality pertains to this project.
- programming environment
- Resources with links to pages to get started programming
- Detailed Programming tips
- Running example code on the device as a member of the MQTT TEST Example
Functionality: Tracks and publishes environmental conditions (temperature and humidity) to the Uniihiker.
4.1 1. Environment
This is my programming environment on the nRF7002-DK. This section describes the programming environment for the nRF7002-DK, including the tools and libraries, code language, development OS, device OS, and example code.
Tools and Libraries: Nordic nRF Connect SDK WiFi,MQTT,GPIO), Zephyr APIs,,Visual code with nRF connect Extensions.
Code Language : C
Development OS: Windows10 (Surface PC)
Device OS: Zephyr
Example Code: NordicDeveloperAcademy/wifi-fund
Clone this repo to your local disk since you will open it in VSCODE. I created a local folder c:\nordic and placed the entire code base there. When Instructed to load in all lessons, you will have all the lessons already on your disk. I used a lesson for this project, as a template to develop my MQTT Client code on the nRF7002DK.
4.1.2 Resources
This section is detail in content and If you are seasoned Nordic developer, you can skip this section if you wish. However if your new to developing code on Nordic boards you might benefit by this section.
4.1.2.1 Nordic Academy Courses
This section provides an overview of Nordic Academy courses and lessons, focusing on those relevant to WiFi and MQTT programming. It first introduces the nRF Connect SDK Fundamentals and Wi-Fi Fundamentals courses, listing what you'll learn in each. Next, it delves deeper into the Wi-Fi Fundamentals course, specifically Lesson 4 – MQTT over Wi-Fi. It outlines the lesson's objectives and connects them to the code I used in my project. Finally, it provides specific instructions for Connecting to an MQTT broker (Lesson 4, Exercise 1) and directs the reader to Lesson 2, Exercise 1 for WiFi connection setup. The overall goal of this section is to guide the reader towards relevant Nordic Academy resources for understanding and implementing WiFi and MQTT functionality in their projects, particularly those using the nRF7002DK board.
If you have not taken course on the Nordic Academy Nordic Developer Academy (I did), it is a great resource to understand the development environment with the fowling two courses courses:
1. nRF Connect SDK Fundamentals: nRF Connect SDK Fundamentals - Nordic Developer Academy
2. Wi-Fi Fundamentals: Wi-Fi Fundamentals - Nordic Developer Academy
What you'll learn in the course nRF Connect SDK Fundamentals
1. Develop a fundamental understanding of the nRF Connect SDK
2. Practice through hands-on exercises using common hardware peripherals (GPIO, UART, I2C)
3. Develop more knowledge about Zephyr RTOS 101 - Execution model, ISRs, threads, thread's life-cycle and inter-task communication/synchronization mechanisms
What you'll learn in the course Wi-Fi Fundamentals
1. Basic theory on Wi-Fi technology,
2.Relevant API’s to establish a Wi-Fi connection
3.Connecting over Wi-Fi using the application layer protocols, specifically MQTT (MQTT/TLS)
4.Apply what you have learned through hands-on exercises to build and secure Wi-Fi applications
Lesson 4 - MQTT over Wi-Fi - Nordic Developer Academy
For my code I used Lesson 4 – MQTT over Wi-Fi Lesson 4 - MQTT over Wi-Fi - Nordic Developer Academy The Objectives of this lesson are valuable in understanding the use of the MQTT client in this application, which are listed next:
1.Understand the basics of the MQTT protocol and how it works.
2.Learn how to use the MQTT library in nRF Connect SDK.
3.Practice through hands-on exercises on how to utilize MQTT in an application to establish a bidirectional communication channel with another MQTT client.
The MQTT connections for code running on the Nordic nRF7002DK board is based on Lesson 4 Connecting to an MQTT broker, exercise 1, of this course. Exercise 1 - Nordic Developer Academy
In this exercise, you will establish bidirectional communication between your board (acting as an MQTT client) and another remote MQTT client, running on a PC, tablet, or a smartphone. The remote client will control the LEDs and monitor the status of the buttons on the board via MQTT subscribe and publish commands. I used it to test a program and adapted it by a rewrite to implement the nRF7002DK side of the system.
You will need to go over Lesson 2 Exercise 1 to connect to your wifi before you can run the example. Exercise 1 - Nordic Developer Academy
4.2.2.2 Programming tips and instruction for the nRF7002-DK
4.2.2.2.1 Running the example in Visual studio code
After installing nRFconnect SDK,Tools and the VSCode extensions:
After installing nRFconnect SDK,Tools and the VSCode extensions:
Assuming you have already cloned the GitHub repo NordicDeveloperAcademy (Nordic Developer Academy) · GitHub to a folder c:\Nordic, follow the following steps:
1. Get into VSCODE
2. Open the folder C:\nordic\wifi-fund from the VSCODE welcome screen.
3. From the left menu click on the nRFConnect icon , Now you're in the nRFConnect extensions.
4. Make sure you are using the 2.6.0 SDK and toolchain
5. Open existing application in C:\nordic\wifi-fund\lesson4\wififund_less4_exer1_solution
7. Before making any changes, build a config file. Use the nrf7002_cppapp_ns
8. Run the app and make sure it compiles you might have add the broker,port to the prj.cfg
4.1.3 MQTT TEST using Unihiker.I decided to test my acquired knowledge of MQTT with exercise one in lesson 4 in the course mentioned in 2.1 Nordic Academy Courses. In the exercise Testing section, it describes how to use an MQTT client running on your PC, smartphone, or tablet. To test the application from the Unihiker, let’s set up an MQTT client to communicate with the MQTT client from exercise one in lesson 4, running on the nRF7002DK.
To complement the C program from the Nordic Dev academy exercise 1 lesson 4 (wififund\_less4\_exer1\_solution) on the nRF7002DK, I developed and programmed a Python MQTT test script (index.py, callbacks.py) on the DFRobot Unihiker. These scripts can be found in the CODE section of this project. To run the test, start the C program on the Nordic nRF7002DK and the Python script , index.py on the DFRobot Unihiker.
Data Flow Explanation:
- nRF7002-DK client publishes button status to the Buttons Topic when a physical button is pressed
- UniHiker client subscribes to Buttons Topic to receive button status updates
- UniHiker client publishes LED commands to LEDs Topic
- nRF7002-DK client subscribes to LEDs Topic to receive control commands
Key Components:
- MQTT Broker: Central message router handling all communications
- Buttons Topic: Dedicated channel for button status updates
- LEDs Topic: Dedicated channel for LED control commands
- nRF7002-DK Client: Acts as both publisher (buttons) and subscriber (LEDs)
- UniHiker Client: Acts as both subscriber (buttons) and publisher (LEDs)
This bidirectional communication pattern enables real-time IoT control and monitoring through the MQTT pub/sub architecture.
System Workflow
- nRF7002-DK Subscribes LEDs Topic - To receive commands about what the status of its LEDs should be
- Unhiker Subscribes to Buttons Topic - To receive messages whenever a button is pushed.
- User presses button on nRF7002-DK board
- nRF7002-DK client publishes event to Buttons Topic
- Broker distributes button event to all Buttons Topic subscribers (including Unihiker client)
- Unhiker displays button state change on the console.
- Unhiker Loop
- Unihiker client publishes LED status command to LEDs Topic
- Broker distributes LED status event to all LEDs Topic subscribers (including nRF7002-DK client)
- nRF7002-DK client receives command via subscription and LEDs update accordingly
For this project, the Unihiker serves as the central hub for receiving MQTT messages and visualizing data on its touchscreen interface.
The UNIHIKER, a single-board computer with a 2.8-inch touchscreen display, was designed for programming and IoT projects. It runs on a Linux-based operating system (derived from Debian) and uses Python as its primary programming language.
Connectivity is achieved through Wi-Fi and Bluetooth, and data is collected and utilized through built-in sensors (light, accelerometer, gyroscope, and microphone). The UNIHIKER supports various programming tools (VS Code, VIM, Thonny, Mind+, and Jupyter Notebook) and features a built-in SIoT service that utilizes MQTT for local data storage and access.
The PinPong Control Library facilitates control over both built-in and connected sensors and actuators. Setup is straightforward, requiring only a Type-C cable and a web browser for programming, and a wide range of interfaces allows for control over open-source hardware.
Programming the UNIHIKER
Programming options include SSH (using tools like Putty or MobaXterm), Jupyter Notebook, Mind+ (block-based programming), and Thonny IDE.
- Key programming steps via SSH include:
- Connecting the UNIHIKER via USB and WiFi.
- Using SSH to connect to its IP address.
- Creating/editing Python files.
- Running Python programs.
Additional Notes
The UNIHIKER can connect to Wi-Fi networks and also function as a Wi-Fi hotspot. Remote programming and management are possible through SSH and web interfaces, and data transmission over Wi-Fi to remote servers and dashboards is supported. MQTT Protocol Support enables communication with other IoT devices.
Mind+ offers block-based programming and hardware integration, and online documentation and tutorials are available. Data is stored locally on the device. The UNIHIKER can serve as a central hub in multi-device IoT setups communicating with ESP32 microcontrollers.
TEST Example
Refer to section 4.2.3 MQTT TEST using Unihiker from the 4.2 nRF702DK section above, for how I used it for this test.
Conclusion
The Unihiker's ease of setup and program execution, as highlighted by the quick implementation of test code, makes it a strong candidate for the central hub of this project. Its suitability is further supported by the features detailed in this section.
4.3 SenseCap Watcher with SenseCraft AIFunctionality: Detects food items using SenseCraft AI and publishes inventory data in JSON format to the MQTT topic.
4.3.1 Environment
This is my programming environment on the SenseCap Watcher. It describes the programming environment, including the tools and libraries, code language, development OS, device OS,S
- Core: Dual-core Xtensa LX7 ESP32-S3 Based MCU + Himax HX6538 AI accelerator
- OS: FreeRTOS via ESP-IDF v5.2.1
- Languages: C/C++ (ESP-IDF framework), MicroPython installed on ESP32 (limited AI acceleration)
- Key Tools: VSCode+ESP-IDF Toolchain, SenseCraft SDK, Arduino IDE (limited AI acceleration)
- Node-red on node.js running on PC
- Communication: MQTT over Wi-Fi/BLE using esp-mqtt library
- Workflow: ESP-IDF for firmware, SenseCraft Model Assistant for AI
- Two chips; ESP32-S3 Based MCU AI accelerator
NOTE: there are TWO editing tools available ESP-IDF Framework, which is NOT LIMITED and can Handle AI acceleration and the Arduino IDE which is limited. Also a third option exist, Micro Python installed on the ESP32 and executes scripts directly. here are the key features comparison of all three:
Programming Language: ESP-IDF uses C/C++, Arduino IDE uses simplified C++, and MicroPython uses Python.
Ease of Use: ESP-IDF is moderate to difficult, Arduino IDE is easy, and MicroPython is very easy.
Hardware Access: ESP-IDF provides full control over peripherals, Arduino IDE offers simplified access via libraries, and MicroPython allows basic access via Python modules.
Networking Features: ESP-IDF has advanced features (Wi-Fi mesh, BLE coexistence), Arduino IDE and MicroPython have basic features (Wi-Fi, BLE, and MQTT).
AI/ML Support: Himax HX6538 AI accelerator is fully supported in ESP-IDF, limited in Arduino IDE and MicroPython.
Performance: High in ESP-IDF, moderate in Arduino IDE, and low in MicroPython.
Power Management: Comprehensive APIs in ESP-IDF, limited in Arduino IDE and MicroPython.
Debugging Tools: ESP-IDF uses JTAG/GDB, Arduino IDE uses Serial Monitor, and MicroPython uses REPL.
Community Support: ESP-IDF's community is advanced developer-focused, while Arduino IDE and MicroPython have beginner-friendly communities.
My research found that ESP-IDF is better suited for projects like KitchenMind due to its robust feature set and flexibility, especially with projects that involve IoT integration, environmental monitoring, and AI-based decision-making
4.3.2 Resources
This section provides programming resources to help developers work with the SenseCAP Watcher effectively.
WATCHER WIKI:
Getting started, using firmware app, notifications. This section contains all but how to send the results via a MQTT call to a broker.
GITHUB
GitHub - Seeed-Studio/OSHW-SenseCAP-Watcher: SenseCAP Watcher
- Contains the app firmware if you ever need to flash it to the watcher
- Contains the code examples from the wiki
USING NODE-RED with WATCHER and communicating results over MQTT TOPICS to A BROKER
This seems the easiest once you get the environment set up. (node.js, node-red running on node.js)
PROJECT:
FREISA meets SenseCAP Watcher - Hackster.io
This project shows how the WATCHER prompt is accessible using terminal (putty) to the 1st COM port on the ESP32. There are commands (HELP) that are available like
- If you press Enter on the Terminal Emulator, a prompt appears and you can send commands to the SenseCAP Watcher.
- If you type "help" all the recognized commands will be displayed together with their parameters.
Sensecap Watcher: New health agent Assistant - Hackster.io
- Use the sensecap account to get the image and description of the object from the phone app
- Login to the created account on the website of SenseCap.
- Once logged in, the next step is to register the SenseCap Watcher device. You can follow the steps provided on the official.website.
- Once registered on the website and with the Watcher device registered, you need to go to the Security tab and click on "Access with API Key." By doing this, the website will allow you to create a key that will then be used to access the Watcher's data from external sources.
- After completing this, it's time to connect to the device from the outside. To do this, you can use the following link to establish the connection:
- You can do this from various platforms, such as NodeJS, curl, or the Java SDK.
4.3.3 programming tips for example
I was able to use the following tutorial to teach myself to use Node-Red to prepare myself to program the Watcher. I tried other environments but I found this to be the easiest way to use data from the watcher.
From the following tutorial, I found the Watcher to Node-RED Quick Start on GitHub to be the most straightforward resource for learning how to work with Watcher data in Node-RED. This tutorial was instrumental in my journey to program the Watcher, as I explored several environments and ultimately found Node-RED to be the most user-friendly for this purpose.
I successfully installed Node-Red on my PC by following the first two parts of the tutorial and verified the installation by running a "hello world" test sketch. Even though I'm not yet receiving data from the sensecap Watcher, the tutorial indicates that adding a library will enable data retrieval. The next steps involve sending the data to Node-Red and utilizing the MQTT library to publish it to an MQTT broker. I will detail my progress in the upcoming section.
4.3.4 TEST Example
Write an MQTT test to send Item descriptions via MQTT to the Unihiker. I used the tutorial mentioned in the section above to figure out how to get data from the Watcher. I followed the next 2 sections in the tutorial , Part 3 “Run a task in Watcher”, then Part 4 “Watcher send message to Node-RED”, Method 1: Use SenseCAP node.
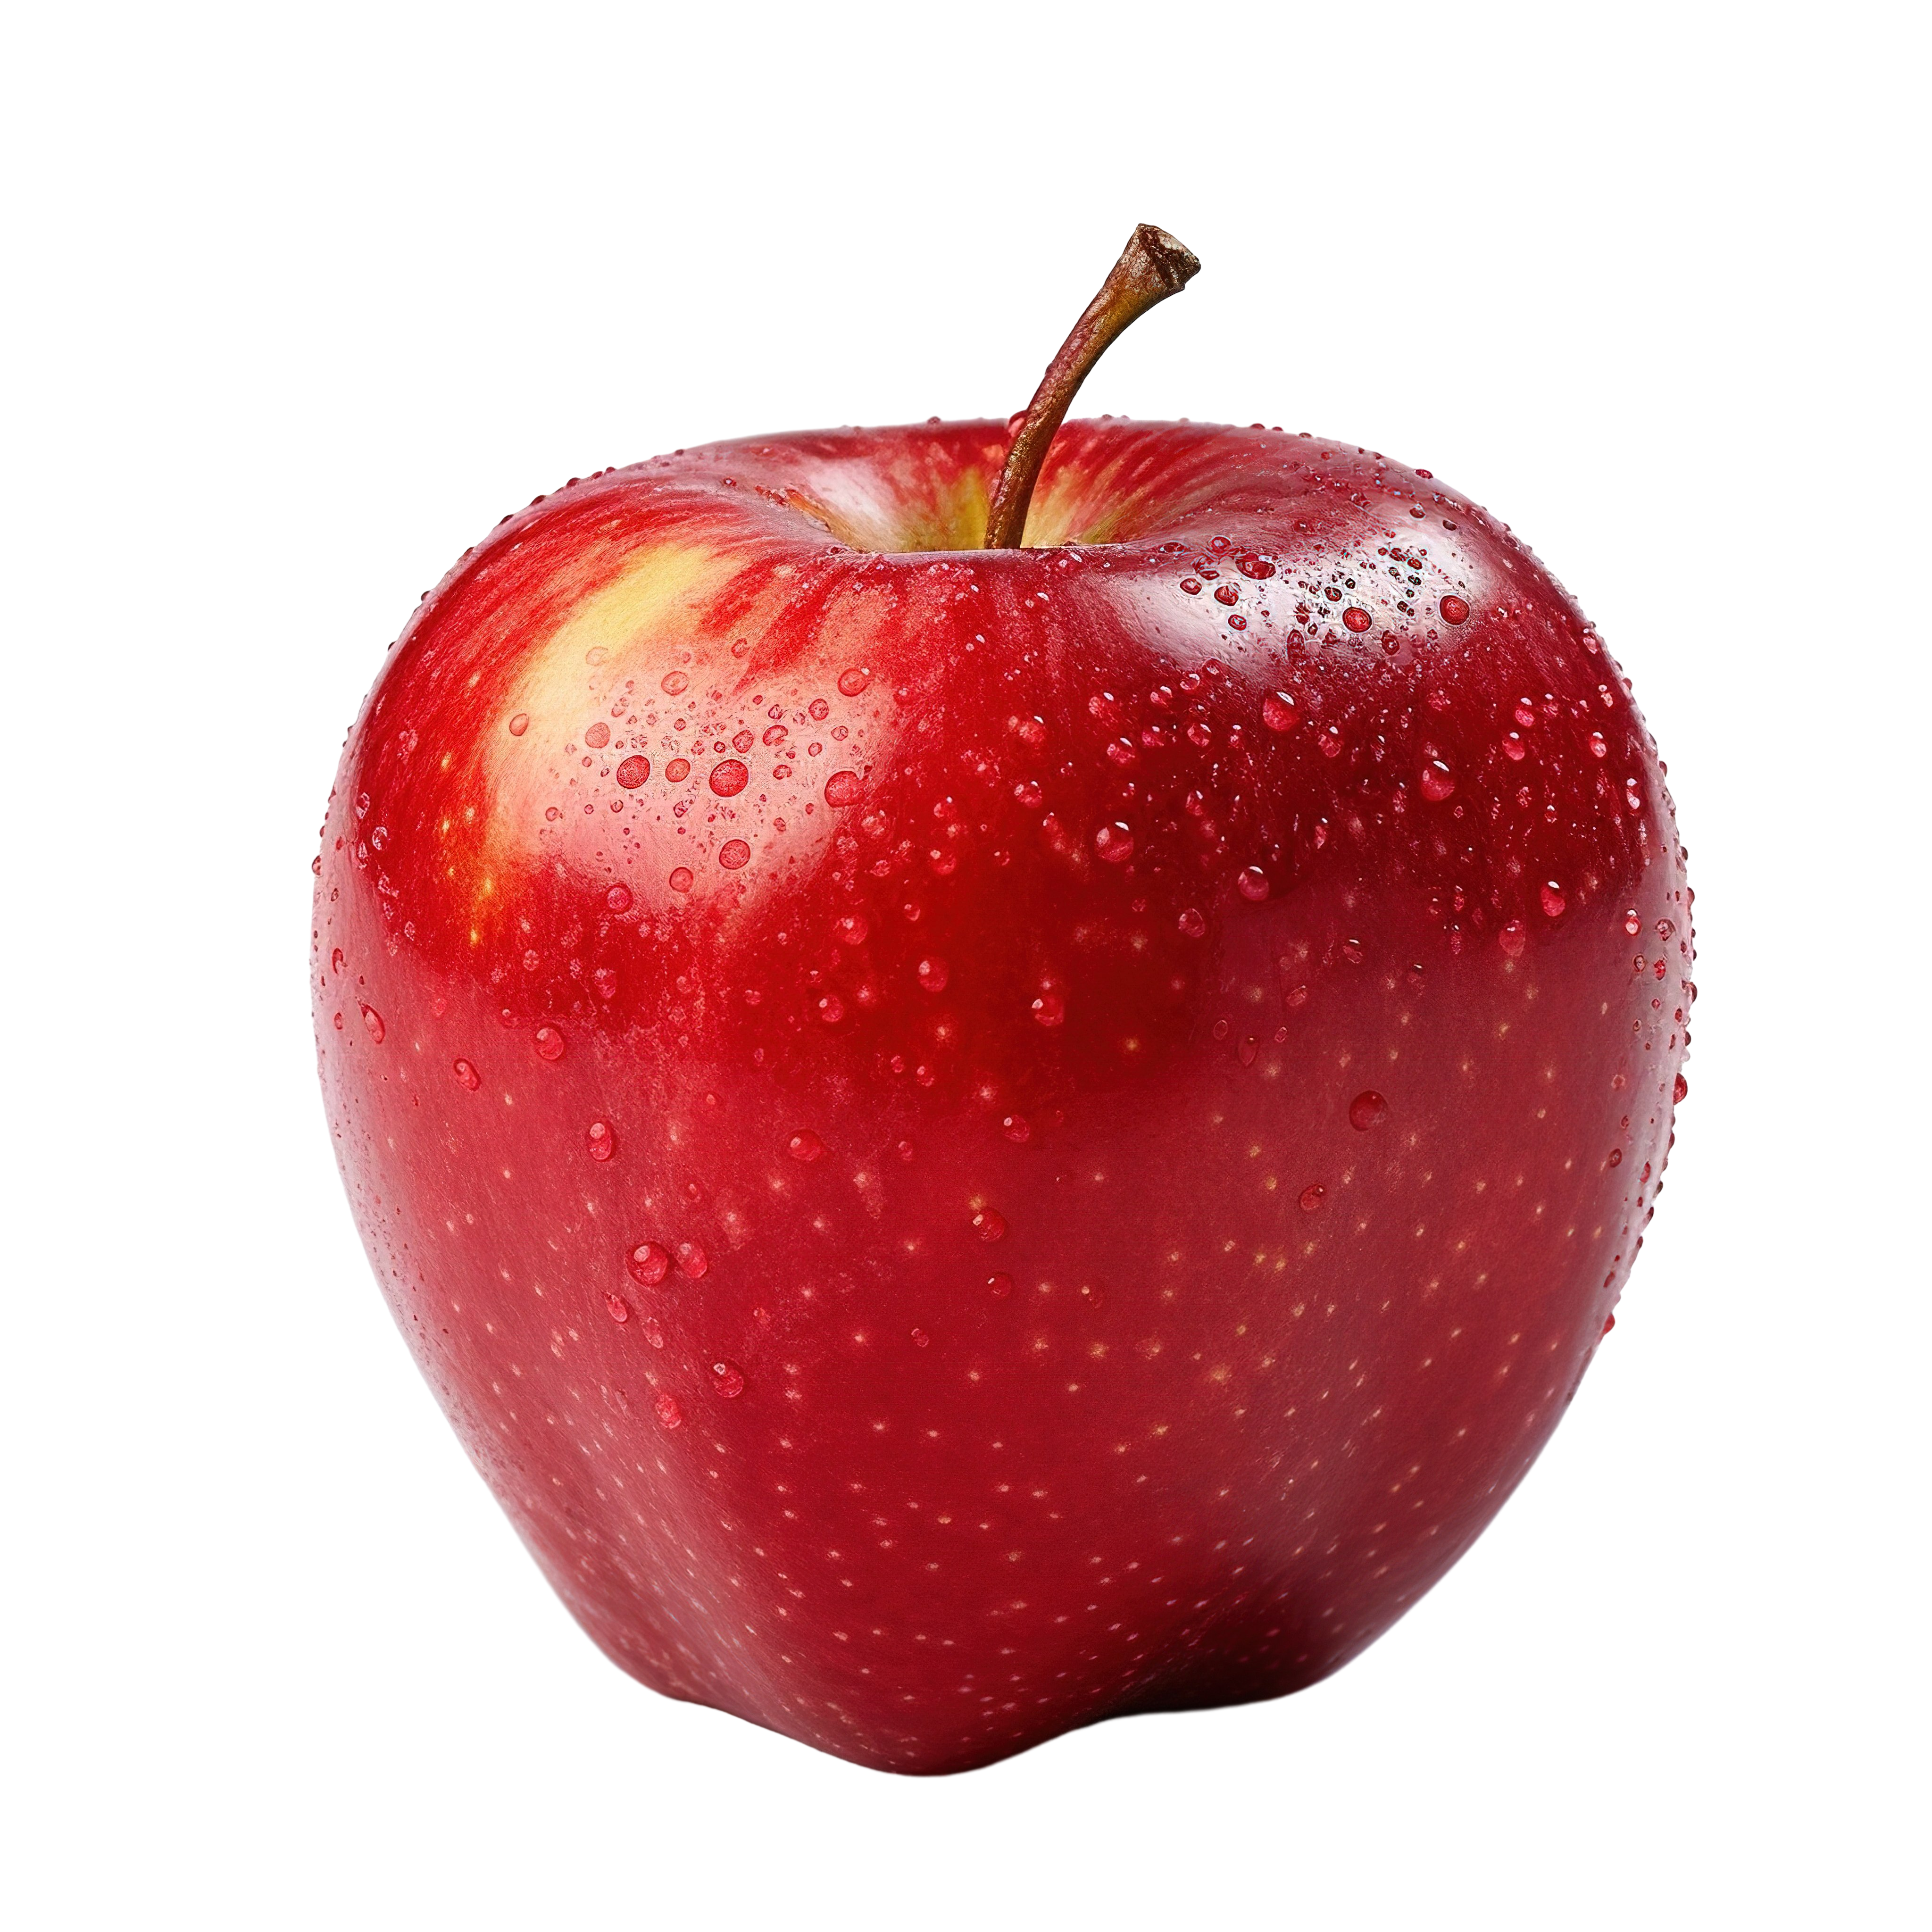
When I was done I was able to get the image of an apple with the description text I set up.
Results:
Detected an apple
Next add code to node-red to publish This message to an MQTT broker topic for Unihiker.
To use MQTT in Node-RED to publish content to a topic on a broker, follow these steps:
1. Add the MQTT-Out Node
- Drag and drop an MQTT-out node from the Node-RED palette onto the workspace canvas
2. Configure the MQTT Broker
- Double-click the MQTT-out node to open its configuration dialog.
- Click the pencil icon next to the Server field to create a new MQTT broker configuration.
- Enter the broker's address (e.g., localhost, test.mosquitto.org).
- Specify the port (default is 1883 for non-secure connections).
- broker = 'broker.hivemq.com' # HIVEMQ Unsecured
- myport = 1883
- If required, add authentication credentials (username and password).
- Save the configuration by clicking Done
3. Set the Topic and Options
- In the MQTT-out node configuration:
- Enter the Topic you want to publish to (e.g., sensors/temperature).
- Set the QoS level (0, 1, or 2) based on your delivery guarantee needs.
- Choose whether to enable the Retain option if you want the broker to store the last message for new subscribers.
4. Connect an Inject Node
- Add an Inject node from the palette and connect it to the MQTT-out node.
- Configure the Inject node:
- Set a payload type (e.g., string, number, or JSON) and value. For example, you might send a temperature value like.
- Optionally, set a topic in this node if you want dynamic topic assignment.
5. Deploy and Test
- Click the Deploy button in the top-right corner of Node-RED to activate your flow.
- Trigger the Inject node by clicking its button. This will send the payload through the MQTT-out node to your configured topic on the broker.
- I will use the knowledge I've gained from this tutorial to implement my project idea.
Fusion
PCBWay's CNC machining and 3D printing services, combined with Autodesk Fusion 360, is utilized to design and fabricate custom enclosures and components tailored to KitchenMind's hardware.
The initial steps will involve a learning curve focused on Fusion and modeling cases. Simultaneously, understanding the process of ordering PCBway services is crucial. These acquired skills will then be applied to create robust, modular enclosures specifically designed for the Nordic nrf7002-DK and its connected components. The final step involves exporting the design file in a format that PCBway can use to manufacture the custom case.
To learn about Fusion and modeling cases, I utilized the following resources:
- Get the FREE version and install it on surface PC
- to Learn how to use it I followed the YouTube video
https://www.youtube.com/watch?v=5hComh1hFzY
Create a case for the Nordic nRF7002
- This was a 1 month challenge to create a case for the Nordic nRF7002.
- The video uses the raspberry pi but you can use any shape file. I was able to get one and attached it to this project.
- Then I proceed to use the video mentioned above as a guide for building my case for the Nordic nrf7002-DK. I eventually was able to design and save files used to submit to PCBWay for manufacturing. then files are attached in the CAD section at the bottom of the project
Here are my results:
BOTTOM
TOP
ASSEMBLED
Export the design file in a PCBway-compatible format.
- Save a file for PCBWAY
- Hide everything that you DO NOT want to Export. For example BOTTOM show and hide everything else
- In this case I'm only working with the bottom so I hide everything and EXPORT just the bottom image to a step file name bottom.step Notice the top project was the step file brought back in the Fusion360.
- Now your ready to manufacture the case on PCBWy as described in the next section.
This sexton is long in content. If you are a sesonen PCBWay User, feel free to go on the the next section. However if your NEW to PCBWay you might benifit from my instuctions.
1. If you have not created an account do that now on www.pcbway.com
2. If you have an account login and go directly to cnc printing page:https://www.pcbway.com/rapid-prototyping/manufacture/?type=2&reffercode=TOP
3. Navigate to 3D Printing Section: On the PCBWay website, find the section for 3D printing services.
4. Prepare Your File: Ensure your shape file is in an accepted format such as *.stl, *.obj, *.step, or *.stp. Each file should be under 500 MB.
5. Upload Your File, by drag and drop onto the form as described below
6. Go through the 3D printing order process and upload your file.
7. Select Parameters: Choose the material and any special options like wall thickness or thread inserts if necessary. On the right side of the form
8. Submit Request: Once all parameters are set, press the “Submit Request” button on the RIGHT side of the form to submit your request for review. The request enters the “Under review process”
9. Review and Payment: After PCBWay reviews your order, you will receive a notification with a final price quote. If everything is satisfactory, proceed to payment.
10. Shipping: Once payment is completed, Proceed to checkout
11. Your order will be processed and shipped according to your selected shipping options. Make sure to include your coupon if you have one.
12. Once you submit a payment, you are directed to the production status page
13. Next If there are no engineering questions then the your order is manufactured and goes into the delivery stage, where you can check on your delivery status
5.2 Final productAttach a pic of the bottom PCBWay manufactured part received.
MY ONLY PROBLEM is that the Nordic Nrf7002 board that I used as template to extrude the case, does not fit perfectly into the manufactured case. It is slightly of on only One side it seems to be short by 2 mm to allow the board to fall into place. All other sides are perfect and the 4 screws hole line up perfectly.
I'm not sure what can be done about this. have attached photos and a video describing the problem.
Stay tuned for my results of my solution to expand this , but I need to finish this project as the challenge deadline is fast approaching.
6. Putting it all togetherThe current implementation of this project, utilizing three devices, has established successful MQTT communication between them. However, it is still lacking some functionalities outlined in the design phase. Specifically, the UNIHIKER's inventory management system, the transmission of images and voice data from the Senscap watcher, and humidity readings from the nRF7002 have not yet been implemented.
The most difficult thing in using these 3 devices is that each one uses a different programming environment to code in. Using the MQTT broker makes sending data between these diverse devices easy. If you recall the diagram from above section 2.2.1 Data Flow.
This system uses MQTT Publish/Subscribe architecture over WiFi to coordinate the three IoT devices through a central broker.
Enironmental Data Path
- nRF7002DK → PUBLISH → skrug/pantry1/temp topic → MQTT Broker
- Transmits temperature
- Uses dedicated environmental topic (nRF7002DK/env)
Multimedia Data Path
- SenseCap Watcher → PUBLISH → skrug/watcher/item & skrug/watcher/voice topics → MQTT Broker
- Sends image recognition results and voice command transcripts
- Separates data types into distinct topics
Centralized Control
- Unihiker acts as the sole subscriber, receiving all sensor data via:
skrug/pantry1/temp (environmental)
skrug/watcher/item (visual)
skrug/watcher/voice (auditory)
MQTT Broker
- The MQTT Broker simplifies and streamlines communication within the KitchenMind system, making it more efficient and scalable.
- The purpose of the MQTT Broker Is to act as a central hub for messages between the different parts of the KitchenMind system.
The following sections describe in detail the 3 devices and their connectivity. It will include photos and brief descriptions of the programming environment and code on each device, as outlined in the flow diagram above.
6.1.1 UnihikerDescription
This device acts as the central hub for the system. The Unihiker communicates to both theSenseCap Watcher and the nRF7002DK via WiFI using an MQTT subscribe. When the Unihiker receives data, it processes this data, updating the user interface located on the Unihiker.
The initial display when the code is run.
The display when a temperature and item detection object is published to the MQTT Broker.
Code
I developed and ran my project code on the Unihiker using Mind+, a FREE platform from DFRobot. Mind+ simplified the process of developing Python projects on the unihiker by enabling a WiFi connection and providing a code area with tabs for each Python file. Additionally, Mind+ displays a terminal screen for entering commands and monitoring the operation of the Python files.
The provided screenshot displays my Python project for KitchenMind, showcasing the 3 project files within the code area. In the terminal, the execution of 'index.py' establishes a connection to the MQTT broker, subscribes to the specified topic, and receives a Qos 2 status. Temperature data, published to the 'temp' topic by the Nordic nRF7002DK, is received and displayed on the Unihiker display along with the room name "Pantry1". Additionally, an apple image is displayed when Sensecap Watcher publishes to the 'Item' topic. Currently, apple detection is the only supported item, but I plan to develop a model for comprehensive food item detection.
The file system area shows my KitchenMind project, under the “File in UNIHIKER” heading.
NOTE: These files are found in Code attachments section at the end of this project
If you put the images named apple.png and pantry.png (I placed these in the schematics attachments) in the “img” directory and place the 3 files in a folder as described, you should be able to run index .py by pressing the RUN button.
The screenshot displays the KitchenMind project directory structure on Unihiker. The code attached to the “Code Attachment” section at the end of this project includes the files index.py, callbacks.py, shared.py, apple.png, and pantry.png. To run index.py, place the images in the "img" directory and the 3 files in a folder as described; then, press the RUN button.
6.1.2 Senscap WatcherDescription
The SenseCap Watcher captures images and voice commands, sending them to the Unihiker via Wi-Fi. using a MQTT publish
Code
I utilized Node-RED to retrieve data from the watcher. Node-RED is a flow-based, low-code development tool for visual programming, originally developed by IBM for wiring together hardware devices, APIs and online services as part of the Internet of things.
Node-RED provides a web browser-based flow editor, which can be used to create JavaScript functions. The runtime is built on Node.js. The flows created in Node-RED are stored using JSON. Since version 0.14, MQTT nodes can make properly configured TLS connections.
To facilitate this process, I followed a tutorial that provided comprehensive guidance on installing and using Node-RED, and effectively calling the Watcher API to establish a connection. Specifically, I adhered to "Method 1: Use SenseCAP node" outlined in the Part4 section of the tutorial.
Setting up the environment with node.js and node-red running on node.js to retrieve data from the Watcher appears to be the simplest solution offered to get data from the watcher. This was my first attempt in using this environment so it took some time to get the hang of it.
After following the example from the tutorial, I implemented the apple object detection model to detect the image of an apple and publish the data to the MQTT broker, so that UNHIKER could retrieve it using a Subscribe. The following steps were taken to accomplish this using Node-Red.
Step-1 Run Node-RED
Enter a command window. If Node-RED is installed as a global npm package, then execute the command node-red directly: node-red
This will output the Node-RED log to the terminal. You must keep the terminal open in order to keep Node-RED running. This will allow you to see the Node-RED editor on http://localhost:1880.
Step-2 Assign a Task
Use the sensecap app to run the apple detection model and send messages.
Step-3: Add blocks to create the code.
I used what I had learned from the tutorial to get the messages from the sensecap watcher into Node-red, by using the following blocks
Then I figured out how to publish MQTT messages to a broker. In Node-Red , I published the topic skrug/watcher/item, using the following blocks
If you run this code the unihiker subscribe will receive this topic. Now that's all there is to it, to get data from the Sensecap watcher to the Unihiker.
6.1.3 nRF7002dkDescription
The nRF7002DK continuously sends environmental data to the Unihiker through the WIFI connection using MQTT publish.
The environment sensor is attached to the nRF7002DK. The Grove base shield is attached to the nRF7002 then the Kit Temperature sensor module is attached to the I2C grove connector on the base shield as shown.
The nRF7002 is then attached to the bottom piece of the case manufactured by PCBWay and described in Section 5 "Utilizing PCBWay CNC/3D Printing Services and Autodesk Fusion" described above.
Code
I used the same code as in the example code described in section 4.2.3, ”MQTT TEST using Unihiker”.
I published the topic skrug/pantry1/temp with the temperature from the Grove temperature sensor module described above.
I modified two files in the project (prj.conf, main.c )
prj.conf - to add the publish topic and the broker information used in main.c
main.c - added code to get the temperature from the Grove temperature sensor module over I2C and did some cleanup of unused code. If you run this code the Unihiker subscribe will receive this topic. Now that's all there is to it, to get data from the nRF7002 to the Unihiker.
Here is a video of the system in action
Pantry 1 components
In the KitchenMind project, the SenseCap Watcher and the nRF7002-DK, with its connected Grove temperature sensor module are deployed in "Pantry1," my basement basement. This video shows the SenseCap Watcher successfully identifying an apple, and the temperature sensor recording the ambient temperature within the pantry.
To Identify the apple I have set up the sensecraft app with a task as the following screenshots will describe:
This data, captured by these two devices, is then transmitted to the central Unihiker hub, as further demonstrated in a separate "Unihiker Hub Video." This highlights the initial successful data acquisition and transmission from remote sensors to the central processing unit within the KitchenMind system.
Unihiker Hub
This video demonstrates the KitchenMind system's central hub, the Unihiker, processing and displaying real-time data. When an apple is detected by the SenseCap Watcher in the "Pantry 1," that event and the temperature from the nRF7002-DK's sensor are sent via a MQTT Publish Topic: skrug/pantry1/temp and visualized on the Unihiker's screen. An image of the detected apple, the pantry's location ("Pantry 1"), and the room's current temperature are displayed, showcasing the integration and functionality described throughout the document, particularly the data flow and system architecture outlined in Section 2.
6.2 Implementation ConclusionDeveloping workflows within the Sensecap Watcher environment presented a notable learning curve compared to my experiences with the other two devices. Initially, establishing a consistent coding practice for data acquisition and subsequent MQTT message transmission proved challenging. Several approaches were explored, but finding a familiar and efficient methodology required significant effort. Ultimately, Node-Red emerged as the most effective solution, providing a visual and intuitive platform that streamlined the workflow development process. The transition to Node-Red significantly improved my ability to manage data flow and integrate MQTT messaging within the senscap watcher ecosystem.
Integrating the Unihiker, SenseCap Watcher, and nRF7002DK presented a multifaceted development challenge primarily due to their distinct ecosystems. The Unihiker, based on a Linux distribution and primarily programmed in Python, offered a high-level, user-friendly environment with libraries like PinPong for hardware interaction and standard Linux tools for development. In contrast, the SenseCap Watcher, utilizing an ESP32-S3 microcontroller, demanded familiarity with the ESP-IDF framework and C/C++, a lower-level environment requiring careful memory management and hardware peripheral configuration. While Arduino IDE offered a more accessible C++ interface for the Watcher, full access to the AI acceleration hardware was limited. Furthermore, the eventual adoption of Node-RED for the Watcher introduced a visual, flow-based programming paradigm using JavaScript, adding another layer of diversity. Finally, the nRF7002DK, with its dual-core architecture and Zephyr RTOS, necessitated working within the Nordic Connect SDK and the intricacies of real-time operating systems in C. This landscape of different operating systems, programming languages (Python, C/C++, JavaScript), development frameworks (Linux, ESP-IDF, Zephyr, Node-RED), and toolchains created a significant hurdle in establishing a unified and efficient development workflow. Each device required a specific setup, debugging approach, and understanding of its unique capabilities and limitations, making cross-device integration and testing a complex endeavor.
Despite the diverse programming environments of these devices, the adoption of MQTT architecture provided significant benefits for inter-device communication. MQTT acted as a unifying protocol, abstracting away the complexities of each device's unique ecosystem. The publish/subscribe model allowed each device to send and receive data without needing direct knowledge of the others. For instance, the nRF7002DK could publish temperature readings to a specific MQTT topic, and the Unihiker, subscribing to that topic, could seamlessly receive and process the data, regardless of the differing underlying technologies. This decoupling simplified the system's design and enhanced its scalability, as new devices could be added to the network simply by publishing or subscribing to relevant topics. The central MQTT broker facilitated efficient message routing, ensuring reliable and timely data exchange between the KitchenMind components.
In closing MQTT communication is established among Unihiker, SenseCap Watcher, and nRF7002DK. However, integrating Unihiker's inventory, SenseCap Watcher's advanced data (images, voice), and nRF7002 humidity readings is pending. The pending integrations are due to the complexity and the iterative nature of the project's development.
Integrating the Unihiker's inventory management requires developing specific data structures and algorithms within the Python environment to store, update, and retrieve food item information based on MQTT messages received from other devices. This could involve challenges in data parsing, maintaining data consistency, and designing an efficient user interface on the Unihiker's touchscreen.
The SenseCap Watcher's advanced data, including images and voice commands, introduces additional layers of complexity. Processing images for food recognition, even with the SenseCraft AI, and transcribing voice commands into actionable data require robust libraries and significant computational resources. Transmitting this multimedia data efficiently over MQTT and ensuring its accurate interpretation by the Unihiker likely involves overcoming bandwidth limitations and handling different data formats. Developing workflows within the Sensecap Watcher environment presented a learning curve, suggesting that getting the image and voice data into a usable format for MQTT transmission took considerable effort, potentially delaying the subsequent integration with the Unihiker.
7. Possible EnhancementsThese ideas were not included in the project implementation due to time constraints. I've documented them here so that I can revisit and implement them once the current project is complete.
This section details proposed enhancements to the system, focusing on improving Inventory using AI Agents, security through TLS encryption for MQTT communication, integrating cloud platforms for remote monitoring and data analysis, developing a mobile app for remote control, and utilizing RFID tracking and robotics for automated inventory and ingredient handling.
Inventory using AI Agents, Lang Chain, and Vector Database
AI Agent Role: An AI agent could be responsible for understanding user queries about inventory, triggering actions (like adding or removing items), and potentially reasoning about food based on its properties (expiration, category).
Lang Chain Integration: Lang Chain could provide the framework for building this AI agent. Its modules for conversation history, tools, and memory would be valuable. Specifically, a conversational agent could be designed.
Vector Database Use Case: A vector database (like Chroma or Pinecone) could store embeddings of food item names and descriptions. This would enable semantic search, allowing users to ask questions like "What do I have that's similar to chicken?" or "Are any of my vegetables about to expire?".
Data Source: The inventory data itself (name, quantity, expiration) would likely be stored in a more structured database. The vector database would hold embeddings pointing to this structured data.
Workflow:
- User asks about inventory.
- Lang Chain agent processes the query.
- If a semantic search is needed, Lang Chain queries the vector database.
- The vector database returns relevant food item embeddings.
- Lang Chain uses these results to fetch detailed information from the structured inventory database.
- The agent formulates a response to the user.
Short Implementation Solution:
Focus on a basic "ask and retrieve" functionality for a small set of inventory items.
Steps to Follow:
Set up Basic Inventory: Create a simple Python dictionary or list of dictionaries representing your initial kitchen inventory. Each item should have a name and potentially a short description.
Embed Inventory Items:
Choose an embedding model (e.g., Sentence Transformers via Lang Chain's `HuggingFaceEmbeddings`).
Use Lang Chain to create embeddings for the names (and optionally descriptions) of your inventory items.
Initialize Vector Database:
Set up a local vector database (like Chroma in-memory for simplicity).
Use Lang Chain's `Chroma.from_texts()` or similar method to add your inventory item names (as texts) and their corresponding embeddings to the vector database. Store metadata to link back to the original inventory item details.
Build a Simple Lang Chain Retrieval Chain:
Use Lang Chain's `RetrievalQA` chain.
Create a `Chroma` retriever from your vector database.
Define a simple language model (e.g., `ChatOpenAI` if you have an API key, or a local model).
Instantiate the `RetrievalQA` chain with the language model and retriever.
Test with User Queries:
Define some example user queries related to your inventory.
Run the queries through the `RetrievalQA` chain and observe the responses. The chain should use semantic search on your inventory to answer the questions.
Further Development (Beyond Short Implementation):
Integrate with the actual KitchenMind inventory system.
Develop the AI agent with conversational capabilities and tools for modifying the inventory.
Refine the embedding strategy to include more relevant information (category, expiration status).
Explore more advanced Lang Chain agent features and memory management.
Enhanced Security through TLS Encryption:
To address potential security vulnerabilities and protect sensitive user data, all MQTT communication within the KitchenMind system will be encrypted using TLS (Transport Layer Security). This will ensure that all data transmitted between devices and the central hub remains confidential and tamper-proof.
Cloud Integration for Remote Monitoring and Data Analysis:
By integrating the KitchenMind system with leading cloud platforms, users will be able to remotely monitor and control their kitchen appliances from anywhere in the world. Additionally, the cloud integration will enable advanced data analysis, allowing users to track their food consumption, optimize their meal planning, and receive personalized recipe recommendations.
Mobile App Development for Remote Control:
A dedicated mobile application will be developed to provide users with convenient remote control of their KitchenMind system. The app will allow users to adjust appliance settings, monitor cooking progress, and receive real-time notifications, all from their smartphone or tablet.
RFID Tracking and Robotics for Automated Inventory and Ingredient Handling:
To streamline inventory management and reduce food waste, RFID (Radio Frequency Identification) tracking will be implemented to automatically track ingredient usage and expiration dates. Furthermore, the integration of robotics will enable automated handling of ingredients, such as retrieving items from storage, measuring precise quantities, and even assisting with basic food preparation tasks.
Food-Safe Enclosures: Using Autodesk Fusion 360, sleek, airtight housings for weight sensors will be designed to fit on refrigerator shelves or pantry setups. These designs will ensure durability, hygiene, and precise dimensions.
Camera Mounts: Design adjustable mounts for SenseCap Watcher for optimal placement inside the refrigerator or pantry. This improves the accuracy of visual recognition tasks.
Central Hub Case: Create robust, modular enclosures for the DFRobot Unihiker and connected components, ensuring a clean and integrated look.
Sensor Mounts: Produce custom brackets for attaching environmental sensors in various kitchen locations.
Iteration Support: Autodesk Fusion 360 will allow rapid prototyping of designs that can be fine-tuned before CNC/3D production to ensure proper fit and aesthetics.
I was chosen as a winner of hardware for the Machine Builder Competition and won the nRF7002 DK, Boron LTE-M, Photon 2, nRF9151 DK, and Arduino GIGA R1 WiFi. This section describes how these devices could be integrated into the KitchenMind system using MQTT. It also details the MQTT topics that would be used to support these devices.
Particle Boron LTE-M: The Boron LTE-M is a small, power-efficient device that uses cellular technology (LTE-M) for remote monitoring and control.
Particle Photon 2: excels at aggregating environmental sensor data and publishing it to MQTT brokers via Wi-Fi.
nRF9151DK: is designed for LTE-M connected applications, featuring a SiP with an LTE-M modem, GNSS receiver, and Arm Cortex-M33 processor for real-time cloud data synchronization.
Arduino GIGA R1 WiFi: offers enhanced multitasking for handling multiple sensor data and communication protocols, with integrated Wi-Fi and extensive software/hardware resources for IoT prototyping.
KitchenMind's modular architecture and MQTT communication framework enable seamless integration of advanced hardware components to enhance functionality. Here's how each device could expand the system's capabilities:
Particle Boron LTE-M Remote Monitoring
Critical Alert Redundancy: Publishes emergency notifications (expiring perishables, equipment failures) directly via LTE-M when WiFi is unavailable14.
Field Deployment: Enables mobile kitchen implementations (food trucks, pop-up restaurants) with always-on monitoring34.
nRF9151DK Enhanced Connectivity
Cloud Synchronization: Uses LTE-M to mirror MQTT data streams to AWS IoT Core for disaster recovery and analytics37.
Multi-Network Support: Maintains connectivity through automatic fallback to NB-IoT in LTE-M dead zones3.
Geo-Fencing: GNSS module triggers restocking alerts when users approach preferred grocery stores3.
Particle Photon 2 Advanced Environmental Sensing
Sensor Fusion Hub: Aggregates data from multiple zones using I2C multiplexers:
Predictive Analytics: Runs lightweight ML models to forecast appliance energy usage patterns46.
Air Quality Monitoring: Integrates VOC sensors with existing temp/humidity metrics14.
Arduino GIGA R1 WiFi High-Performance Compute Node
Vision Co-Processing: Offloads AI inference tasks from SenseCap Watcher using TensorFlow Lite Micro:
Multi-Protocol Gateway: Simultaneously manages MQTT, WebSocket, and Bluetooth LE connections57.
Robotic Integration: Controls servo motors for automated pantry organization via CAN bus47.
MQTT topic to support these options:
Device: Boron LTE-M
- MQTT Topic: kitchen/emergency
- Payload Example: {"alert":"PowerOutage"}
- QoS Level: 2
Device: Photon 2
- MQTT Topic: kitchen/zones
- Payload Example: {"zone1":22.5,"zone2":18.7}
- QoS Level: 1
Device: nRF9151DK
- MQTT Topic: kitchen/geo
- Payload Example: {"lat":40.7128,"lng":-74.0060}
- QoS Level: 1
Device: GIGA R1
- MQTT Topic: kitchen/ai
- Payload Example: {"prediction":"milk_restock"}
- QoS Level: 1
These proposed enhancements are designed to transform the KitchenMind system into a truly intelligent and user-centric kitchen assistant, capable of anticipating user needs, optimizing food management, and delivering a seamless culinary experience.. These integrations transform KitchenMind into a resilient, multi-modal system capable of handling complex kitchen automation tasks while maintaining real-time responsiveness through optimized MQTT communication patterns
8. SummaryCurrent Status: The core communication system using MQTT is working. The Nordic nRF7002-DK sends temperature and humidity data, and the Seeed SenseCap Watcher sends image data to the DFRobot Unihiker, which displays this information. This establishes the basic hardware and communication for the project.
As the Machine Builder Competition comes to a close, I want to share a few reflections on this incredible journey. Working on my project—integrating the DFRobot Unihiker, Seeed SenseCAP Watcher, and Nordic nRF7002DK—has been both challenging and rewarding. Each device brought its own unique strengths and learning curves: the Unihiker served as a versatile central hub with its intuitive Python environment and touchscreen interface; the SenseCAP Watcher impressed me with its advanced on-device AI, voice and image processing, and seamless integration capabilities; and the nRF7002DK showcased the power and flexibility of Nordic’s Wi-Fi 6 and environmental sensing, all while requiring a deep dive into Zephyr RTOS and the Nordic SDK.
The most valuable part of this experience was overcoming the hurdles of integrating such diverse ecosystems—different programming languages, operating systems, and toolchains. It pushed me to expand my skills in Python, C/C++, and MQTT-based IoT communication, and to appreciate the importance of modular, scalable design in real-world IoT solutions1. I’ve learned a great deal about each platform, especially how they can work together to create robust, responsive, and expandable systems.
To all my fellow participants: thank you for the inspiration and camaraderie throughout this challenge. I wish everyone the best of luck—may your ideas thrive, your prototypes shine, and may we all continue learning from each other long after the competition ends!
Next Steps: The AI features for food recognition, expiration tracking, and recipe recommendations will be developed. Future improvements also include integrating the other supplied devices and creating custom enclosures using PCBWay/Autodesk Fusion 360.
Current Limitations:
- AI vision is currently tested with simulated data.
- Recipe suggestions are from static lists, not dynamic AI analysis.
- Environmental alerts use simple thresholds and are not yet connected to food preservation models.
I appreciate your time in reviewing my project. This is a work-in-progress, and new ideas for enhancements are being tracked in section 7. Expect future updates with new features. So stay tuned to this project for updates long after the competition is over.

_t9PF3orMPd.png?auto=compress%2Cformat&w=40&h=40&fit=fillmax&bg=fff&dpr=2)


Comments
Please log in or sign up to comment.